9 Configuring Oracle Enterprise Repository Workflow
This chapter describes how to use the registration process to manage assets in Oracle Enterprise Repository.
This chapter contains the following sections:
-
Section 9.2, "Introduction to the Oracle Enterprise Repository Automated Workflows"
-
Section 9.3, "Configuring the Oracle Enterprise Repository Event Manager"
-
Section 9.4, "Administrating Oracle Business Process Management Processes"
-
Section 9.6, "Configuring JMS Servers for Oracle Enterprise Repository"
-
Section 9.8, "Extending the Event Manager for Web Service Endpoints"
9.1 Overview
Assets determined to be appropriate for reuse are submitted to the repository. Submitted assets are reviewed by the registrar, who determines which assets will proceed through the registration process.
Assets accepted by the registrar enter the registration work queues. The submitter can track the asset's progress toward registration using the My Submissions folder on the My Stuff page. Submitters are notified about rejected assets and the reason for rejection (for instance, a duplicate asset).
This section contains the following topics:
9.1.1 Understanding the Registration Process
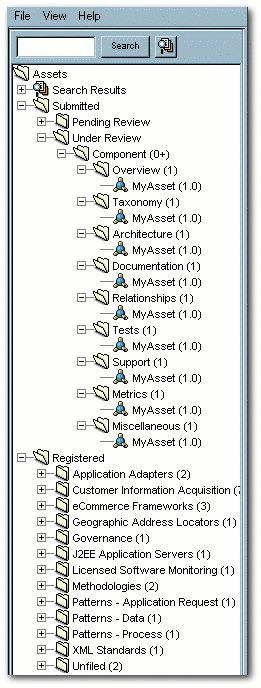
Assets moving through the registration process are organized and managed via several folders, as displayed in the file tree in the Asset Editor shown in Figure 9-1.
An asset begins the registration process in the Pending Review folder, under the Submitted folder. Once accepted or rejected by the registrar, the asset moves to the Under Review folder, under Submitted.
Pending registrar review and approval of the data on the tabs in the Asset Editor, the asset moves from Under Review to the Registered folder. Users can track the progress of assets by using the Search function, which accesses Submitted, Unsubmitted, and Registered assets, or by using My Stuff.
The registration process includes the following actions:
An asset is submitted by a user and appears in the Pending Review folder under Submitted. An automatic email message alerts the registrar that a new asset has entered the submission queue.
The Registrar examines the asset and its associated information and makes a decision to accept it, which enters it into the work queues. The Registrar may also choose to reject the asset.
-
If the asset is rejected, the registrar enters a reason for the rejection.
-
When an asset is rejected from the submission folder, it is removed from the Asset Editor and marked as rejected in the submitter's My Submissions folder in My Stuff.
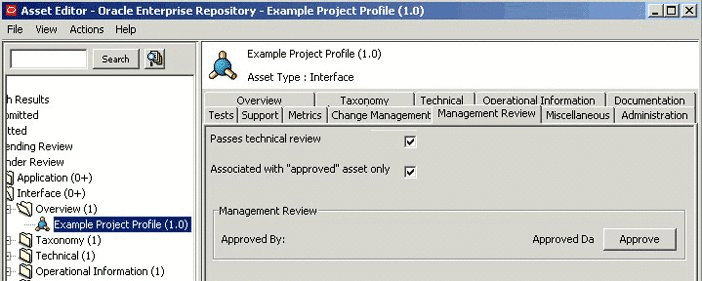
Once an asset is accepted, it can be assigned to one or more Registrars for processing and approval. Registrars can view assets assigned to them from My Stuff. Assets accepted for registration move to the Under Review folder, and the registrar or advanced submitter begins the registration process. The required information is gathered and entered on the appropriate tabs in the Asset Editor. The registrar examines each tab and monitors the workflow. When information for a specific stage of the workflow is acceptable, the registrar approves the data on the appropriate tab. There is no prescribed order in the approval process; the registrar can approve any stage in any order. The registrar also has the option to edit any of the information for any stage of the process.
The registrar grants final approval on the Administration tab, based on organizational standards regarding the information supplied on each of the various tabs. The specific configuration of Asset Editor tabs for any asset is determined by the Type template to which the asset is assigned on submission. Each tab provides various elements for metadata that is used to describe the asset and facilitate its use.
This section contains the following topics:
9.1.1.1 Automated Asset Registration Using Automated Workflows
The Oracle Enterprise Repository bundles pre-built BPM asset registration flows that attempt to automate the registration and governance processes defined in Understanding the Registration Process. For ease of use, you can use the predefined OBPM endpoint or create your own Web Service endpoints to subscribe to Oracle Enterprise Repository events. You may use the OBPM Designer to create new Governance workflows. There are also event monitoring and logging tools for troubleshooting and tuning purposes.
For more information about using the Automated Workflows feature, see Section 9.5, "Configuring Automated Workflows".
9.1.1.2 Accepting a Submission
This procedure is performed in the Asset Editor. (Requires appropriate permission.)
-
Open the Submitted folder.
-
Open Pending Review.
-
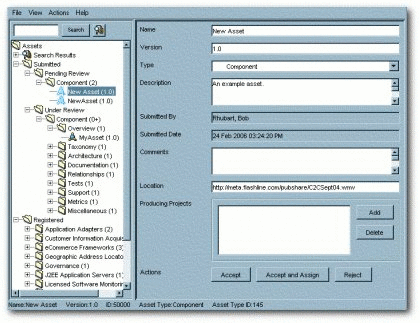
Select the asset to be registered, as shown in Figure 9-2.
-
Options:
-
Click Accept. The asset moves to the Under Review folder in the tree, and also appears in each of the workflow folders under the asset. The workflow folders correspond to tabs in the Asset Editor.
-
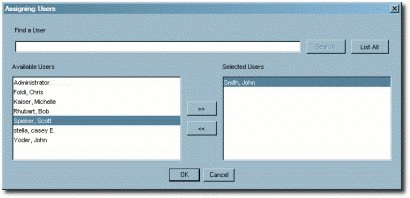
Click Accept and Assign. The Assigning Users dialog is displayed, as shown in Figure 9-3.
-
-
Use the << and >> buttons to move items between the Available Users and Selected Users columns.
-
Click OK.
The asset moves to the Under Review folder in the tree and is assigned to the selected user/users, who will provide the information required for each of the tabs in the Asset Editor. The assignees also may receive a notification e-mail that lets them know they are assigned to this asset.
9.1.1.3 Registering an Asset
While certain tabs are common to all asset types, the specific Asset Editor tabs for any asset are determined by the configuration of the Type template to which the asset is assigned on submission.
-
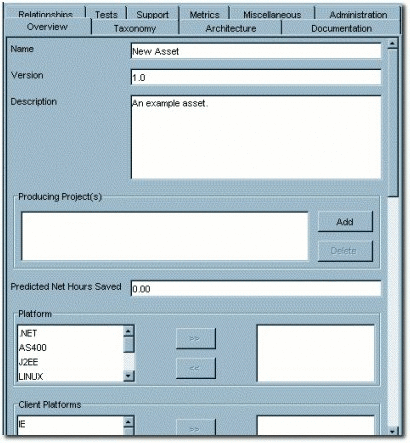
Click the Overview tab. The Overview tab is displayed, as shown in Figure 9-4.
-
Enter the appropriate information in each of the fields.
-
Click Approve, as shown in Figure 9-5
The text in the Overview tab changes color and the Approve button changes to Unapprove.
Note:
Approval buttons in the Asset Editor are visible only to users with the appropriate permissions.
-
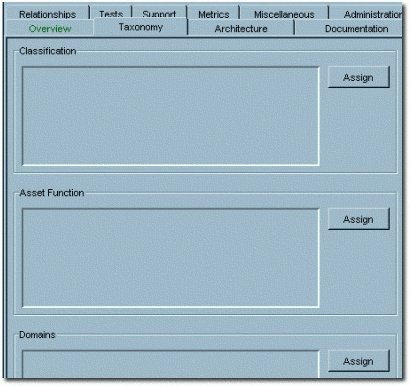
Click the Taxonomy tab. The taxonomy tab is displayed, as shown in Figure 9-6.
Several Categorizations are displayed.
-
Click the Assign button in the Classification section. The Assign Classifications dialog is displayed.
-
Use the options to select the appropriate classification.
-
Approved
Approved by the Registrar for use in projects.
-
Educational
For educational/informational purposes only. Not approved for use in projects.
-
Mandated
Must be used whenever a project requires the functionality the asset provides. (This is especially relevant for Web services that access customer data, process payments, etc.).
-
Raw
No assurance of quality or completeness.
-
Recommended
Approved and successfully deployed in at least one project.
-
-
Click OK. The selections are listed in the Classifications section.
Note:
Default Categories may be customized to reflect your environment. -
Repeat the process for each section in the Taxonomy tab.
-
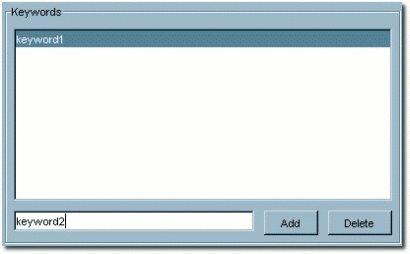
Enter an appropriate keyword in the text box in the Keywords section.
-
Click Add. The new keyword appears in the Keywords list, as shown in Figure 9-7.
Add other keywords as necessary.
-
When the Taxonomy tab is completed, click Approve.
The text in the Overview tab changes color and the Approve button changes to Unapprove.
-
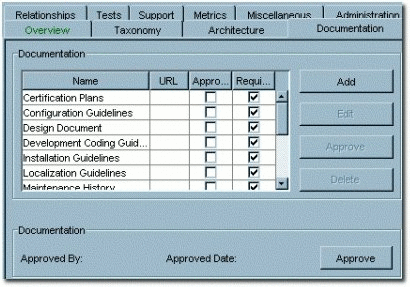
Click the Documentation tab. The documentation tab is displayed, as shown in Figure 9-8.
A number of suggested document titles are listed in the Documentation window. Appropriate documentation may be associated with each of these titles, and new documents may be added to the list.
To add a new document:
-
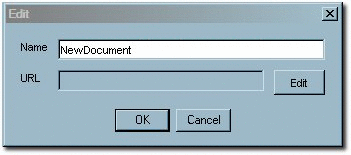
Click Add. The Edit dialog is displayed, as shown in Figure 9-9.
-
Enter the appropriate information in the Name text box.
-
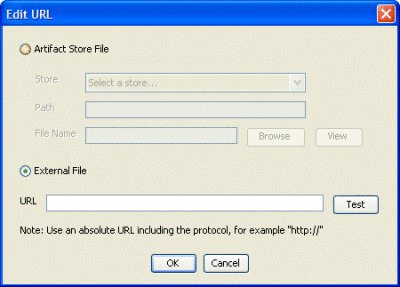
Click the Edit button next to the URL text box. The Edit URL dialog is displayed, as shown in Figure 9-10.
-
Select Artifact Store File or External File, as appropriate.
-
Enter all necessary information in the available text boxes.
-
Click OK. The new document appears in the list, as shown in Figure 9-11.
Figure 9-11 Documentation Tab - NewDocument
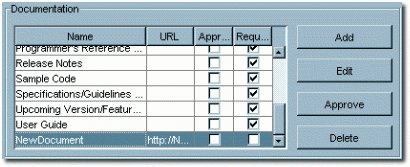
Description of "Figure 9-11 Documentation Tab - NewDocument"
-
To edit file information for an existing document, select the document, click Edit and repeat Steps 4 to 7.
-
When finished, click Approve, as shown in Figure 9-12.
Figure 9-12 Documentation Tab - Approve Button

Description of "Figure 9-12 Documentation Tab - Approve Button"
-
Click the Relationships tab.
-
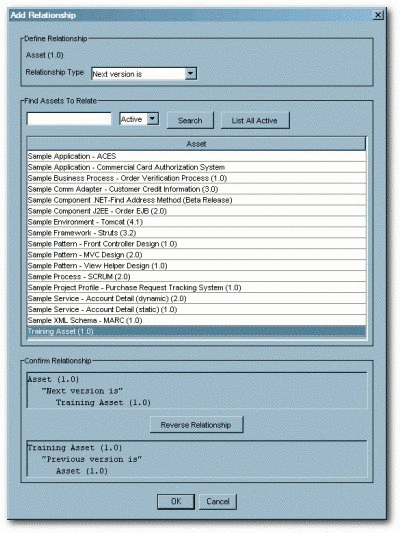
Click the Add button. The Add Relationship dialog is displayed, as shown in Figure 9-13.
-
Use the Search or List All Active buttons to display assets in the Asset section of the dialog.
-
Select an asset from the list.
-
Use the Relationship Type list to select the appropriate relationship between the two assets.
Note:
If necessary, click the Reverse Relationship button to reverse the relationship. -
Click OK when finished.
-
Repeat as necessary to add other asset relationships.
-
When finished, click Approve.
See the Oracle Enterprise Repository Administration Guide for information on configuring relationships.
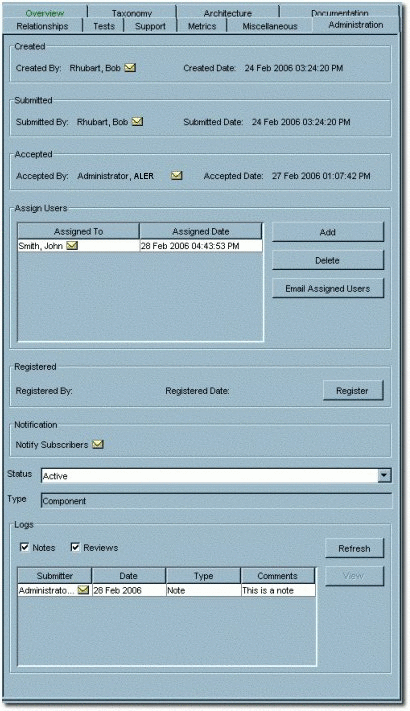
Every asset in Oracle Enterprise Repository has an Administration tab. Use the Administration tab to:
-
Track the asset Created, Submitted, Accepted workflow.
-
Assign users to review and approve information on the other tabs.
-
Change the asset's status:
-
Active
-
Inactive
-
Retired
-
Deleted
-
-
View asset notes and reviews.
-
Complete the registration process by clicking the Register button, as shown in Figure 9-14.
A registered asset can include unapproved tabs.
Whenever a tab is approved, a TabApprovedEvent is triggered. This event along with the tab name and certain other metadata is sent to the workflows for processing. This event is used by the Multi-Tier workflows where depending on the tab approved and depending on the configuration, the workflows will decide if the next tier in the approval process needs to be assigned or not.
Also the users can wire the TabApprovedEvent to any of the pre-defined workflows such as ChangeAssetLifecycle etc. So, this is also tied to the Tab names.
9.1.1.4 Completing the Tab Approval Process
While certain tabs are common to all asset types, the specific Asset Editor tabs for any asset are determined by the configuration of the Type template to which the asset is assigned on submission. Similarly, the metadata elements that appear on any tab are also determined by the Type configuration. While the specific tabs and elements may vary from Type to Type, the approval process for each tab involves the entry and/or review of the information in each element. Each time a you click the Approve on a tab, you are prompted to save the changes.
Process to approve a tab for a specific type configuration
-
In the Oracle Enterprise Repository screen, click the My Stuff link. The My Stuff section is displayed.
-
Select Assigned Assets and then select the asset for which you would want to approve the tab(s).
-
Click the Edit button in the right-bottom pane of the page. The Asset Editor dialog is displayed.
-
Select the tab that you want to approve.
-
Review the information in that tab.
-
Click the Approve button. You are prompted to save the changes you made.
-
Click OK in the Select an Option dialog.
-
Go back to the Assigned Assets page and refresh to note the changes. In the Tab Approval Status pane, you will notice that Approved has one item against it, as shown in Figure 9-16.
9.1.1.5 Audit Log, Reviews, and Notes
When an Asset is updated, a record of the User, date and action appears in the Audit Log. Logged changes include:
-
Asset Creation
-
Asset Update
-
Changes in an Asset's Registration Status
-
Changes in an Asset's Active Status
-
Completion of an approval tab
The log entry is added to the list in the Logs section on the asset's Administration tab. (It may be necessary to click the Refresh button in the Logs section.)
Note:
When changes are made to a custom data field, a log is created indicating that a field has changed. However, the specific details of that change are empty.-
Click Add Note in the File menu. The Add a Note for... dialog is displayed, as shown in Figure 9-17.
-
Enter the appropriate information in the text box.
-
Click OK. The note is added to the list in the Logs section on the asset's Administration tab. (It may be necessary to click the Refresh button in the Logs section.)
9.1.2 Installing Oracle Enterprise Repository Workflow into Oracle BPM 10.3
The Oracle Enterprise Repository bundles pre-built BPM asset registration flows that automate the registration and governance processes defined in Section 9.1.1, "Understanding the Registration Process". For ease of use, you can use the predefined OBPM endpoint or create your own Web Service endpoints to subscribe to Oracle Enterprise Repository events. You can use the OBPM Designer to create new Governance workflows. There are also event monitoring and logging tools for troubleshooting and tuning purposes.This section describes how to install the Oracle Enterprise Repository Workflow into Oracle BPM 10.3. It contains the following topics:
-
Section 9.1.2.3, "Step 3: Obtain the Oracle Enterprise Repository Workflow Installer"
-
Section 9.1.2.4, "Step 4: Configure the build.properties File"
9.1.2.1 Step 1: Requirements
Before installing the Oracle Enterprise Repository Workflow consider these requirements:
-
Apache ANT version 1.6.5 or later
-
Oracle BPM 10.3 Enterprise Install
-
Oracle Enterprise Repository 11g
-
Oracle Enterprise Repository URL and port number
-
DBA User account able to create users/tables/indexes within the selected database server
-
Appropriate JDBC drivers for your selected database server
-
Identify the DB permissions required to do the install
-
JDK version 1.6 or later
-
Download and apply the latest hotfix build to the OBPM installation
9.1.2.2 Step 2: Install OBPM and Apply Patch
Install OBPM in the <ORACLE_HOME>/obpm/enterprise directory. After you have successfully installed OBPM, update it with the OBPM Hotfix patch, which is found in the Oracle MetaLink at http://metalink.oracle.com. This section contains the following topics:
Perform the following steps to download the Hotfix patch from MetaLink:
-
Log into Oracle MetaLink at http://metalink.oracle.com/.
-
Click the Patches & Updates link.
-
In the Patch Search section, click the Product or Family (Advanced Search) link.
-
Enter
Business Process Management Suitein the Product is field. -
Select Oracle BPM 10.3.1 from the Release is list.
-
Click Search.
-
Download the latest hotfix for Studio or EnterpriseSA, for the enterprise standalone environment.
-
Extract the fix zip.
-
Install the latest hotfix into the environment.
For more information about how to apply the hotfix patch for Studio or Enterprise, see the Oracle BPM Installation Guide at
http://download.oracle.com/docs/cd/E13154_01/bpm/docs65/installguide/index.html?t=modules/installation/c_Updating.html
For more information about how to update the OBPM JVM to 1.6 + for Studio, see http://download.oracle.com/docs/cd/E13154_01/bpm/docs65/installguide/index.html?t=modules/installation/t_Changing_Studio_JVM.html.
For more information about how to update the OBPM JVM to 1.6 + for Enterprise, see http://download.oracle.com/docs/cd/E13154_01/bpm/docs65/installguide/index.html?t=modules/installation/t_Changing_Enterprise_JVM.html.
9.1.2.3 Step 3: Obtain the Oracle Enterprise Repository Workflow Installer
Obtain the Oracle Enterprise Repository Workflow installer from the following directory within the Oracle Enterprise Repository installation location: ORACLE_HOME/repositoryXXX/core/tools/solutions/11.1.1.x.0-OBPM-Workflow-Management-Scripts.zip.
Extract the zip file into the Oracle_HOME/obpm directory on the server where Oracle BPM is installed. Two directories are created from this zip file: OBPM_SetupScripts and workflow.
9.1.2.4 Step 4: Configure the build.properties File
Enter the correct values for the ORACLE_HOME\obpm\OBPM_SetupScripts\build.properties file. Table 9-1 describes the properties listed in the build.properties files and its descriptions.
Note:
Use forward slash characters to separate path elements regardless of platform.The DBA user account must be specified in the fuego.fdi.db.admin.id setting of the build.properties file for the Ant tasks to correctly create the database schemas, which will host the Oracle Enterprise Repository Workflows.
Table 9-1 build.properties File Property Values
| Property | Description |
|---|---|
|
bea.home |
This property specifies the location of your Oracle Home directory, for example, c:\oracle or /opt/oracle. |
|
oer.uri |
This property specifies the URI for your Oracle Enterprise Repository installation. |
|
fuego.basedir |
This property specifies the Oracle BPM installation location. For example, c:\oracle\obpm\enterprise or /opt/oracle/obpm/enterprise. |
|
fuego.project |
|
|
fuego.fdi.id |
|
|
fuego.fdi.organization |
|
|
fuego.fdi.admin.id |
This property specifies the admin user for the Oracle BPM installation. This user account is used to access the Oracle BPM webconsole application. |
|
fuego.fdi.admin.password |
This property specifies the admin password for the Oracle BPM installation. |
|
fuego.fdi.db.host |
This property specifies the machine on which the Oracle BPM FDI (directory) database is to be installed. |
|
fuego.fdi.db.port |
This property specifies the Oracle BPM FDI database port. |
|
fuego.fdi.db.admin.id |
This property specifies the database admin user for the Oracle BPM FDI database. The installer uses this property to install the FDI schema (see below). |
|
fuego.fdi.db.admin.password |
This property specifies the database user's password for the Oracle BPM FDI database. |
|
fuego.server.db.host |
This property specifies the system on which the Oracle BPM process engine database is to be installed. |
|
fuego.server.db.port |
This property specifies the Oracle BPM process engine database port. |
|
fuego.server.db.admin.id |
This property specifies the database admin user for the Oracle BPM process engine database. The installer uses this property to install the FDI schema (see below). |
|
fuego.server.db.admin.password |
This property specifies the database password user for the Oracle BPM process engine database. |
|
fuego.fdi.db.type |
This property specifies the database type for the Oracle BPM FDI database. Possible values are: oracle, mssqlserver, db2. |
|
fuego.fdi.db.sid |
This property specifies the SID for the Oracle BPM FDI database. This property is only applicable for the Oracle database type. |
|
fuego.fdi.db.schema |
This property specifies the database user name for the Oracle BPM FDI schema the database creates. This property is used by Oracle BPM at run time and is specific to Oracle database type. |
|
fuego.fdi.db.schema.password |
This property specifies the database password for the Oracle BPM FDI schema and is specific to Oracle database type. |
|
fuego.fdi.db.user.id |
This property specifies the database user name for the Oracle BPM FDI schema the database creates. This property is used by Oracle BPM at run time and is only applicable for mssqlserver and db2 database types. |
|
fuego.fdi.db.user.password |
This property specifies the database password for the Oracle BPM FDI schema and is only applicable for mssqlserver and db2 database types. |
|
fuego.fdi.db.database |
This property specifies the database name for the Oracle BPM FDI database. This property is only applicable for mssqlserver and db2 database types. |
|
fuego.server.db.user.id |
This property specifies the database user name for the process engine schema that is created. This property is used by Oracle BPM at run time and is only applicable for mssqlserver and db2 database types. |
|
fuego.server.db.user.password |
This property specifies the database password for the Oracle BPM process engine schema and is only applicable for mssqlserver and db2 database types. |
|
fuego.server.db.database |
This property specifies the database name for the Oracle BPM process engine database. This property is only applicable for the mssqlserver and db2 database types. |
|
fuego.server.db.type |
This property specifies the database type for the Oracle BPM process engine database. Possible values are: oracle, mssqlserver, db2. |
|
fuego.server.db.sid |
This property specifies the SID for the Oracle BPM process engine database. This property is only applicable for the oracle database type. |
|
fuego.server.db.schema |
This property specifies the database admin user name for the Oracle BPM process engine database. The installer uses this property to install the FDI schema for Oracle database. |
|
fuego.server.db.schema.password |
This property specifies the database password for the Oracle BPM process engine database for Oracle database type. |
9.1.2.5 Step 5: Configure the setenv File
Enter the correct values for the ORACLE_HOME\obpm\OBPM_SetupScripts\setenv.bat (Windows), or /setenv.sh file (Unix). Table 9-2 describes the setenv file properties and its descriptions.
Note:
Use back slash characters (\) to separate path elements.Table 9-2 setenv File Property Values
| Property | Description |
|---|---|
|
|
This property specifies the location of the Oracle Home directory. For example, |
|
|
This property specifies the location where Oracle BPM is installed. For example, |
|
|
This property specifies the location of a Java runtime on the system. For example, |
|
|
This property specifies the location of a Apache ANT installation on your machine. For example, |
9.1.2.6 Step 6: Edit the workflow.xml File
Edit the workflow.xml file located within the ORACLE_HOME/obpm/OBPM_SetupScripts/workflow.xml and modify the URI to match the URI of the Oracle Enterprise Repository installation. Retain the /services/FlashlineRegistry at the end of the path reference. Also, modify all the user credentials in the workflow.xml file to their correct values.
9.1.2.7 Step 7: Encrypt the workflow.xml File
Encrypt the Oracle Enterprise Repository Workflow configuration file, workflow.xml. For more information about how to encrypt the workflow.xml file, see Section 5.3.3, "Workflow Configuration File".
9.1.2.8 Step 8: Copy the JDBC jar(s)
Copy the JDBC jar(s) for your database to the $Oracle_HOME\OBPM_SetupScripts\ext directory.
9.1.2.9 Step 9: Change Permissions
Change permissions for the OBPM_SetupScripts and workflow folders to make them writeable.
9.1.2.10 Step 10: Run the Setup Script
To run the setenv.bat or setenv.sh file:
-
Open a command, or shell window.
-
Navigate to the
$Oracle_HOME\OBPM_SetupScriptsdirectory. -
Run the following command:
setenv.bat (Windows)
setenv.sh (Unix)
-
Run the following command:
ant create-fdi -
Run the following command:
ant install-workflow
Note:
When the ant scripts are run successfully, it results in the build.properties file being deleted due to security concerns with passwords embedded in that file. You cannot prevent this, so the workaround is to take backups. Thefuego.fdi.admin.id and fuego.fdi.admin.password properties must be recorded for future login to the Oracle BPM Web console application.9.1.2.11 Step 11: Verify the Setup Script
To validate the success of the setup script:
-
Open the Oracle BPM Admin Center application.
-
Click Start BPM Applications.
-
Click Launch Process Administrator.
-
Access the Web console Web interface and login using the credentials for the Oracle BPM Web console application. These credentials are specified in the
build.propertiesfile in the fuego.fdi.admin.id and fuego.fdi.admin.password properties. -
Select the Engines link in the left side menu.
The
aler_engineengine is displayed with a status of Not running. -
Click the option to start the engine using the left most icon in the Engine Actions column.
Once the engine is running, the status of the engine displayed is Ready.
-
Validate that the Oracle BPM service endpoint is listening appropriately. Use a Web browser to connect to the Oracle BPM server at port 9000, for example, http://localhost:9000/albpmServices/aler_engine/ws.
-
Click the link for albpmServices/oer_engine/ws link.
Two services are then listed, StatusChangeEndpointServiceListener and RefreshConfigServiceListener.
-
Click the Oracle Enterprise Repository installation within the
WEB-INF/classes/EndPointEventSubscription.xmlfile and modify the <sub:host> element to contain the IP address or the fully qualified host name of the server where Oracle BPM is installed.Oracle Enterprise Repository workflows are now deployed.
To run workflows successfully, you must encrypt passwords in the xml file and then restart the Oracle Enterprise Repository server. If the
EndPointEventSubscription.xmlhas clear text password, then the events do not get delivered to Oracle BPM.If the password is not encrypted, then the following log message is displayed in the <ORACLE_HOME>\user_projects\domains\<oer_domain>\eventing.log file:
Insufficient subscription data. End point with name [<ENDPOINT_NAME>] requires an encrypted password...
Note:
If any build failure or errors appear during the ANT deployment of the workflows, follow these steps:-
Drop the FDI Schema user (as specified for fuego.fdi.db.schema in build.properties file) from Database.
-
Drop the FDI Engine user (as specified for fuego.server.db.schema in build.properties file) from Database.
-
Make sure the BPM Applications are not running and obpmadmcenter.exe is closed.
-
Run setenv.bat or setenv.sh.
-
Run the ant create-fdi command.
-
Run the ant install-workflow command.
-
9.2 Introduction to the Oracle Enterprise Repository Automated Workflows
This section describes how to get started with the automated workflows and how to use event manager.
Oracle Enterprise Repository provides a set of predefined flows designed to automate common Oracle Enterprise Repository tasks, such as asset submission, acceptance, registration, synchronization of Oracle Enterprise Repository and Oracle Service Registry, and other governance processes.
This section contains the following topics:
9.2.1 Example "Community Flow" Use Case
The Community flow provides a way to automate the asset acceptance, assignment, and registration process by allowing the configuration of automated assignment rules and also introduces the notion of federated registrars among different authorities. Rather than spamming many registrars across all communities (through the system registrar notification), you can limit the system registrar to one or a few individuals, and let the Automatic Acceptance flow accept assets on behalf of a registrar-of-record for the community. The Community flow feature can distribute asset submissions to those with the authority to approve them for the community.
For example, you can add two communities and configure two different registrars responsible for each community. Then, depending on the producing projects or asset types, certain assets can belong to a community. The Community flow automatically accepts such assets in the same way it would be manually accepted by a registrar.
9.2.1.1 Software Components
Automated Workflows includes the following software components:
9.2.1.1.1 Oracle Enterprise Repository Event Manager
The Event Manager emits asset registration events in the form of Web Service messages. These events trigger pre-built flows that automate Oracle Enterprise Repository asset submission, acceptance, registration, and other governance processes. See Section 9.3, "Configuring the Oracle Enterprise Repository Event Manager".
9.2.1.1.2 Subscription Manager
The Subscription Manager is XML-based configuration file that is responsible for managing the event subscriptions by the Web Service endpoints (either the predefined ALPBM endpoint or user-defined endpoints) where matched events are delivered. The Event Manager uses the EndPointEventSubscription.xml file to load information about the endpoints where events need to be delivered. See Section 9.3, "Configuring the Oracle Enterprise Repository Event Manager".
9.2.1.1.3 JMS Server
The Event Manager uses an embedded version of Apache ActiveMQ JMS Server that is enabled by default. The embedded JMS server is configured to run out-of-the-box without any additional configuration. However, you can also configure the Event Manager to use an external JMS server, such as Weblogic Server JMS or IBM MQSeries. See Section 9.6, "Configuring JMS Servers for Oracle Enterprise Repository".
9.2.1.1.4 Event Monitor
A tool to monitor the events that are generated by the Event Manager. The Event Monitor peeks into the event traffic and prints information, such as the event body and event properties. See Section 9.7, "Monitoring and Managing Events".
9.2.1.1.5 Oracle Business Process Management
Oracle Business Process Management is included with your purchase of Oracle Enterprise Repository. You may use Oracle Business Process Management to modify existing workflows that are supplied with Oracle Enterprise Repository and implement new Repository-centric workflows.
9.2.1.2 Automated Workflows
The Automated Workflows can be run out-of-the box or can be tailored to suit your environment. For more information, see Section 9.5, "Configuring Automated Workflows".
-
Community Assignment Flow: provides a way to automate the asset acceptance, assignment, and registration process by allowing the configuration of automated assignment rules and also provides the notion of federated registrars among different authorities. For more information, see Section 9.5.4.1, "Configuring Community Flows".
-
Automated Acceptance and Automated Registration Flow: in addition to using the Community Flows to automatically accept and register the assets, a number of user roles can be used to accept and register assets. For more information, see Section 9.5.4.2, "Configuring Automated Acceptance and Automated Registration Flows".
-
Multi-tier Approval Flow: structures the tab approval process in multiple steps called tiers. Asset approval tabs can be grouped in tiers, and the Mult-tier Approval flow tracks each tier to verify whether all the tabs are approved by the designated approvers. As soon as the last tab in a tier is approved, the flow starts the next tier by assigning the asset to the next level of designated approvers. For more information, see Section 9.5.5, "Multi-tier Automatic Assignment Flows".
-
Metadata Change Flow: exposes a flexible framework where state changes or metadata changes can be wired to actions. The Metadata Change flows come with the a set of pre-bundled actions. New actions can be developed in the form of Oracle Enterprise Repository flows and can be plugged in. For more information, see Section 9.5.6, "Metadata Change Flows".
-
Time-based Escalation Flow: track assets in various states and notifies all interested parties. There are four different kinds of Time-based Escalation flows and each one can be configured individually. For more information, see Section 9.5.7, "Time-based Escalation Flows".
-
Validation Expiration Flow: tracks expired assets prior to the specified expiration date, as well as at the day of expiration, and sends warning notifications to all interested parties. For more information, see Section 9.5.8, "Validation Expiration Flows".
-
AutoSyncAlerToUddi Flow: moves a service from Oracle Enterprise Repository to Oracle Service Registry when the Asset Lifecycle Stage is changed from Stage 4 - Build to Stage 5 - Production. For more information, see "Section 10.3.1.1, "Invoking the Oracle Registry Repository Exchange Utility Using Workflows".
9.2.1.3 Event Management Tools
There are event monitoring and logging tools for troubleshooting and tuning purposes.
9.2.1.3.1 Web-based Process Administrator
The Oracle Business Process Management Process Execution Administrator actively manages the orchestration of asset registration events in the form of Web Service messages. For more information, see Section 9.4, "Administrating Oracle Business Process Management Processes".
9.2.1.3.2 Log Viewer
The Oracle Business Process Management Log Viewer enables you to read information logged by the Process Execution Engine. A set of log files is created for each project you define. The Studio Log Viewer reads the files and displays them to help you monitor and trace Engine execution. For more information, see Section 9.4.5, "Using the Oracle Business Process Management Log Viewer".
9.2.1.3.3 Email Notification Templates
The Automated Registration Flows automatically send email notifications under many circumstances. Administrators can customize the email subject, body, etc., the same way as other email templates. See Section 9.5.9, "Customizing Email Notification Templates".
9.2.1.3.4 Workflow Configuration Tools
There are workflow configuration tools for generating new configuration file, refreshing exisiting files, and encrypting passwords. For more information, see Section 9.7, "Monitoring and Managing Events".
9.2.1.3.5 Generating a New Config File
Oracle Enterprise Repository administrators may need to configure and customize flows because there are new asset types, projects, categorizations, etc. The Generate Config XML tool connects to Oracle Enterprise Repository and creates a new file that can be customized.
9.2.1.3.6 Refreshing an Existing Config File
The Refresh Config XML tool lets you to refresh a Config XML file without restarting the Event Manager.
9.2.2 Getting Started with Automated Workflows
This section will help you to quickly get started using the Advanced Registration Flow feature using the bundled Oracle Business Process Management Web Service endpoint that is configured to work with the Oracle Business Process Management Process Engine. However, this feature is highly extensible and can be tailored to suit your environment.
9.2.2.1 Steps to Configure the Oracle Enterprise Repository Event Manager
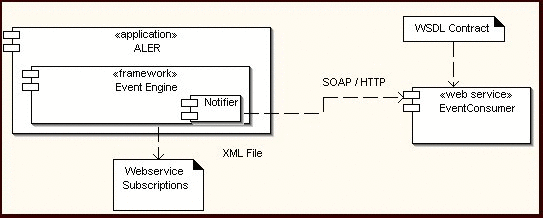
The Event Manager is a component embedded within Oracle Enterprise Repository that manages event subscriptions, event persistence, event filtering, and event delivery. Web Service endpoints can subscribe to the Event Manager's Subscription Manager and the events that are generated within Oracle Enterprise Repository are delivered to the Web Service endpoints.
Figure 9-18 shows the different components that are involved.
Figure 9-18 Advanced Registration Flow Components
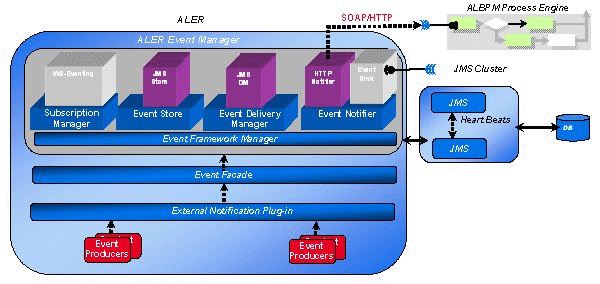
Description of "Figure 9-18 Advanced Registration Flow Components"
The Event Manager uses an embedded version of Apache ActiveMQ JMS Server that is enabled by default. The embedded JMS server is configured to run out-of-the-box without any additional configuration. However, you can also configure the Event Manager to use an external Java-based message broker, such as Weblogic Server JMS or IBM MQSeries.
For more information about configuring the Event Manager, see Section 9.3, "Configuring the Oracle Enterprise Repository Event Manager".
9.2.2.2 Use Cases
This section describes the use cases for configuring Oracle Enterprise Repository Event Manager:
-
Oracle Enterprise Repository features pre-bundled Oracle Business Process Management flows and a Web Service endpoint that is by default registered with the Event Manager's Subscription Manager. All the triggered events are delivered to this Oracle Business Process Management endpoint, which then attempts to automate Oracle Enterprise Repository processes, such as the asset registration process, tracking metadata changes, and taking pre-defined actions.
-
You can also write your own Web Service endpoints, subscribe them with the Event Manager, and start getting the events to solve your specific business needs.
9.2.2.3 Configuring the Event Manager
After Oracle Enterprise Repository is installed, configure the Event Manager as follows.
-
The Event Manager needs to be enabled in Oracle Enterprise Repository to allow the Event Manager to send events to external Web Service endpoints. You can either:
-
Enable the
cmee.eventframework.enabled=true property in the eventing.properties file in the<OER Domain>\WEB-INF\classesdirectory.or
-
This property can also be enabled using the Oracle Enterprise Repository Web-based console's System Settings, as explained in "Configuring the Event Manager's System Settings" on page 3-2.
-
-
The default Eventing
cmee.eventframework.delivery.sleepandcmee.eventframework.store.sleepproperty values can also be tuned to control the overall performance of Oracle Enterprise Repository and the Web Service endpoints. These properties directly impact the number of events that get triggered per second by the Event Manager. For example, If a faster response is required for testing purposes, the defaultcmee.eventframework.store.sleepvalue of 7200 seconds should be changed to a reasonable testing amount. -
The Event Manager uses the same logging framework as Oracle Enterprise Repository. By default, logging is enabled to go to a file, but you direct the debug statements to go to the console by appending the following categories to the
log4fl.propertiesfile in the<OER Domain>\WEB-INF\classesdirectory.# eventing subsystem log4j.category.com.bea.infra.event.core= debug,eventingLog,stdout log4j.category.com.bea.infra.event.dm= debug,eventingLog,stdout log4j.category.com.bea.infra.event.facade= debug,eventingLog,stdout log4j.category.com.bea.infra.event.notifier= debug,eventingLog,stdout log4j.category.com.bea.infra.event.store= debug,eventingLog,stdout log4j.category.com.bea.infra.event.sub= debug,eventingLog,stdout
-
Configure the Web Service subscriptions with the Event Manager's Subscription Manager.
Note:
By default the Subscription Manager is configured to work out-of-the-box with the Oracle Business Process Management Process Engine if the Oracle Business Process Management Process Engine is running on the same machine as Oracle Enterprise Repository. You can skip this step if this is the case because the default settings are ready to run.As shown below, the following information may need to be changed within the EndPointEventSubscription.xml file under
<OER Domain>\WEB-INF\classesdirectory, depending on the requirement:-
Host: If the Web Service Endpoint is running in a host other than Oracle Enterprise Repository. If it is the same host, then leave the default unchanged.
-
Port: Specify the port of the Web Service Endpoint. If Oracle Business Process Management is used as the Process Engine, then leave the default unchanged.
-
URI: Specify the URI of the Web Service. If Oracle Business Process Management is used as the Process Engine, then leave the default unchanged\
-
Operation Name: If Oracle Business Process Management is used as the Process Engine, leave the default unchanged. Please refer to the WSDL within the eventNotifier.jar file located in <OER Webapp path>/WEB-INF/lib for the available operations.
-
User Name/Password: Used only if Oracle Business Process Management is used as the Process Engine. The default user name/password for OBPM is aler_workflow_user/<encrypted_password>. The default password text used is
aler_workflow_pass. -
Expression: Default is empty, which means all the events are delivered.
-
-
Restart Oracle Enterprise Repository for the configuration changes to take effect.
9.2.2.4 Triggering an Asset Event
Follow these steps to make sure that events are triggered after the configuring the Event Manager.
-
Launch the Oracle Enterprise Repository Asset Editor from the Web-based console. For information on using the Oracle Enterprise Repository Asset Editor, see Oracle Fusion Middleware User Guide for Oracle Enterprise Repository.
-
Create a new asset, as shown in Figure 9-19.
Figure 9-19 Oracle Enterprise Repository Asset Editor - Create New Asset
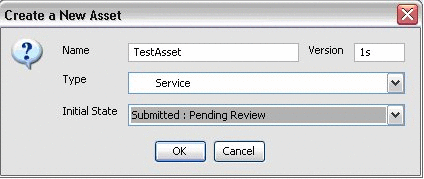
Description of "Figure 9-19 Oracle Enterprise Repository Asset Editor - Create New Asset"
Note:
The Asset Type should be Service. -
Click OK to submit the asset.
-
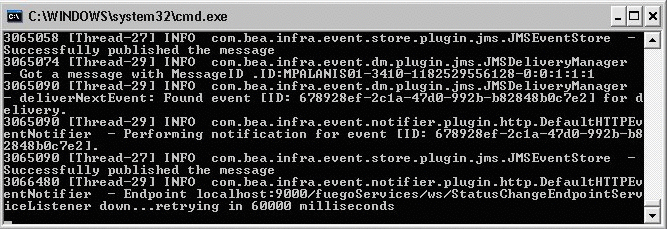
After the asset is submitted, switch to the Oracle Enterprise Repository console to verify the following logging statements printed to the console, as shown in Figure 9-20.
-
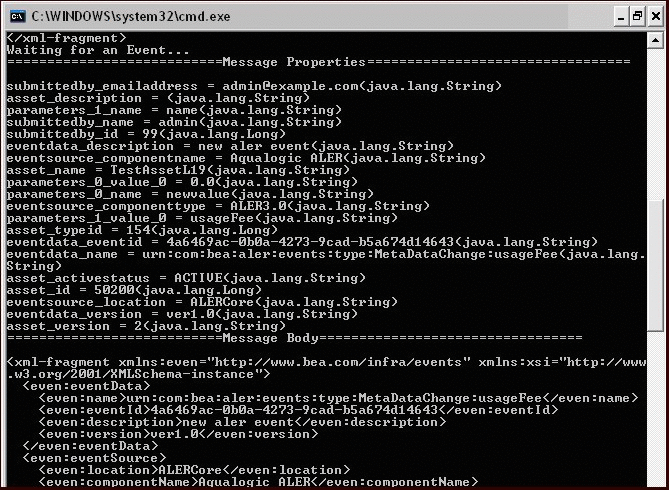
The Event Monitoring tool can be used to view the payload of the event that is delivered. For more information about how to monitor and manage events, see Section 9.7, "Monitoring and Managing Events".
The HarvesterSettings.xml file can be optionally configured to set the <triggerEvent> tag turned to true or false so as to turn the BPM workflow eventing enabled or disabled respectively for the harvester tasks.
9.2.2.5 Steps to Configure and Run the Oracle Business Process Management Process Engine
When Oracle Enterprise Repository is installed, you are directed to install and configure Oracle Business Process Management. This section assumes that Oracle Business Process Management was successfully installed.
After the Event Manager is ready to send events, the Oracle Business Process Management Process Engine needs to be configured and be ready to process the events. When Oracle Enterprise Repository is installed, it provides an option to install and configure the Process Engine. This section assumes that the Process Engine was successfully installed before following these steps.
To launch the Oracle Business Process Management Admin Center, double-click the obpmadmcenter.exe file in the <OBPM Enterprise Home>\bin directory.
9.2.2.5.1 Use Cases
Oracle Enterprise Repository features pre-bundled Automated Workflows that are deployed to the Process Engine. When events are triggered within Oracle Enterprise Repository, they are delivered to the Process Engine and execute the Automated Workflows that attempt to automate Oracle Enterprise Repository processes, such as asset submission, acceptance, registration, and other governance process.
For more information about the available Automated Workflows, see Section 9.5, "Configuring Automated Workflows".
9.2.2.5.2 Configuring the Automated Workflows to Process a Submission Event
Follow these steps after the Oracle Business Process Management Process Engine is installed.
-
Generate the Workflow Configuration (
workflow.xml) file using the Generate Workflow Config tool (config_gen.bat). This tool connects to Oracle Enterprise Repository and creates a bootstrapping file that can be customized. For more information about generating the workflow.xml file, see Section 9.7.4, "Configuring Workflow". -
Encrypt the Workflow Configuration (
workflow.xml) file. For more information, see Section 5.3.3, "Workflow Configuration File". -
Copy the newly generated
workflow.xmlfile to the<OBPM Enterprise Edition>/enterprise/server/aler_enginedirectory. -
Open the
workflow.xmlfile using the XML editor of choice. -
Ensure that the Oracle Enterprise Repository Connection information, such as the URI and the registrar user name/password, are configured correctly as shown here.
<alerconnection> <uri>http://server01.amer.bea.com:7005/aler/services/FlashlineRegistry </uri> <registrar> <user>admin</user> <password>*****</password> </registrar> </alerconnection>The URI must use the following format:
http://<host>:<port>/<oer web app name>/services/FlashlineRegistry
-
Within the
workflow.xmlfile, locate the assetType settings for the "Service" asset type, as shown here.<assetType name="Service" community="_CHANGE_COMMUNITY_" id="154"> <allTabs> <allTabs> <tab name="Oveview"/> <tab name="UDDI: Business Entity"/> <tab name="Taxonomy"/> <tab name="Architecture"/> </allTabs> -
Add the autoAccept attribute and set the value to true, as shown here.
<assetType name="Application" community="_CHANGE_COMMUNITY_" id="154" autoAccept="true"> <allTabs> <allTabs> <tab name="Oveview"/> <tab name="UDDI: Business Entity"/> <tab name="Taxonomy"/> <tab name="Architecture"/> </allTabs>Now the Oracle Business Process Management Process Engine is configured to automatically accept any asset of type "Service."
-
If the Oracle Business Process Management Process Engine is running, stop it and then restart it to load the latest
workflow.xmlchanges. -
The Refresh Workflow Configuration tool can be used to refresh the workflow.xml file without restarting the Oracle Business Process Management Process Engine. For more information about refreshing the
workflow.xmlfile, see Section 9.7.4.1, "Refreshing the Workflow Config File".
9.2.2.6 Triggering an Asset Submission Event
Once the Oracle Business Process Management Process Engine is configured and running, follow these steps to process an asset submission event.
-
Launch the Oracle Enterprise Repository Asset Editor from the Web console.
For information about using the Oracle Enterprise Repository Asset Editor, see Oracle Fusion Middleware User Guide for Oracle Enterprise Repository.
-
Create a new asset from File ->New, as shown in Figure 9-1.
Note:
The Asset Type should be Service. -
Click OK to submit the asset.
-
After the asset is submitted, switch to the Oracle Business Process Management Log Viewer to ensure that the event is processed. To launch the Log Viewer, double-click the obpmlogviewer.exe file in the <OBPM Enterprise Home>\bin directory.
-
Turn on the "Debug" level on the Log page of the Process Engine using the Process Administrator preference settings, as shown in Figure 9-21. By default, the level is set to "Warning."
Figure 9-21 Oracle Business Process Management Process Administrator - Logging Preferences
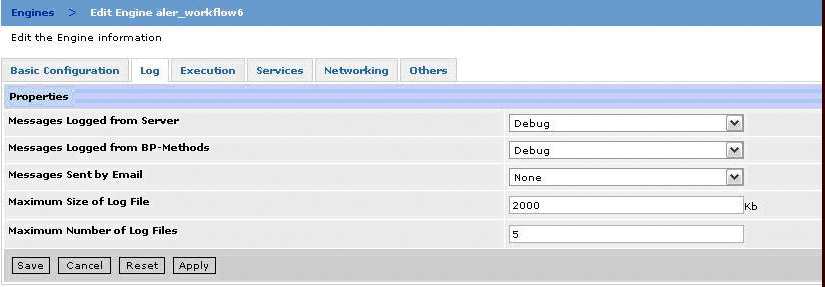
Description of "Figure 9-21 Oracle Business Process Management Process Administrator - Logging Preferences"
-
When you turn on the Debug level though you will notice that the Process Engine prints a lot of information, not just for the Oracle Enterprise Repository Automated Workflows, but other Process Engine information as well. To filter the Oracle Enterprise Repository logging, follow these steps, as shown in Figure 9-22:
-
Within the Log viewer, select Message in the left-most list box.
-
Select Begins With in the next list box.
-
Type OER: in the text box.
-
Click the Apply Filter button.
Figure 9-22 Oracle Business Process Management Log Viewer
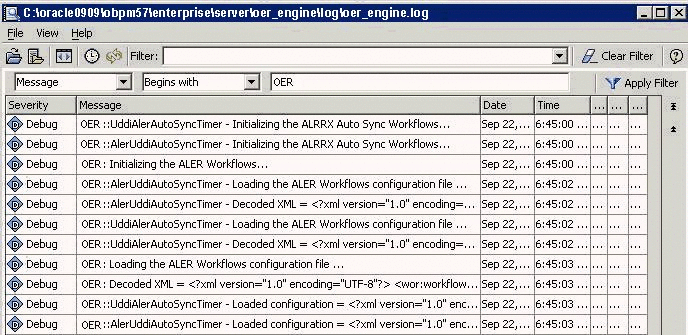
Description of "Figure 9-22 Oracle Business Process Management Log Viewer"
-
-
After the "OER: Done accepting the asset" message is displayed in the Log Viewer, switch back to the Asset Editor, and then refresh the Administration tab using the View -> Refresh Tree command.
-
Verify that the "Accepted" section is updated with the latest data, as shown in Figure 9-23.
Figure 9-23 Oracle Enterprise Repository Asset Editor - Administration Tab
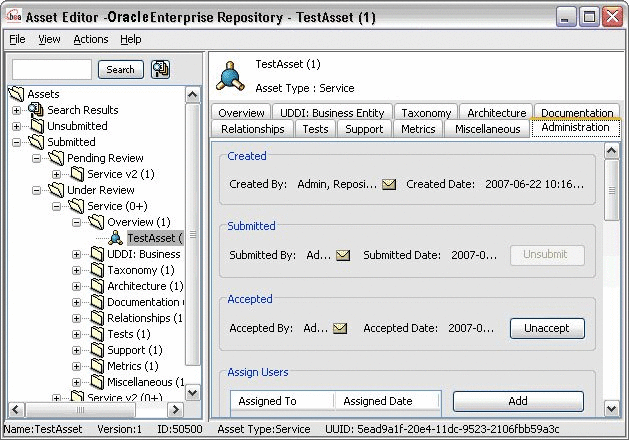
Description of "Figure 9-23 Oracle Enterprise Repository Asset Editor - Administration Tab"
-
Also verify that the Audit Log on the Administration tab is updated, as shown in Figure 9-24.
Figure 9-24 Oracle Enterprise Repository Asset Editor - Audit Log
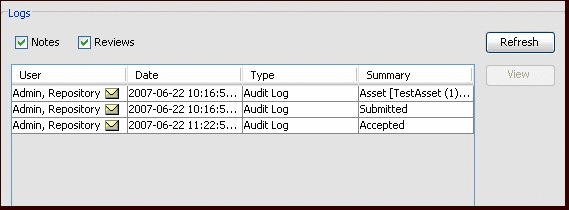
Description of "Figure 9-24 Oracle Enterprise Repository Asset Editor - Audit Log"
9.3 Configuring the Oracle Enterprise Repository Event Manager
This section discusses the Event Manager configuration that needs to be completed before using the Automated Workflows.
This section contains the following topics:
-
Section 9.3.1, "What is the Oracle Enterprise Repository Event Manager?"
-
Section 9.3.2, "Configuring the Event Manager's System Settings"
-
Section 9.3.4, "Configuring Logging of Event Manager Events"
9.3.1 What is the Oracle Enterprise Repository Event Manager?
The Event Manager is a component embedded within Oracle Enterprise Repository that manages event subscriptions, event persistence, event filtering, and event delivery. Web Service endpoints can subscribe to the Event Manager's Subscription Manager and the asset registration events that are generated within Oracle Enterprise Repository are delivered to the Web Service endpoints.
Figure 9-25 shows the different components that are involved.
Figure 9-25 Automated Workflow Components

Description of "Figure 9-25 Automated Workflow Components"
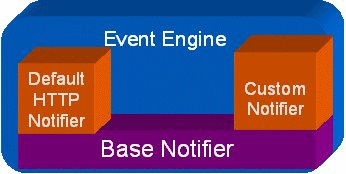
The Event Manager uses an embedded version of Apache ActiveMQ JMS Server that is enabled by default. The embedded JMS server is configured to run out-of-the-box without any additional configuration. However, you can also configure the Event Manager to use an external JMS server, such as WebLogic Server or IBM WebSphere.
This section discusses the Event Manager configuration that needs to be completed before using the Automated Workflows.
For information on configuring the Automated Workflows, see Section 9.3, "Configuring the Oracle Enterprise Repository Event Manager".
9.3.2 Configuring the Event Manager's System Settings
Oracle Enterprise Repository's System Settings section allows administrators to configure the basic Oracle Enterprise Repository operation and to enable/disable specific features. The Event Manager-related settings are under the "Eventing" group under the main "External Integrations" category.
For more information about System Settings, see Chapter 16, "System Settings Overview".
Additional "Eventing" properties are available for configuring an external JMS server, such as WebLogic Server and IBM WebSphere, and are described in Section 9.6, "Configuring JMS Servers for Oracle Enterprise Repository".
9.3.2.1 Enabling the Event Manager
The Event Manager needs to be enabled in Oracle Enterprise Repository to allow the Event Manager to send events to external Web Service endpoints.
-
Click System Settings in the sidebar on the Oracle Enterprise Repository Admin screen.
-
Enter Event in the System Settings Search box to view all the Event Manager related settings.
-
Click True next to the Enable Event Manager property,
cmee.eventframework.enabled. -
Click Save.
-
Restart Oracle Enterprise Repository for the configuration changes to take effect.
9.3.2.2 Configuring Optional Event Manager Settings
There are some optional "Eventing" properties that you can use to tune the Event Manager performance.
Note:
You must restart Oracle Enterprise Repository after changing any Eventing property in order for the changes to take effect.This section contains the following topics:
-
Section 9.3.2.2.1, "Eventing Manager Notifier Thread Sleep (seconds)"
-
Section 9.3.2.2.2, "Eventing Manager Store Thread Sleep (seconds)"
-
Section 9.3.2.2.3, "Eventing Manager Store Delivery Sleep (seconds)"
-
Section 9.3.2.2.4, "Batch Size for Event Manager Deliveries"
9.3.2.2.1 Eventing Manager Notifier Thread Sleep (seconds)
If an endpoint is not unavailable when one or more events should be delivered to that endpoint, the Event Manager notifier will retry delivering the event until the endpoint is available. The cmee.eventframework.notifier.sleep property configures in seconds how long the notifier should wait before trying to redeliver an event.
9.3.2.2.2 Eventing Manager Store Thread Sleep (seconds)
As soon as an event is triggered, the Event Manager stores the event in memory before pushing it to the JMS server so that the Oracle Enterprise Repository thread is not blocked. The cmee.eventframework.store.sleep property specifies in seconds how long the Event Manager's Store Manager thread should sleep before polling for the next available batch of events stored in memory. The default polling delay is 16 seconds.
9.3.2.2.3 Eventing Manager Store Delivery Sleep (seconds)
By default, the Event Manager delivers events in batches. The cmee.eventframework.delivery.sleep property specifies in seconds how long the Event Manager's Delivery Manager thread should sleep before selecting the next available event from the JMS server.The default delay between each batch is 13.
Tip:
The default cmee.eventframework.store.sleep andcmee.eventframework.delivery.sleep property values can be tuned to control the overall performance of Oracle Enterprise Repository and the Web Service endpoints. These properties directly impact the number of events that get triggered per second by the Event Manager. For example, if a faster response is required for testing purposes, the default cmee.eventframework.delivery.sleep value of 13 seconds should be changed to a reasonable testing amount, if needed.9.3.2.2.4 Batch Size for Event Manager Deliveries
When the Event Manager delivers events in batches, the delivered batch size can be configured using the cmee.eventframework.delivery.batch.size property. The default batch size is 100 events. If the Event Manager finds less number of events to deliver, it will deliver the available events and then sleep for the time configured in the cmee.eventframework.delivery.sleep property.
9.3.3 Configuring the Subscription Manager
The Subscription Manager is responsible for managing the event subscriptions by the Web Service endpoints where the matched events are delivered.
The Subscription Manager configuration file is located in <oer webapp name>\WEB-INF\classes\EndPointEventSubscription.xml.
9.3.3.1 Configuring Web Service Endpoints
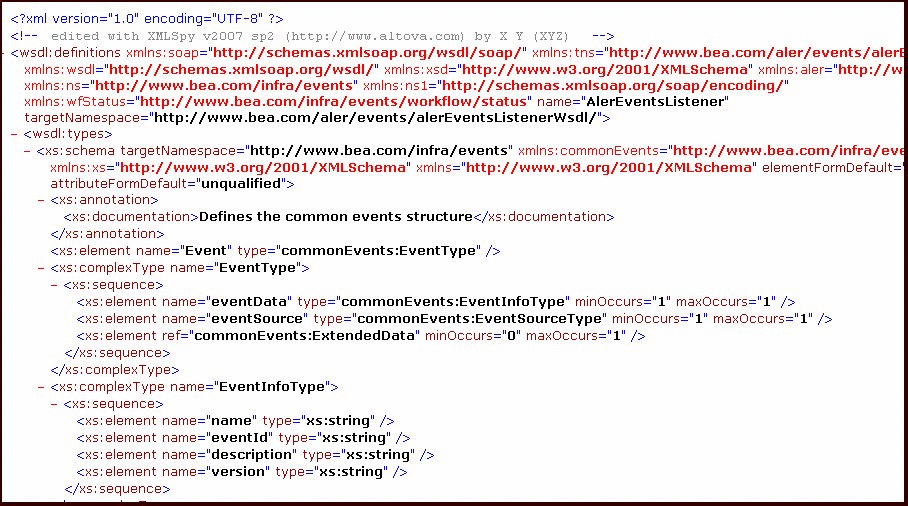
The Event Manager uses the EndPointEventSubscription.xml file to load information about the Web Service endpoints where events need to be delivered. The host, port, URI, user, and password of the predefined ALPBM endpoint, or user-defined Web Service endpoint, need to be configured, as shown in this example snippet:
<sub:EventSubscriptionData
xmlns:sub="http://www.bea.com/infra/events/subscription" xmlns:xsi=???
<sub:eventSubscription>
<sub:endPoint name="ALBPMEndpoint">
<sub:host>maplanis01.amer.bea.com</sub:host>
<sub:port>9000</sub:port>
<sub:uri>fuegoServices/ws/StatusChangeEnpointServiceListener</sub:uri>
<sub:targetNamespace>StatusChangeEndpoint</sub:targetNamespace>
<sub:operationName>newEvent</sub:operationName>
<sub:authenticationData>
<sub:basicAuthentication>
<sub:username>aler_workflow_user</sub:username>
<sub:password>*******</sub:password>
</sub:basicAuthentication>
</sub:authenticationData>
</sub:endPoint>
<sub:notifierClass>com.bea.infra.event.notifier.help.AlbpmHTTPEventNotifier
</sub:notifierClass>
<sub:expression>id > 500</sub:expression>
</sub:eventSubscription>
</sub:EventSubscriptionData>
As many endpoints can be added as desired and the endpoints can be located in different hosts or ports and the events can be load balanced. The pre-defined Advanced Registration Flow has just one endpoint called "StatusChangeEndpoint".
9.3.3.2 Setting the Expression to Filter Events
Events can be filtered based on the value entered in the expression element. This section contains the following topics:
-
Section 9.3.3.2.2, "Delivering Events to an Endpoint Filtered by Event Type"
-
Section 9.3.3.2.3, "Delivering Events to an Endpoint Filtered Using a JMS Message Selector"
9.3.3.2.1 Delivering all Events to an Endpoint
The default setting is to deliver all events to an endpoint. All the events that are triggered within Oracle Enterprise Repository are delivered to the OOTB endpoint when the expression element is empty.
<sub:expression></sub:expression>
9.3.3.2.2 Delivering Events to an Endpoint Filtered by Event Type
The following XML snippet shows how to deliver an event of type AssetSubmission to an endpoint:
<sub:expression> eventdata_name ='urn:com:bea.aler:events:type:AssetSubmission'</sub:expression>
You can also use the "OR" operator to filter more than one event type:
eventdata_name ='urn:com:bea.aler:events:type:AssetSubmission' OR eventdata_name ='urn:com:bea.aler:events:type:AssetAccepted'
These are the event types that are supported:
-
urn:com:bea:aler:events:type:AssetSubmission -
urn:com:bea:aler:events:type:AssetAccepted -
urn:com:bea:aler:events:type:AssetTabApproved -
urn:com:bea:aler:events:type:AssetAllTabApproved -
urn:com:bea:aler:events:type:AssetRegister -
urn:com:bea:aler:events:type:PolicyAssertionChanged -
urn:com:bea:aler:events:type:MetaDataChange:name -
urn:com:bea:aler:events:type:AssetUnSubmission -
urn:com:bea:aler:events:type:AssetUnAccept -
urn:com:bea:aler:events:type:AssetUnregister -
urn:com:bea:aler:events:type:AssetStatusChanged -
urn:com:bea:aler:events:type:MetaDataChange:version -
urn:com:bea:aler:events:type:MetaDataChange:description -
urn:com:bea:aler:events:type:CategorizationChanged:assetLifecycleStage -
urn:com:bea:aler:events:type:CategorizationChanged:classification -
urn:com:bea:aler:events:type:MetaDataChange:supported -
urn:com:bea:aler:events:type:MetaDataChange:organizational ownership -
urn:com:bea:aler:events:type:MetaDataChange:usagefee
9.3.3.2.3 Delivering Events to an Endpoint Filtered Using a JMS Message Selector
Selectors are a way of attaching a filter to a subscription to perform content-based routing. Selectors are defined using SQL 92 syntax. The following is a complete list of fields that can be used to write a filter expression to filter the events. These fields are added to the JMS message as properties by the Event Manager and a JMS Message Selector that accesses the fields can be written to filter the events.
submittedby_emailaddress = [email protected] asset_description = Test Asset submittedby_name = aler_workflow_user submittedby_id = 99 asset_community = Java eventdata_description = new aler event eventsource_componentname = OER asset_name = TestAsset eventsource_componenttype = OER 10.3 asset_typeid = 154 eventdata_eventid = d0cdac55-c78f-4a29-8aec-6ea9ba8d31f1 eventdata_name = urn:com:bea:aler:events:type:MetaDataChange:name asset_activestatus = ACTIVE eventsource_location = ALERCore asset_id = 50100 eventdata_version = ver1.0 asset_version = 1
For more information about JMS Message Selectors, see the following web sites:
9.3.3.2.4 JMS Message Selector Examples
Here are some sample usages of JMS message selectors:
-
asset_idBETWEEN 50000 AND 50100 -
eventdata_name= 'urn:com:bea:aler:events:type:AssetSubmission' AND asset_id BETWEEN 50000 AND 50100 -
asset_nameLIKE 'Inventory' -
asset_id> 500
Tip:
Symbols, such as "< >" used for less than/greater than, are not valid XML content. This is because the expression is written in an XML file and parsed by the Event Manager, the XML unfriendly characters need to be managed using the XML Rules. For example, you must use "id > 500", which is equivalent to "asset_id > 500".9.3.4 Configuring Logging of Event Manager Events
The Event Manager uses the same logging framework as Oracle Enterprise Repository. By default, logging is enabled to go to a file, but you direct the debug statements to go to the console by appending the following categories to the log4fl.properties file in the <OER Domain>\WEB-INF\classes directory.
# eventing subsystem
log4j.category.com.bea.infra.event.core= debug,eventingLog,stdout
log4j.category.com.bea.infra.event.dm= debug,eventingLog,stdout
log4j.category.com.bea.infra.event.facade= debug,eventingLog,stdout
log4j.category.com.bea.infra.event.notifier= debug,eventingLog,stdout
log4j.category.com.bea.infra.event.store= debug,eventingLog,stdout
log4j.category.com.bea.infra.event.sub= debug,eventingLog,stdout
9.4 Administrating Oracle Business Process Management Processes
This section discusses the administration tasks for Oracle Business Process Management provesses.
This section contains the following topics:
-
Section 9.4.2, "Administering Oracle Business Process Management Web Applications"
-
Section 9.4.3, "Tuning the Oracle Business Process Management Automated Workflows Engine"
-
Section 9.4.4, "Configuring a Standalone Process Engine for Failover"
-
Section 9.4.5, "Using the Oracle Business Process Management Log Viewer"
9.4.1 Overview
After the Event Manager is ready to send events, the Process Engine needs to be configured in order to be ready to process the Events. When Oracle Enterprise Repository is installed, it provides an option to install and configure the Oracle Business Process Management Process Engine. This section assumes that the Oracle Business Process Management Process Engine was successfully installed.
9.4.2 Administering Oracle Business Process Management Web Applications
To start the Oracle Business Process Management Process engine and define the participants, you must launch the Oracle Business Process Management Admin Center.
9.4.2.1 Starting the Oracle Business Process Management Admin Center
Follow these steps to launch the Oracle Business Process Management Admin Center:
-
Navigate to the <ORACLE_HOME>\obpm\enterprise\bin directory and double-click one of the following files:
-
obpmadmcenter.exe (Windows or UNIX GUI-based)
-
./startwebconsole.sh(UNIX console-based). Then point your browser to http://<host>:8585/webconsole (for example, http://localhost:8585/webconsole).
-
-
On the Admin Center page, click the Start BPM Web Applications option, as shown in Figure 9-26.
Figure 9-26 Oracle Business Process Management Admin Center
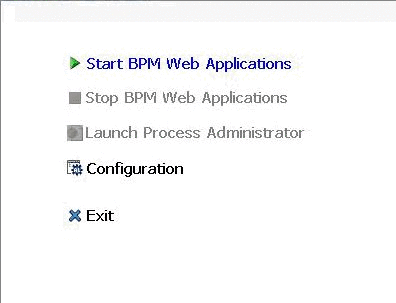
Description of "Figure 9-26 Oracle Business Process Management Admin Center"
-
When it becomes available, click the Launch Process Administrator option to launch the Process Administrator.
-
When prompted to enter the required credentials, enter the BPM admin user name and password that was used on the FDI User Credentials panel during the installation process. The recommended example for these credentials is bpm_admin for the user name and password.
9.4.2.2 Starting the Oracle Business Process Management Process Engine
Follow these steps to start the Oracle Business Process Management Process Engine.
-
On the Oracle Business Process Management Process Administrator page, open the
aler_engineProcess Engine by clicking the Engine link on the left side of the page, as shown in Figure 9-27.Figure 9-27 Oracle Business Process Management Process Administrator - Start / Stop

Description of "Figure 9-27 Oracle Business Process Management Process Administrator - Start / Stop"
-
Start the
aler_engineby clicking the Start icon under Engine Actions on the right side of the page. Starting the engine may take several minutes to complete. Make sure that the status of the engine is Ready.
Once you the Oracle Business Process Management Process Engine is running, you can stop it and then restart it to load your latest workflow.xml changes.
9.4.2.3 Defining the Oracle Business Process Management Participants
This section explains how to define the Oracle Business Process Management Process Engine participants.
9.4.2.3.1 Oracle Business Process Management Administrators
Using the FDI User Credentials, Oracle Business Process Management Process Administrator can log into the Process Administrator, start/stop the process engine, and create other users.
9.4.2.3.2 Advanced Registration Flow Participant
When the Oracle Business Process Management Process Engine is installed by Oracle's Products installer, it creates aler_workflow_user as the Advanced Registration Flow user. By default, the password is set as aler_workflow_pass, but the password can be changed in the Process Administrator by selecting Participants in the navigator and clicking Change the password in the Advanced Properties section, as shown in Figure 9-28.
Figure 9-28 Oracle Business Process Management Process Administrator - Change Password
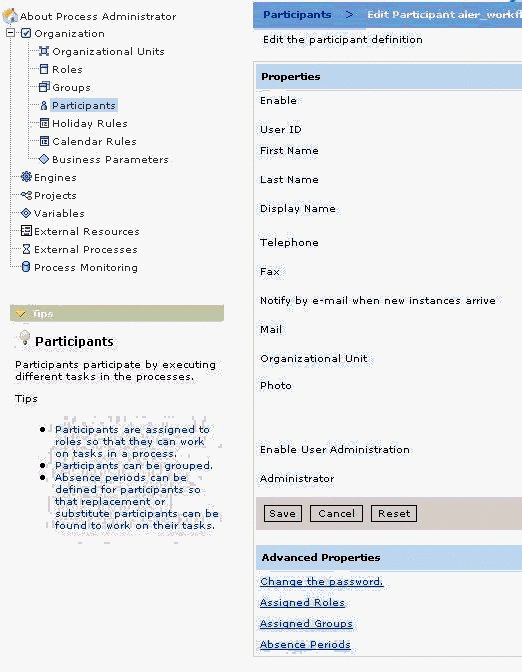
Description of "Figure 9-28 Oracle Business Process Management Process Administrator - Change Password"
A new participant can also be created for the role of "administrator" and this new participant can be configured in the Event Manager's Subscription Manager file. For more information, see Section 9.3.3, "Configuring the Subscription Manager".
9.4.3 Tuning the Oracle Business Process Management Automated Workflows Engine
The following parameters need to be tuned using the Oracle Business Process Management Process Administrator.
9.4.3.1 Advanced Properties
Go to the Engines, <Engine Name>, Engine Nodes, Advanced Properties page. Figure 9-29 illustrates the Oracle Business Process Management Process Administrator - Advanced Properties page.
Figure 9-29 Oracle Business Process Management Process Administrator - Advanced Properties
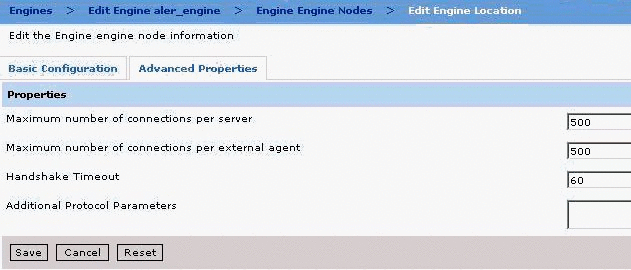
Description of "Figure 9-29 Oracle Business Process Management Process Administrator - Advanced Properties"
9.4.3.2 Database Runtime Properties
Go to the Engines, <Engine Name>, Edit Engine Database Configuration page. Figure 9-30 illustrates the Oracle Business Process Management Process Administrator - Database Runtime page.
Figure 9-30 Oracle Business Process Management Process Administrator - Database Runtime

Description of "Figure 9-30 Oracle Business Process Management Process Administrator - Database Runtime"
9.4.3.3 Memory and Execution Thread Properties
Go to the Engines, <Engine Name>, Execution page. Figure 9-31 illustrates the Oracle Business Process Management Process Administrator - Memory and Threads page.
Figure 9-31 Oracle Business Process Management Process Administrator - Memory and Threads
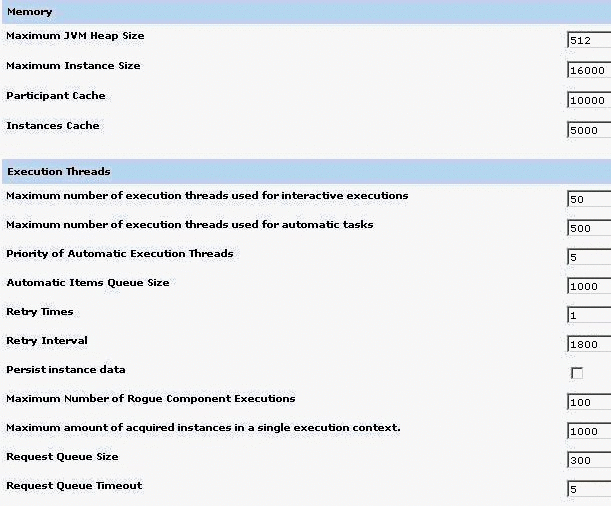
Description of "Figure 9-31 Oracle Business Process Management Process Administrator - Memory and Threads"
9.4.4 Configuring a Standalone Process Engine for Failover
To support failover of Oracle Business Process Management standalone process engines, you can configure a backup engine(s) in your environment. One of the engines in this federation is marked as PRIMARY and the others assume to be backups for this primary engine. Multiple engines can be configured to serve as backups. Any of these backup engines will take the role of the primary if the designated primary fails. When the server that has failed comes back online, it will join in as a backup to the one acting as primary.
For detailed instructions on configuring backup engines, see the section on configuring engine failover in the Oracle Business Process Management Administration Guide at:
http://download.oracle.com/docs/cd/E13165_01/bpm/docs65/admin_guide/index.html
9.4.5 Using the Oracle Business Process Management Log Viewer
The Oracle Business Process Management Log Viewer enables you to read information logged by the Process Execution Engine. A set of log files is created for each project you define. The Studio Log Viewer reads the files and displays them to help you monitor and trace Engine execution.
To launch the Log Viewer, double-click the obpmlogviewer.exe file in the <Oracle Business Process Management Enterprise Home>\bin directory.
9.4.5.1 Filtering Event Log Messages for Oracle Enterprise Repository Flows
You can filter log messages so that the Automated Workflows log Info, Debug, and Fatal messages.
Turn on the "Debug" level on the Log page of the Process Engine using the Process Administrator preference settings. By default, the level is set to "Warning".
Go to the Engines, <Engine Name>, Log page. Figure 9-32 illustrates the Oracle Business Process Management Process Administrator - Logging Preferences page.
Figure 9-32 Oracle Business Process Management Process Administrator - Logging Preferences

Description of "Figure 9-32 Oracle Business Process Management Process Administrator - Logging Preferences"
When you turn on the Debug level though you will notice that the Process Engine prints a lot of information, not just for the Oracle Enterprise Repository Automated Workflows, but other Process Engine information as well. To filter the debug logging to show only the Oracle Enterprise Repository flow-related information, follow these steps, as shown in Figure 9-33:
-
Within the Log viewer, select Message in the left-most list box.
-
Select Begins With in the next list box.
-
Type OER: in the text box.
-
Click the Apply Filter button.
The Oracle Enterprise Repository Event Logging prints a prefix of ALER: for all logged event messages, as shown here.
9.5 Configuring Automated Workflows
This section describes how to get started with Harvester and its use in various high level use cases.
This section contains the following topics:
9.5.1 Overview of Automated Workflows
Tip:
Before you begin, you should read Section 9.2, "Introduction to the Oracle Enterprise Repository Automated Workflows" to quickly get started using the Advanced Registration Flow feature using the bundled Oracle Business Process Management Web Service endpoint that is configured to work with the Oracle Business Process Management Process Engine.Oracle Enterprise Repository bundles pre-built Oracle Business Process Management flows that attempt to automate Oracle Enterprise Repository asset submission, acceptance, registration and other governance process. This section discusses the configuration that is required before starting the Oracle Business Process Management Process Engine to process the asset events that are triggered by Oracle Enterprise Repository. For more information about configuring the Process Engine to trigger flows, see Section 9.3, "Configuring the Oracle Enterprise Repository Event Manager".
The flows are also designed to be flexible and can be customized using either the Workflow Configuration file (workflow.xml) or Oracle Business Process Management. This section also discusses each flow in detail and gives examples of how they can be tailored to suit your environment.
This section describes how to configure an advanced registration flow. To create a new workflow, follow these steps:
-
Open an existing Oracle Business Process Management project in an IDE.
-
Add a new workflow. See the Oracle Business Process Management documentation for details on this step.
-
Undeploy and deploy the project.
-
Wire the workflow to the events by following the instructions in Section 9.5.3, "Wiring Asset Events to Flows".
9.5.2 Creating and Customizing a Workflow Configuration File
This section explains how to create and customize a Workflow Configuration XML file.
9.5.2.1 Generating a Workflow Configuration File
Generate the workflow.xml file using the Generate Workflow Config tool (config_gen.bat). This tool connects to Oracle Enterprise Repository and creates a bootstrapping file that can be customized. For more information about generating the workflow.xml file, see Section 9.7.4, "Configuring Workflow".
-
From a command prompt, run the Generate Workflow Config tool as follows:
> config_gen.bat URI User Password ConfigDir
where
-
URI = OER URI, using the following format:
http://<host>:<port>/<oer web app name>/services/FlashlineRegistry
For example: http://localhost:7001/alerbuild/services/FlashlineRegistry
-
User = Oracle Enterprise Repository user name
-
Password = Oracle Enterprise Repository password
-
ConfigDir = the directory where the workflow.xml file is created
-
-
Copy the newly generated workflow.xml file to the <Oracle Business Process Management Enterprise Edition>/enterprise/server/aler_engine directory.
-
Open the workflow.xml file using the XML editor of choice.
9.5.2.2 Defining the Oracle Enterprise Repository Connection and Registrar
The Workflow Configuration file loads the Oracle Enterprise Repository connection and registrar information from the following XML data.
<alerconnection>
  <uri>http://localhost.7001/aler/services/FlashlineRegistry</uri>
  <registrar>
    <user>admin</user>
    <password>******</password>
  </registrar>
</alerconnection>
9.5.2.3 Encrypting the Registrar User Password
The Security Encrypt Password tool (runWfSecurity.bat) allows you to encrypt the registrar passwords that are stored in the Workflow Config file. The tool recursively scans the file and encrypts all the password elements it encounters.
For more information, see Section 9.7.5, "Encrypting Your Passwords".
9.5.3 Wiring Asset Events to Flows
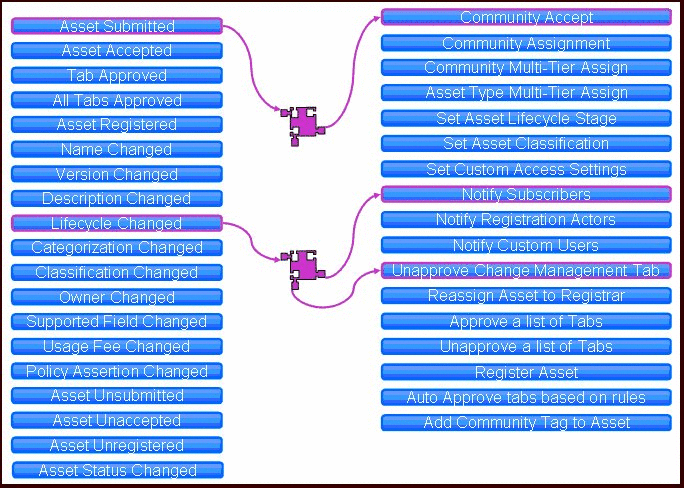
The Automated Workflows are designed with a flexible framework where asset events can be wired to one or more flows that are executed when an event is triggered, as illustrated in Figure 9-34.
Note:
All the events are wired to pre-defined flows out-of-the-box. The wirings only need to be changed if customizations or new flows are designed.The wiring of asset events to flows is configured within the Workflow Configuration file. For example, the following configuration snippet shows that when an "Asset Submitted" event is triggered, it in turn triggers a flow to automatically accept the asset based on rules that are configured in the Workflow Configuration file.
  <!--Community Flows-->
  <state name="urn:com:bea:aler:events:type:AssetSubmission">
    <action>CommunityAccept</action>
  </state>
  <!--The Multi_tier Flows-->
  <state name="urn:com:bea:aler:events:type:AssetAccepted">
    <action>MultiTier_Tier1_Assign</action>
  </state>
  <state name="urn:com:bea:aler:events:type:AssetTabApproved">
    <action>MultiTier_NextTier_Assign</action>
  </state>
  <!--Asset Registration Status Flows-->
  <state name="urn:com:bea:aler:events:type:AssetAllTabApproved">
    <action>AllTabApproved_Register</action>
  </state>
This example configuration wires the following events to various flows. The <action> element contains the name of the flow that are executed.
-
When an asset "submitted" event is triggered, execute the Community Accept flow.
-
When an asset "accepted" event is triggered, execute the MultiTier1 flow.
-
When a tab "approved" event is triggered, execute the Multi-Tier Next Tier flow.
-
When "all the tabs approved" event is triggered, execute the Automatic Registration flow.
Some of the flows take parameters that are needed as input. Different parameters are passed to different flows. For example, the ChangeCAS (Change Custom Access Settings) flow takes <customAccessSettings> as a parameter. Here is a sample wiring when an asset is registered, where the flow automatically assigns MyCAS and MyCAS2 custom access settings.
  <state name="urn:com:bea:aler:events:type:AssetRegister">
    <action>ChangeCAS</action>
  <customAccessSettings>
    <customAccessSetting>MyCAS</customAccessSetting>
    <customAccessSetting>MyCAS2</customAccessSetting>
  </customAccessSettings>
  </state>
9.5.4 Automatic Asset Registration Flows
This section describes how the Automated Workflows can automate the manual asset acceptance and registration process done using the Oracle Enterprise Repository Asset Editor. For information on using the Oracle Enterprise Repository Asset Editor and the asset registration process, see Oracle Fusion Middleware User Guide for Oracle Enterprise Repository.
Note:
Do not enable the "Community Acceptance" or the "Automated Acceptance" flows if repository users submit assets via the "Submit an Asset" link. This configuration is not currently supported in Oracle Enterprise Repository.9.5.4.1 Configuring Community Flows
The Community flow provides a way to automate the asset acceptance, assignment, and registration process by allowing the configuration of automated assignment rules and also introduces the notion of federated registrars among different authorities. Rather than spamming many registrars across all communities (through the system registrar notification), you could limit the system registrar to one or a few individuals, and let the Automatic Acceptance flow accept assets on behalf of a registrar-of-record for the community. The Community flow feature can distribute asset submissions to those with the authority to approve them for the community.
The Community flow can be used to address the following scenarios:
-
Automatic federated registrars support for acceptance as opposed to a single registrar getting many notifications about newly submitted assets.
-
Even if asset acceptance is manual, the Community flow can be used to automate the assignment of the asset approvals to pre-defined approvers. Creating pre-defined approvers can be achieved in two ways:
-
Creating a list of pre-defined approvers for all the tabs in that asset.
-
Using multi-tier assignment (this is the same as the Multi-Tier flow but it operates within the Community).
-
-
Automation of the registration process. The flows will automatically register the assets if the following conditions happen:
-
When all the tabs approved
-
When the last tier in a Multi-tier process is completed
-
Or whichever happens first.
The Communities are configured within the flow configuration and Asset Types, Producing Projects, etc., can point to a Community.
Figure 9-35 demonstrates how a Community for an asset is located by the flow, as well as how the rules for automatic acceptance are located by the flow.
Figure 9-35 Automatic Asset Acceptance Flowchart
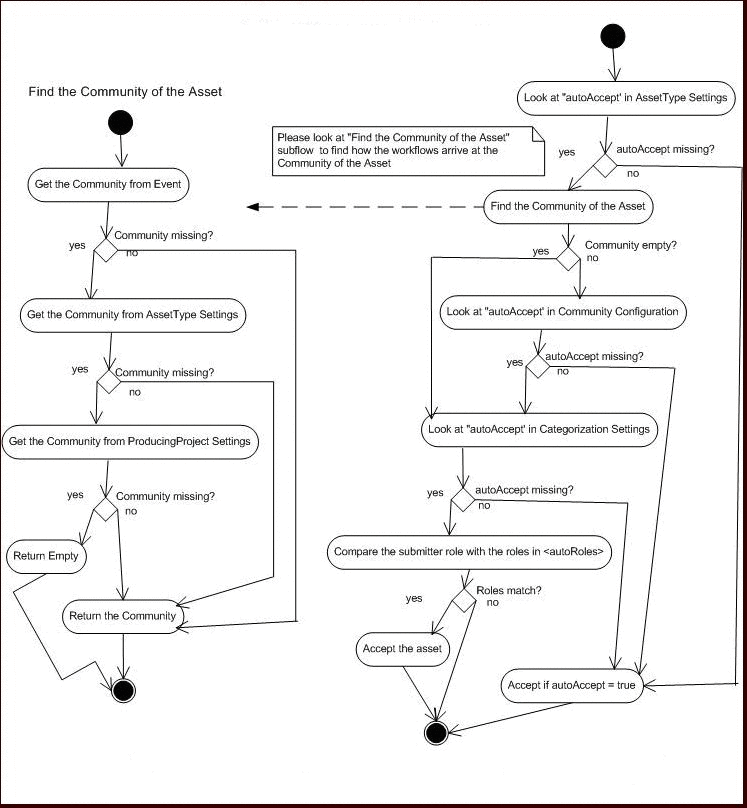
Description of "Figure 9-35 Automatic Asset Acceptance Flowchart"
Note:
The same flowchart applies for automatic Registration. Simply substitute autoRegister for autoAccept. -
9.5.4.1.1 Setting the Community for an Oracle Enterprise Repository Project
Define the community for a project using the <producingProjectSettings> element. The following example demonstrates creating a project named "Registry" for the "SOA Center of Excellence" community, and with an ID of "40000".
<producingProjectSettings>
   <producingProject name="Registry" community="SOA Center of Excellence
   id="40000"/>
</producingProjectSettings>
9.5.4.1.2 Setting the Community for an Asset Type
Define the community for an Asset Type using the <assetType> element. The following example demonstrates creating an asset type named "Application" for the "SOA Center of Excellence" community, and with an ID of "158".
  <assetType name="Application" community="SOA Center of Excellence
  id="158">
    <allTabs>
9.5.4.1.3 Setting the Community for an Asset using the Type Manager and Asset Editor
Instead of setting the community for an Asset in workflow.xml, you can set the community for the Asset Type using the Type Manager and Asset Editor.
In the Type Manager, follow these steps:
-
Select the Asset Type for which you want to enable the Community field, and click the Viewer tab.
-
Click the Display in Group button, as shown in Figure 9-36.
Figure 9-36 Setting the Community for an Asset Type in Type Manager
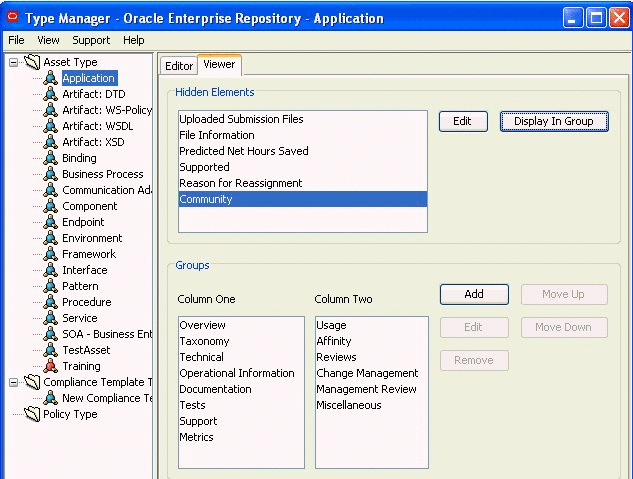
Description of "Figure 9-36 Setting the Community for an Asset Type in Type Manager"
Then, in Asset Editor, follow these steps:
-
Select an asset of the Asset Type you selected in the Type Manager.
-
Set the community name to use for that asset in the Community field of the Overview tab, as shown in Figure 9-37.
Figure 9-37 Setting the Community Name in the Community Field in Asset Editor
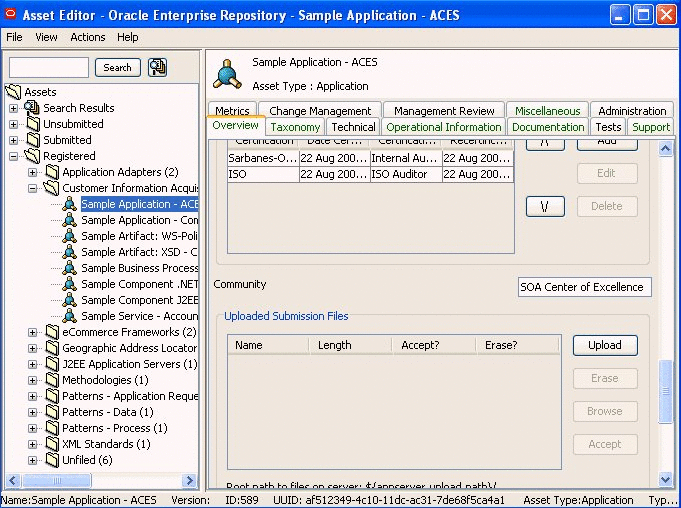
Description of "Figure 9-37 Setting the Community Name in the Community Field in Asset Editor"
If you followed the instructions for setting a community in Section 9.5.4.1.2, "Setting the Community for an Asset Type"and you then set a Community name for an asset in Asset Editor, the Community name you set for the asset in Asset Editor overrides the Community name set in the workflows.xml file.
-
9.5.4.1.4 Configuring a Community to Automatically Accept an Asset
The following example demonstrates how to set the "SOA Center of Excellence" community to automatically accept assets.
<communities name="SOA Center of Excellence autoAccept="true">
Note:
Do not enable the "Community Acceptance" or the "Automated Acceptance" flows if repository users submit assets via the "Submit an Asset" link. This configuration is not currently supported in Oracle Enterprise Repository.9.5.4.1.5 Configuring a Community to Assign Assets for Tab Approval
If the AssetSubmitted event is wired to the Community flow, then the <approvers> element lists the approvers that are assigned by the Community flow automatically.
  <communities name="Java" autoAccept="true">
    <approvers>
      <alerid>5003</alerid>
      <alerid>5004</alerid>
    </approvers>
For instructions on using the <alerid> in Tab Approval flows, see Section 9.5.5.2, "Using an <alerid> for Tab Approvals".
9.5.4.1.6 Configuring a Community to Assign Assets for Tab Approval Using Multi-tier
Multi-tier assignment is the same as the Multi-Tier flow but it operates within the Community. For more information about the Multi-tier flow, see Section 9.5.5, "Multi-tier Automatic Assignment Flows".
Note:
The tabs that are provided within the Multi-tier configuration of a community should be the common tabs that exist in all the asset types.9.5.4.1.7 Configuring a Community to Automatically Register an Asset
The following example demonstrates how to set the "SOA Center of Excellence" community to automatically accept and register assets.
  <communities name="SOA Center of Excellence autoAccept="true"
   autoRegister="true">
9.5.4.1.8 Configuring a Community to Have a Dedicated Registrar
The Registrar user name and password is required to accept, assign, and register assets. The Community flow will load the registrar information from the Community that the asset belongs to. If an asset does not belong to a community or if the registrar information is not found in the community, then the global registrar is used by the Community flow.
The following is the order of precedence in getting the Community tag by the Community flows, as illustrated in Figure 9-34:
-
Community Tag in the incoming event
-
Community Tag in the Asset Type that the incoming asset belongs to
-
Community Tag in the Producing Project that the incoming asset belongs to
9.5.4.2 Configuring Automated Acceptance and Automated Registration Flows
Besides using the Community flows to automatically accept and register assets, the following rules can be used to accept and register assets, as illustrated in Figure 9-34.
Note:
Do not enable the "Community Acceptance" or the "Automated Acceptance" flows if repository users submit assets via the "Submit an Asset" link. This configuration is not currently supported in Oracle Enterprise Repository.9.5.4.2.1 Asset Type
The autoAccept and autoRegister flag within the AssetType element can be used to automatically accept or register assets.
  <assetType name="Application" autoAccept="true" autoRegister="true"
  id="158">
    <allTabs>
      <tab name="Overview"/>
      <tab name="Application Lifecycle"/>
    </allTabs>
9.5.4.2.2 Categorization Settings
By default the flows do not look for the autoAccept and autoRegister flags, since the look-up may affect performance. However, this can be enabled by using the <action> flag.
As shown in this example, the <action> flag must be set to true if the flows should use the Categorization settings. If not, the Categorization settings are ignored.
  <catgorizationTypeSettings action="true">
    <catgorizationType name="AssetFunction" type "100">
      <catgorizations name="Application Adapters" autoAccept="false"/>
      <catgorizations name="Customer Information Acquisition" autoAccept="false"/>
      <catgorizations name="eCommerce Frameworks" autoAccept="false"/>
    </catgorizationType>
9.5.4.2.3 Submitter Role
The submitter role can be used to automatically accept or register the asset. If the role specified in the following configuration matches the submitter role, then the asset is automatically accepted.
  <automation>
    <autoRoles>
      <role>admin</role>
      <role>accesAdminstrator</role>
    </autoRoles>
    <autoApprovalTabs>
      <tab name="Documentation"/>
    </autoApprovalTabs>
  </automation>
9.5.4.2.4 Conflict Resolution and Precedence
In some cases, there are more than one rule that matches for a given event trigger, so there is a hierarchy for how each rule is evaluated by the Automated Acceptance and Automated Registration flows for acceptance, registration, etc., as illustrated in Figure 9-34. The flow will scan for the following piece of metadata and as soon as it encounters the one in the following precedence, it will break and use the settings in that metadata.
-
AssetType settings in the Flow configuration file
-
Community Tag found in the incoming asset
-
Community Tag found in the AssetType settings in the Flow configuration file
-
Community Tag found in the ProducingProject settings in the Flow configuration file
-
Categorization settings in the Flow configuration file
-
Categorization settings in the Flow configuration file
-
SubmitterRole settings in the Flow configuration file
9.5.5 Multi-tier Automatic Assignment Flows
Multi-tier flows structure the asset tab approval process in multiple steps called tiers. Asset approval tabs can be grouped in tiers, and the Mult-tier flow tracks each tier to verify whether all the tabs are approved by the designated approvers. As soon as the last tab in a tier is approved, the Mult-tier flow starts the next tier by assigning the asset to the next level of designated approvers.
9.5.5.1 Use Cases
-
In some cases, it may be desired to assign tabs for Tab Approval in multiple steps called Tiers. For example, it may be desirable to approve the Architecture tab first before approving the Documentation tab. This is because any architectural issue needs to be corrected first before it comes to the attention of the Documentation expert.
-
In previous releases, Tab Approval was done manually by the registrar by manually tracking the status of each tab approval and then assigning the tabs for the next tier level approvals. With the Multi-tier flows, this process is automated by the flows.
Figure 9-38 demonstrates the flow of the Mult-tier process.
Figure 9-38 Multi-tier Automatic Assignment Flowchart
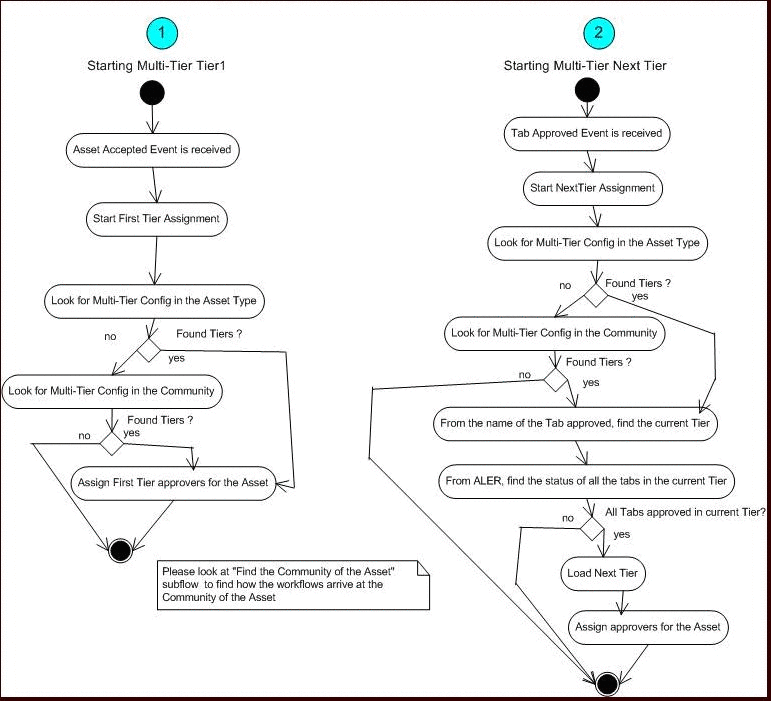
Description of "Figure 9-38 Multi-tier Automatic Assignment Flowchart"
9.5.5.2 Using an <alerid> for Tab Approvals
When the workflow.xml file is generated, the following XML section is created under the <allAssetSettings> section. These are all the users that are created in Oracle Enterprise Repository.
  <alerUsers>
    <user name="admin" alerid="99"/>
    <user name="allpriv" alerid="50000"/>
    <user name="nopriv" alerid="50001"/>
    <user name="tier1" alerid="50002"/>
    <user name="tier2" alerid="50003"/>
    <user name="mrsmith" alerid="50004"/>
  </alerUsers>
As the Workflow Administrator, you need to identify the user(s) by name that you want to use for approving the asset tabs and use the corresponding <alerid>. Then you can use that <alerid> in the Workflow XML, such as in the following Multi-tier approval flow:
  <tiers>
    <tier name="Tier1">
      <approvers>
        <alerid>50001</alerid>
      </approvers>
      <tabs>
        <tab name="Overview"/>
        <tab name="Technical"/>
        <tab name="Documentation"/>
      </tabs>
  </tier>
9.5.5.3 Setting Up a Community for Multi-tier Tab Approval
The following example demonstrates how the Multi-tier flow is configured for tab approvers in the "SOA Center of Excellence" community to automatically accept tabs.
<communities name="SOA Center of Excellence autoAccept="true">
    <tiers>
      <tier name="Tier1">
        <approvers>
          <alerid>5002</alerid>
        </approvers>
        <tabs>
          <tab name="Overview">
          <tab name="Taxonomy">
        </tabs>
      </tier>
      <tier name="Tier2">
        <approvers>
          <alerid>5003</alerid>
        </approvers>
        <tabs>
          <tab name="Architecture">
        </tabs>
      </tier>
    </tiers>
  </communities>
Note:
Tabs that are provided within the Multi-tier configuration of a Community should be the common tabs that exist in all the Asset Types.9.5.5.4 Setting Up an Asset Type for Multi-tier Tab Approval
The following example demonstrates how the tabs of an asset type of "Application" are configured for multi-tier approval.
<assetType name="Application" id="158">
    <allTabs>
      <tab name="Oveview"/>
      <tab name="Application Lifecycle"/>
      <tab name="License Information"/>
      <tab name="Certification Tracking"/>
      <tab name="Taxonomy"/>
      <tab name="Documentation"/>
      <tab name="Relationships"/>
      <tab name="Support"/>
      <tab name="Cost Categories"/>
      <tab name="Ownership"/>
      <tab name="Technology Stack"/>
      <tab name="Operational Information"/>
      <tab name="Miscellaneous"/>
    </allTabs>
    <tiers>
      <!--Please change "_CHANGE_TIER1_NAME_" to the name of the Tier-->
      <!--Example:- "Tier1"-->
      <tier name="Tier1">
        <approvers>
          <alerid>99</alerid>
        </approvers>
        <tabs>
        <!--Please change "_CHANGE_TABNAME_" to the name of the Tab-->
        <!--Example:- "Documentation"-->
          <tab name="Overview">
          <tab name="Taxonomy">
        </tabs>
      </tier>
    </tiers>
9.5.6 Metadata Change Flows
Metadata flows are a group of flows that take one or more actions when a metadata element of an asset changes. The Metadata element that changes will trigger an event that is wired to one or more flows. For instructions on how to wire an event to a flow, see Section 9.5.3, "Wiring Asset Events to Flows".
9.5.6.1 Use Cases
These are some of the use cases where Metadata Change Flows may apply:
-
When the "Asset Lifecycle Stage" metadata element of an asset changes from "Build" to "Release,", you may want to change Custom Access Settings to have more restricted access control to the asset.
-
When the "Name" of an asset changes, you may want to notify the subscribers.
-
When any metadata element of an element changes, you may want the asset to go through a "Change Management" approval process. The "Change Management" will involve the following:
-
Unapprove a tab named "Change Management." The Change Management tab in Asset Editor is shown in Figure 9-39.
Figure 9-39 The Asset Editor Change Management Tab
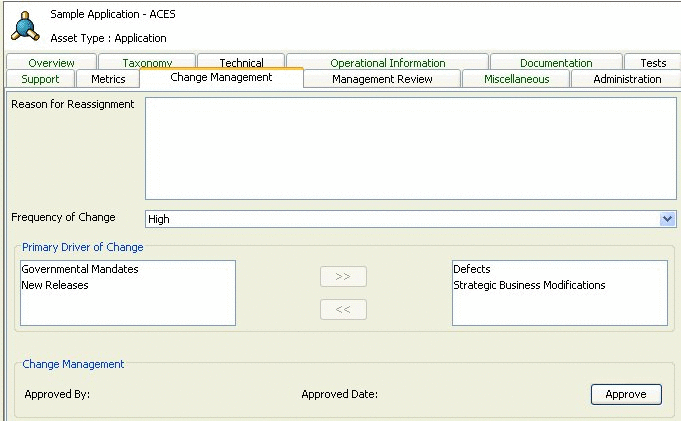
Description of "Figure 9-39 The Asset Editor Change Management Tab"
-
Assign the asset to the registrar
-
Append the kind of change to a field called "Reason for reassignment" to assist the registrar
-
9.5.6.2 Configuring Metadata Change Flows
This section describes the configuring metadata change flows. This section contains the following topics:
-
Section 9.5.6.2.1, "Available Metadata Change Events/States"
-
Section 9.5.6.2.2, "Available Flows That Can Be Wired to Actions"
-
Section 9.5.6.2.4, "Example Metadata Change Configuration That Checks for Metadata Value"
-
Section 9.5.6.2.14, "Invoking Flows Based on Approval of Named Tabs"
9.5.6.2.1 Available Metadata Change Events/States
Following are the states that are available that can be wired to Metadata Change flows.
Note:
Besides these events, any categorization changes can be wired, including the custom categorization.<state name="urn:com:bea:aler:events:type:MetaDataChange:name"> <state name="urn:com:bea:aler:events:type:MetaDataChange:version"> <state name="urn:com:bea:aler:events:type:MetaDataChange:description"> <state name="urn:com:bea:aler:events:type:CategorizationChanged: assetLifecycleStage"/> <state name="urn:com:bea:aler:events:type:CategorizationChanged:classification"> <state name="urn:com:bea:aler:events:type:MetaDataChange:supported"> <state name="urn:com:bea:aler:events:type:MetaDataChange:organizationalOwnership"> <state name="urn:com:bea:aler:events:type:MetaDataChange:usageFee">
For most asset types, the usageFee field is found on the Miscellaneous tab of the Asset Editor.
9.5.6.2.2 Available Flows That Can Be Wired to Actions
These are the pre-defined flows that can be wired to actions. These flow names should appear as content inside the <action> element to indicate that this is the action that should take place when the event occurs. Note that any element other than <action> are parameters used by specific flows.
-
ChangeCAS: applies one or more Custom Access settings to an asset
-
ChangeAssetLifecycle: sets the Asset Lifecycle Stage of an asset
-
ChangeClassification: sets the classification of an asset
-
ReAssignAssetToRegistrar: assigns the asset to Registrar
-
AddCommunityTag: saves the "Community" of an asset to Oracle Enterprise Repository
-
NotifySubscriber: notifies the Subscribers about the Metadata Change
-
NotifyRegistrationActors: notifies the Registrar, Subscribers, Owners, etc., about the Metadata Change
-
NotifyCustomUser: notifies configured custom users about the Metadata Change
-
UnapproveChangeManagementTab: triggers the Change Management process
-
ResetChangeManagementTab: resets the "Reason for reassignment" field in the Change Management tab as soon as the Change Management tab is approved
-
CommunityAccept: invokes the Community Accept Flow used when an asset is submitted
-
CommunityAssign: invokes the Community Assign Flow used when an asset is accepted
-
MultiTier_Tier1_Assign: invokes the Multi-Tier Flow used when an asset is accepted
-
MultiTier_NextTier_Assign: invokes the Multi-Tier Flow used when a tab is approved
-
ApproveTabAction: approves one or more tab
-
UnapproveTabAction: unapproves one or more tab
-
AutoApproveTabAction: approves one or more configured tab based on the role of the submitter
-
AllTabsApproval_Register: invokes the flow to register the asset when all the tabs are approved
-
ReAssignAssetToRegistrar: Assigns the asset to the Registrar for approval. The flow uses the Community Registrar if one is configured. If not, it uses the Global Registrar.
-
ResetFlowState: Resets the State information used by the Timer based flows. This is useful in cases where a Timer flow is tracking the Unsubmitted assets and when the state changes from Unsubmitted to submitted, so the State information can be reset. If not reset, then if the asset goes back to Unsubmitted, the workflows use the same state that was previously set. This is not always desirable and the ResetFlowState action can be used in appropriate events or states to reset the state information.
-
UnRegisterAssetAction: Unregisters the Asset if the asset is in registered state.
-
autoSyncAlerToUddi: Timer-based workflow that moves services from Oracle Enterprise Repository to Oracle Service Registry.
-
autoSyncUddiToAler: Timer-based workflow that moves services from Oracle Service Registry to Oracle Enterprise Repository.
-
PublishAssetToUddi: Moves individual services and their metadata to Oracle Service Registry by wiring the events that get triggered when these services are registered or a lifecycle of a service is changed.
For more information about this workflow, see Section 10.3.1.1, "Invoking the Oracle Registry Repository Exchange Utility Using Workflows".
9.5.6.2.3 Example Metadata Change Configuration
This sample configuration specifies that when an asset is registered, it invokes two flows by the names of "NotifySubscriber" and "ChangeCAS." Note that the element <customAccessSettings> is a parameter to the flow ChangeCAS, which tells the flows the names of the CAS that should be applied.
<state name="urn:com:bea:aler:events:type:AssetRegister">
    <action>NotifySubscriber</action>
    <action>ChangeCAS</action>
    <customAccessSettings>
      <customAccessSetting>MyCAS</customAccessSetting>
      <customAccessSetting>MyCAS2</customAccessSetting>
    </customAccessSettings>
  </state>
  <state name="urn:com:bea:aler:events:type:AssetUnAccept">
    <action>NotifySubscriber</action>
    <action>ChangeClassification</action>
    <classification>Approved</classification>
  </state>
9.5.6.2.4 Example Metadata Change Configuration That Checks for Metadata Value
It is also possible to invoke a flow not only when a metadata element changes, but also when it takes a specific value. For example, when the "Asset Lifecycle Stage" metadata element of an asset changes from "Build" to "Release," you may want to apply one set of Custom Access Settings, where as when the value changes from "Plan" to "Build," you may want to apply a different set. Here is an example:
<state
name="urn:com:bea:aler:events:type:CategorizationChanged:AssetLifecycleStage"
 value="Stage 4 - Release">
    <action>ChangeCAS</action>
    <customAccessSettings>
      <customAccessSetting>MyCAS</customAccessSetting>
    </customAccessSettings>
  </state>
  <state
 name="urn:com:bea:aler:events:type:CategorizationChanged:AssetLifecycleStage"
 value="Stage 3 - Build">
    <action>ChangeCAS</action>
    <customAccessSettings>
      <customAccessSetting>MyCAS2</customAccessSetting>
    </customAccessSettings>
  </state>
9.5.6.2.5 ChangeClassification
Sets the classification of an asset. ChangeClassification uses the following element to set the classification.
<state name="urn:com:bea:aler:events:type:AssetRegister">
    <action>ChangeClassification</action>
    <classification>Approved</classification>
  </state>
9.5.6.2.6 ChangeCAS
Applies one or more Custom Access Settings to an asset. ChangeCAS uses the following element to set the custom access settings.
<state name="urn:com:bea:aler:events:type:AssetRegister">
    <action>ChangeCAS</action>
    <customAccessSettings>
      <customAccessSetting>MyCAS</customAccessSetting>
      <customAccessSetting>MyCAS2</customAccessSetting>
    </customAccessSettings>
  </state>
9.5.6.2.7 ChangeAssetLifecycle
Sets the Asset Lifecycle stage of an asset. ChangeAssetLifeCycle uses the following element to set the asset life cycle.
<state name="urn:com:bea:aler:events:type:AssetRegister">
    <action>ChangeAssetLifeCycle</action>
    <assetLifeCycle>Stage 3 - Build</assetLifeCycle>
  </state>
9.5.6.2.8 ApproveTabAction
The ApproveTabAction flow approves one or more tabs of an asset. The following configuration approves the "Overview" and "Taxonomy" tabs.
<state name=?urn:com:bea:aler:events:type:MetaDataChange:name?>
    <action>ApproveTabAction</action>
    <approveTabs>
      <tab name=?Overview?>
      <tab name=?Taxonomy?>
   </approveTabs>
  </state>
9.5.6.2.9 UnapproveTabAction
The following element configures the list of tabs to be unapproved by the UnapproveTabAction flow.
<state name="urn:com:bea:aler:events:type:MetaDataChange:name">
    <action>UnApproveTabAction</action>
    <unapproveTabs>
      <Tab name="Overview">
      <Tab name="Taxonomy">
    </unapproveTabs>
  </state>
9.5.6.2.10 AutoApproveTabAction
The AutoApproveTabAction flow approves tabs based on the role of the submitter. For example, the following element under <allAssetSettings> configures the list of tabs that need to be automatically approved based on the role of the submitter. The roles that are acceptable are also configured.
<automation>
    <autoRoles>
      <role>admin</role>
      <role>accesAdminstrator</role>
    </autoRoles>
    <autoApprovalTabs>
      <tab name="Documentation"/>
    </autoApprovalTabs>
  </automation>
Here is the configuration for invoking the flow:
<state name="urn:com:bea:aler:events:type:AssetRegister">
    <action>AutoApproveTabAction</action>
  </state>
9.5.6.2.11 UnapproveChangeManagementTab
When any metadata element of an element changes, you may want the asset to go through a "Change Management" approval process, which involves following.
-
Unapprove a tab by name "Change Management." The Change Management tab in Asset Editor is shown in Figure 9-40.
Figure 9-40 The Change Management Tab in Asset Editor

Description of "Figure 9-40 The Change Management Tab in Asset Editor"
-
Assign the asset to the registrar.
-
Append the kind of change to a field called "Reason for reassignment" to assist the registrar
<state name="urn:com:bea:aler:events:type:MetaDataChange:name">
   <action>UnApproveChangeManagementTab</action>
</state>
9.5.6.2.12 ResetChangeManagementTab
This flow resets the "Reason for reassignment" field in the Change Management tab as soon as the Change Management tab is approved.
<state name="urn:com:bea:aler:events:type:AssetTabApproved">
    <action>MultiTier_NextTier_Assign</action>
    <action>ResetChangeManagementTab</action>
</state>
9.5.6.2.13 NotifyCustomUser
Notifies configured custom users about the metadata change. The email addresses of the users are configured inside the <customNotification> element under <allAssetSettings>, as shown below:
<allAssetSettings>
    <notification timerInterval="id">
      <customNotification>
        <emailAddress>[email protected]</emailAddress>
      </customNotification>
    </notification>
9.5.6.2.14 Invoking Flows Based on Approval of Named Tabs
A metadata change flow can be executed based on the approval of a specific tabs, as follows:
<state name="urn:com:bea:aler:events:type:AssetTabApproved" value ="Overview">
    <action>MultiTier_NextTier_Assign</action>    <action>ChangeAssetLifecycle</action>
    <assetLifecycle>Stage 3 - Build</assetLifecycle>
  </state>
9.5.7 Time-based Escalation Flows
The Time-based Escalation flows track assets in various states and notifies all interested parties. The following section explains how to configure the Time-based Escalation flows. There are four different kinds of Time-based Escalation flows and each one can be configured individually, as described in the following sections.
Open the workflow.xml configuration file and locate the <notification> element.
<notification timerInterval="1d">
    <numTimesNotify>10</numTimesNotify>
    <daysBeforeNextNotification>2</daysBeforeNextNotification>
-
The timerInterval element specifies the time interval after which the flows are triggered. In a production environment, this should be set to "1d", which means the flows are triggered once a day. However for testing purposes, you can set it to "1m" or "5m" to trigger the flows every minute or every five minutes. Also, each time this field is changed, the Event Engine needs to be restarted, unlike the other field changes that can be refreshed using the refresh tool.
-
The numTimesNotify element specifies how many times the notifications should be sent by the Time-based Escalation flows.
-
The daysBeforeNextNotification element specifies how many days need to elapse in between the notifications.
Note:
If the timerInterval element is configured in minutes to trigger flows in minute intervals for testing purposes, then the specified interval for daysBeforeNextNotification will also be interpreted in minutes.
Figure 9-41 demonstrates the flow of the Time-based Escalation flows.
Figure 9-41 Time-based Escalation Flowchart
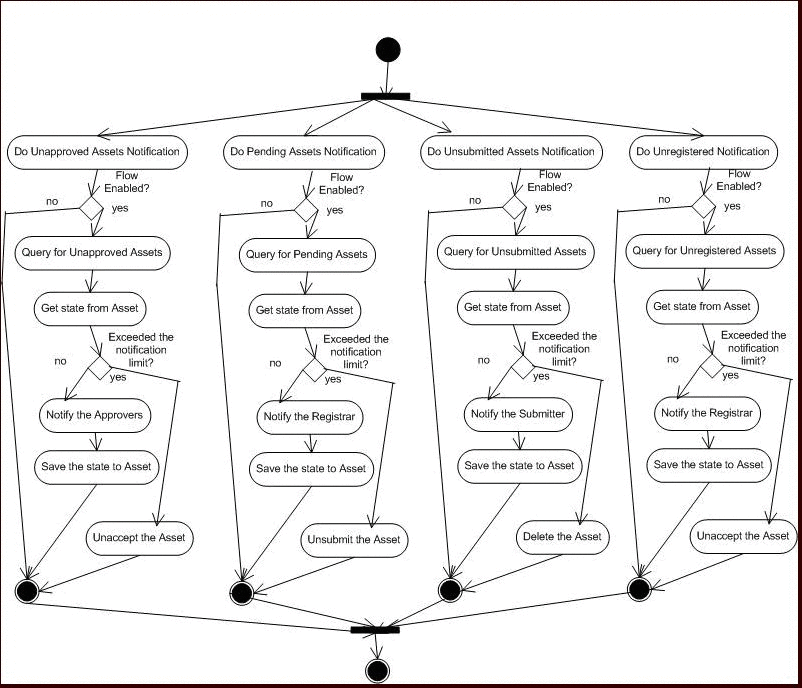
Description of "Figure 9-41 Time-based Escalation Flowchart"
9.5.7.1 Tracking Unsubmitted Assets
This flow tracks assets that are in an "unsubmitted" status and sends notification to the owners to take action.
<owner_resubmit action="false" days="0" regressOnInaction="true" queryOperator="eq"/>
-
action="true" enables the flow and action="false" disables the flow.
-
days="10" tracks the assets that reached unsubmitted status 10 days ago. The Time-based Escalation flows use the current date and subtracts the value from this attribute.
-
regressOnInaction="true" regresses the asset on inaction. For example, unsubmitted assets may be deleted.
-
queryOperator="eq" uses the equals operator when the date is used for querying. Other possible values are "lte", "gte", etc.
9.5.7.2 Tracking Unaccepted Assets
This flow tracks assets that are in an "unaccepted" status and sends notification to the registrar to take action.
<registrar_accept action="false" days="0" regressOnInaction="true" queryOperator="eq"/>
-
action="true" enables the flow and action="false" disables the flow.
-
days="10" tracks the assets that reached unsubmitted status 10 days ago. The Time-based Escalation flows use the current date and subtracts the value from this attribute.
-
regressOnInaction="true" regresses the asset on inaction. For example, submitted assets may be unsubmitted.
-
queryOperator="eq" uses the equals operator when the date is used for querying. Other possible values are "lte", "gte", etc.
9.5.7.3 Tracking Unapproved Assets
This flow tracks assets that are in an "unapproved" status and sends notification to the approvers to take action.
<assignees_approve action="false" days="0" regressOnInaction="true" queryOperator="eq"/>
-
action="true" enables the flow and action="false" disables the flow.
-
days="10" tracks the assets that reached unsubmitted status 10 days ago. The Time-based Escalation flows use the current date and subtracts the value from this attribute.
-
regressOnInaction="true" regresses the asset on inaction. For example, accepted assets may be unaccepted.
-
queryOperator="eq" uses the equals operator when the date is used for querying. Other possible values are "lte", "gte", etc.
9.5.7.4 Tracking Unregistered Assets
This flow tracks the assets that are in an "unregistered" status and sends notification to the approvers to take action.
registrar_register action="false" days="0" regressOnInaction="true"
queryOperator="eq"/>
-
action="true" enables the flow and action="false" disables the flow.
-
days="10" tracks the assets that reached unsubmitted status 10 days ago. The Time-based Escalation flows use the current date and subtracts the value from this attribute.
-
regressOnInaction="true" regresses the asset on inaction. For example, registered assets may be unregistered.
-
queryOperator="eq" uses the equals operator when the date is used for querying. Other possible values are "lte", "gte", etc.
9.5.8 Validation Expiration Flows
The Validation Expiration flows track the expired assets prior to the expiration date, as well as on the date of expiration, and sends warning notifications to all interested parties. After X number of days of expiration, the flows unregister the assets. After Y number of days of expiration, the flows deactivate the assets. After Z number of days of expiration, the flows delete the assets.
<notification timerInterval="1d">
    <numTimesNotify>10</numTimesNotify>
    <daysBeforeNextNotification>2</daysBeforeNextNotification>
-
The timerInterval attribute configures the time interval that the flows are triggered. This should be set to "1d", which means the interval is one day. However for testing, this can be set to "1m" or "5m" to trigger every minute or every 5 minutes. Also, every time this field is changed, the Event Engine needs to be restarted, unlike the other field changes that can be refreshed using the refresh tool.
-
The numTimesNotify element specifies how many times the notifications should be sent by the Validation Expiration flow.
-
The daysBeforeNextNotification element specifies how many days need to elapse in between the notifications.
<expiration>
    <expiration_warning action="false" days="10" owner="false" subscriber="false" contact="99"/>
    <unregister_after_expire action="true" days="10" queryOperator="eq"/>
    <inactive_after_expire action="true" days="10" queryOperator="eq"/>
    <delete_after_expire action="true" days="10" queryOperator="eq"/>
  </expiration>
Figure 9-42 demonstrates the flow of the Validation Expiration flows.
Figure 9-42 Validation Expiration Flowchart
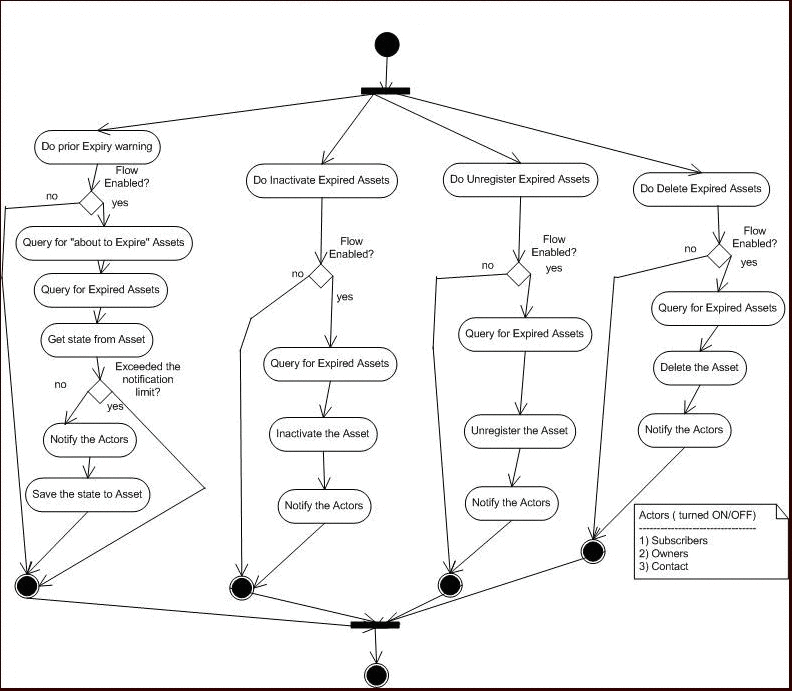
Description of "Figure 9-42 Validation Expiration Flowchart"
To set the expiration date for an asset, specify the date in the Expiration Date (YYYY-MM-DD) field on the Miscellaneous tab of the Asset Editor, as shown in Figure 9-43.
Figure 9-43 The Expiration Date (YYYY-MM-DD) Field on the Asset Editor Miscellaneous Tab

Description of "Figure 9-43 The Expiration Date (YYYY-MM-DD) Field on the Asset Editor Miscellaneous Tab"
9.5.8.1 Asset Expiration Warning Notification
The following line enables the warning notification and determines who should receive the notifications.
<expiration_warning action="false" days="10" owner="false" subscriber="false" contact="99"/
Note:
The days element configures the number of days prior to the expiration that the warning should be sent.9.5.8.2 Unregister Assets After Expiration
The following line enables the Metadata Change flow to unregister the asset after 10 days of expiration.
<unregister_after_expire action="true" days="10" queryOperator="eq"/>
9.5.8.3 Inactivate After Expiration
The following line enables the Metadata Change flow to inactivate the asset after 10 days of expiration.
<inactive_after_expire action="true" days="10" queryOperator="eq"/>
9.5.9 Customizing Email Notification Templates
The Automated Registration Flows automatically send email notifications under many circumstances. There are five new email templates for the new flows. The email templates are stored within Oracle Enterprise Repository and the flows invoke an Oracle Enterprise Repository API by passing name/value pairs that are then substituted by Oracle Enterprise Repository.
Administrators can customize the email subject, body, etc., the same way as other email templates. The following are the templates that are used by the Automated Workflows:
-
Metadata of asset has changed: Notifies the registrar and the users assigned to the asset that the metadata has changed.
-
Registration status unchanged: Notifies the registrar and the users assigned to the asset that the registration status <%asset.reg.status%> has remained unchanged for more than <%action.pending.days%> days.
-
Status of expired asset has changed: Notifies the registrar and the users assigned to the expired asset that the status has changed.
-
Prior to expiration: Notifies the registrar and the users assigned to the asset that it is due for expiration.
-
Asset has been expired: Notifies the registrar and the users assigned to the asset that it has been expired.
For more information about email templates, see Chapter 8, "Configuring Email Notifications and Distribution Lists".
9.5.10 Email Notification Use Cases
This section describes the Email Notification use cases and explains how the following email templates can be triggered:
-
Asset has been expired: Notifies the registrar and the users assigned to the asset that it has been expired.
This email template is triggered whenever the asset gets expired and this email template is created as part of the advanced workflow configuration. To set the expiration date for an asset, specify the date in the Expiration Date (YYYY-MM-DD) field in the Miscellaneous tab of the Asset Editor. There is an element in
workflow.xml, where you can specify what needs to happen once the asset expires. -
Asset regressed: Notifies the registrar and the users assigned to the asset that the asset registration status has remained unchanged for more than
<%action.pending.days%>days.This email template is also created as part of advanced workflow configuration. For example, under
<notification timerInterval="1d">, there is<registrar_accept action="false" days="5" regressOnInaction="true" queryOperator="eq"/>. This flow tracks assets that are in an "accepted" status for the number of days specified and sends notification to the registrar to take action.When regressOnInaction="true", regresses the asset for inaction. For example, the accepted assets may become unaccepted.
-
Asset Used: Notifies the contact specified in the asset Notification Email field that the asset has been used.
This email template is triggered whenever asset is being used in a project. This email template sends notification to the email address specified in Notification Email text field, under the Miscellaneous tab of the asset.
-
Compliance Template Applied: Notifies project leaders when a compliance template has been applied to a project.
This email template is triggered whenever a compliance template type has been assigned to a project. Compliance Template type is part of the arche type for an asset type.
-
Metadata of asset has changed: Notifies the registrar and the users assigned to the asset that the metadata has changed.
This email template is also part of the advanced workflow configuration and is triggered whenever metadata has changed. There are multiple metadata change flows. For more information, see Section 9.5.6, "Metadata Change Flows".
-
New Asset Version Under Development: Notifies subscribers when a new version of an asset is being developed.
This email template notifies subscribers when a new asset version is under development. New version is identified based on the relationship "next version" or "previous version".
-
New Version Registered: Notifies subscribers that a new version of the asset is registered.
This email template notifies subscribers when a new asset version is registered. New version is identified based on the relationship "next version" or "previous. version".
-
Prior to expiration: Notifies the registrar and the users assigned to the asset that it is due for expiration.
This email template is also used with advanced workflow configuration and is triggered when the asset is due for expiration. For example,
<expiration_warning action="false" days="5" owner="false" subscriber="false" contact="[email protected]" queryOperator="eq"/>. -
Registration status unchanged: Notifies the registrar and the users assigned to the asset that the registration status '
<%asset.reg.status%>' has remained unchanged for more than<%action.pending.days%>days.This email template is also used with workflow configuration and is triggered when registration status is not changed for the number of days specified in workflow configuration. For example,
<registrar_register action="false" days="5" regressOnInaction="false" queryOperator="eq"/>. -
Status of expired asset has changed: Notifies the registrar and the users assigned to the expired asset that the status has changed.
This email template is also used with advanced workflow configuration and is triggered when expired asset status gets changed.
-
Usage Reassigned: Notifies the user to whom an asset usage record has been reassigned.
This email template is triggered from couple of places.
From Project Detail:
-
Go to project detail.
-
Click reassign users/usage.
-
Select reassign usage only.
-
Select current or different project.
-
Click Next. The list of users corresponding to that project is displayed.
-
Select a user to whom you want to transfer the usage.
This email template sends notification to the user to whom usage was transferred.
From Edit Project:
-
Click Edit Project.
-
Click Edit Users.
-
Remove the user with usage record. The Assign option to whom the usage can be transferred is displayed.
This email template triggers the notification to the user to whom usage was transferred.
-
9.5.11 Known Issues
This section contains the following known issues in Oracle Enterprise Repository workflow:
-
The
workflow-tools/refresh_workflows.shfile has the path to JDK hard-coded and is invalid. If you are using a different JDK, then you should manually edit the refresh_workflows.sh file to map to that JDK. -
When you modify a file on Windows and save it with an editor that does not understand how to handle CR/NL characters in Unix, then you must run the following command to remove the LF characters from the <file.sh> file:
cat filename.sh | tr -d '\015' > filename.sh.tmp; mv filename.sh.tmp filename.sh
9.6 Configuring JMS Servers for Oracle Enterprise Repository
This section describes how to configure JMS servers for Oracle Enterprise Repository.
This section contains the following topics:
-
Section 9.6.2, "Configuring Connectivity Properties for External JMS Servers"
-
Section 9.6.3, "Configuring the Embedded ActiveMQ JMS Server to Use a Database"
-
Section 9.6.4, "Configuring JMS Servers in an Oracle Enterprise Repository Cluster"
-
Section 9.6.5, "Configuring a JMS Provider In WebSphere 6.1.0.5"
9.6.1 Overview of JMS for the Event Manager
The Event Manager uses an embedded version of Apache ActiveMQ JMS Server that is enabled by default. The embedded JMS Server is configured to run out-of-the-box without any additional configuration. However, if an external JMS server is preferred, such as Oracle's Weblogic Server JMS or IBM WebSphere Application Server, then a number of Oracle Enterprise Repository system settings must be configured.
Note:
When Oracle Enterprise Repository is deployed on WebSphere 6.x, the embedded Apache ActiveMQ JMS Server cannot be used due to conflicts in the classes used by ActiveMQ and Oracle Enterprise Repository. Therefore, WebSphere 6.x customers should use the default JMS implementation that comes with WebSphere 6.x. See Section 9.6.5, "Configuring a JMS Provider In WebSphere 6.1.0.5".9.6.2 Configuring Connectivity Properties for External JMS Servers
Oracle Enterprise Repository's System Settings section allows administrators to configure the basic Oracle Enterprise Repository operation and to enable/disable specific features. The Event Manager's JMS-related settings are under the "Eventing" group under the main "External Integrations" category. For more information about System Settings, see Oracle Fusion Middleware Integration Guide for Oracle Enterprise Repository. Additional "Eventing" properties are described in Section 9.3, "Configuring the Oracle Enterprise Repository Event Manager"
9.6.2.1 Enabling and Configuring an External JMS Server
The internal Apache ActiveMQ JMS Server needs to be disabled in order to configure an external JMS product. You must also configure JNDI and JMS properties for the external JMS.
Note:
These steps are for configuring a single external JMS server. For instructions on configuring multiple JMS servers in a cluster, see Section 9.6.4, "Configuring JMS Servers in an Oracle Enterprise Repository Cluster".-
Click System Settings in the sidebar on the Oracle Enterprise Repository Admin screen.
-
Enter
Eventin the System Settings Search box to view all the Event Manager related settings. -
Disable the internal JMS server property,
cmee.eventframework.embedded.jms.enabled, by clicking False next to the Event Manager Embedded JMS Enable property. This forces the Event Manager to use an external JMS server.Note:
Thecmee.eventframework.embedded.jms.enabledproperty is not visible, by default. To enable this property, enter this property name in the Enable System Setting box, and then click Enable. -
In the
eventing.propertiesfile, configure the required JNDI properties that are :-
JNDI URL:
cmee.eventframework.jndi.provider.urlSpecifies the JNDI URL. For example, t3://localhost:7001.
-
JNDI User Name:
cmee.eventframework.jndi.userSpecifies the JNDI user name.
-
JNDI Password:
cmee.eventframework.jndi.passwordSpecifies the password for the JNDI User Name.
-
JNDI Context Factory:
cmee.eventframework.jndi.context.factorySpecifies the JNDI initial context factory. For example,
weblogic.jndi.WLInitialContextFactory.
Note:
The JNDI properties are not visible, by default. To enable these properties, enter each property name in the Enable System Setting box, and then click Enable. -
-
In the
eventing.propertiesfile, configure the following JMS properties:-
JMS Connection Factory:
cmee.eventframework.jms.connection.factorySpecifies the JMS connection factory to enable JMS clients to create JMS connections. For example,
weblogic.examples.jms.TopicConnectionFactory. -
JMS Topic:
cmee.eventframework.jms.topicSpecifies the JMS topic, which is a publish/subscribe destination type for a JMS server. For example,
weblogic.examples.jms.TopicConnectionFactory.
Note:
The JMS properties are all hidden, by default. To enable these properties, enter each property name in the Enable System Setting box, and then click Enable. -
-
Click Save.
-
Restart Oracle Enterprise Repository for the configuration changes to take effect.
9.6.2.2 Configuring JMS Message Header Properties
Every JMS message contains a standard set of header fields that is included by default and available to message consumers. The Message Expiration and Delivery Mode headers can be configured using the Oracle Enterprise Repository System Settings.
-
Access the "Eventing" System Settings, as described in Section 9.6.2.1, "Enabling and Configuring an External JMS Server".
-
In the
eventing.propertiesfile, configure the JMS message header properties:-
JMS Message Expiration: Sets the JMS message expiration time in seconds. If set, unprocessed events will expire in the specified number of seconds. The default is 0 seconds, which means that messages will never expire. However, some environments have policies that require that JMS messages cannot be stored forever if they are not selected for some reason. Enable this property and set the property value to
cmee.eventframework.jms.expiration. -
JMS Delivery Mode: Sets the JMS message delivery mode to either PERSISTENT or NON-PERSISTENT values. If set to PERSISTENT, the JMS server will write the events to the underlying store. Although more reliable, persisting events to a store can affect performance. The default is PERSISTENT. Enable this property and set the property value to
cmee.eventframework.jms.deliverymode.
-
-
Click Save.
-
Restart Oracle Enterprise Repository for the configuration changes to take effect.
9.6.2.3 Miscellaneous JMS Properties
Note:
You must restart Oracle Enterprise Repository after changing any Eventing property in order for the changes to take effect.The following miscellaneous System Settings can also be configured:
-
Event Manager JMS Subscribers Enabled: If set to False, then the internal JMS subscribers will not be enabled. This is to make sure that the embedded JMS server is started, but an external tool can be used to connect to the embedded server using the given durable subscriber name and the stored events can be cleaned up.
-
JMS Subscribers Client ID: Specifies the JMS durable subscriber ID. For example, ALER_JmsSubscriber. The property name is
cmee.eventframework.jms.subscribers.client.id. -
JMS Producers Client ID: Specifies the JMS producer's client ID. For example, ALER_DeliveryManager. The property name is
cmee.eventframework.jms.producers.client.id. -
Lazy Initialize Event Engine: When enabled, the Event Manager is initialized when an event is produced for the first time. This property should be enabled for either of the following reasons:
-
If there is a large number of events stored by the JMS server and if it is required that these events should not be processed as soon as Oracle Enterprise Repository is started.
-
There are startup issues that occur because of the timing of initializing the embedded JMS server.
The property name is
cmee.eventframework.lazy.load. -
9.6.3 Configuring the Embedded ActiveMQ JMS Server to Use a Database
By default, the ActiveMQ JMS server uses a file-based store to store events. However, you can specify to have events stored in a database. Simply, configure the activemq.xml file in the WEB-INF\classes directory to use your database parameters.
For example:
<persistenceAdapter>
   <journaledJDBC journalLogFiles="5" dataDirectory="../activemq-data"
 dataSource="#oracle-ds" />
   <!-- To use a different datasource, use the following syntax : -->
   <!-- <journaledJDBC journalLogFiles="5" dataDirectory="../activemq-data"
 dataSource="#postgres-ds"/> -->
 <!--  Oracle DataSource Sample Setup  -->
- <bean id="oracle-ds" class="org.apache.commons.dbcp.BasicDataSource"
 destroy-method="close">
  <property name="driverClassName" value="oracle.jdbc.driver.OracleDriver" />
  <property name="url" value="jdbc:oracle:thin:@localhost:1521:AMQDB" />
  <property name="username" value="scott" />
  <property name="password" value="*****" />
  <property name="poolPreparedStatements" value="true" />
  </bean>
9.6.3.1 Configuring JMS Durable Subscribers for Web Service Endpoints
The Event Manager creates one durable subscriber for each Web Service endpoint it encounters in the Subscription Manager XML file. This ensures that events are stored if the endpoints are not online and that they can be reliably delivered once the endpoints are online again. As per the JMS Specification, the durable subscriber name should be unique across the JMS server. The Event Manager gets the durable subscriber name from the name field found in the EndPointEventSubscription.xml file, as shown in this example:
<sub:EventSubscriptionData
 xmlns:sub="http://www.bea.com/infra/events/subscription"
  <sub:eventSubscription>
    <sub:endPoint name="ALBPMEndpoint">
Note:
JMS servers associate the durable subscriber name with the message selectors. Therefore, if the message selector is changed, either a new durable subscriber name should be provided or the existing one should be deleted. You can use the Oracle Enterprise Repository "Event Cleanup" tool, as described in "Cleaning Up Stored Events" on page 7-4. You can also use a JMS-specific tool to accomplish this.9.6.4 Configuring JMS Servers in an Oracle Enterprise Repository Cluster
Note:
For information about configuring Oracle Enterprise Repository in a clustered environment, see Oracle Fusion Middleware Installation Guide for Oracle Enterprise Repository.9.6.4.1 Enabling JMS Clustering Mode
If Oracle Enterprise Repository is deployed on cluster mode, you must enable clustering on each Oracle Enterprise Repository instance regardless of which type of JMS server being used (embedded or external).
-
Click System Settings in the sidebar on the Oracle Enterprise Repository Admin screen.
-
Enter
cmee.eventframework.clustering.enabledin the Enable New System Setting box and click Enable to reveal this hidden property. -
Set the Clustering Enabled property to
True. -
Set other required properties based on the type of JMS server, as described in the following sections.
9.6.4.2 Configuring Embedded JMS Servers for Clustering
In a clustered environment, each member Oracle Enterprise Repository instance in the cluster will have one embedded JMS server. For example, in case of two-node cluster, there are two Oracle Enterprise Repository instances, such as server01 and server02, with each having one embedded JMS server. Once clustering is enabled for the embedded JMS servers, you then need to specify the connection URL information for the embedded JMS servers on server01 and server02.
-
Click System Settings in the sidebar on the Oracle Enterprise Repository Admin screen.
-
Enter
cmee.eventframework.embedded.jms.urlin the Enable New System Setting box and click Enable to reveal this hidden property. -
In the Embedded JMS Server URL property, supply the connection URL for the embedded JMS servers on the clustered Oracle Enterprise Repository servers, using the following format.
failover:(tcp:// $SERVER_DNS_NAME_OR_IP$:61700,tcp://$SERVER_DNS_NAME_OR_IP$:61700, …)
where
$SERVER_DNS_NAME_OR_IP$are replaced by actual server DNS name or IP address. The entries should be repeated for each Oracle Enterprise Repository server in a given cluster.Using the example above, this could be set to: failover:(tcp://server01:61700,tcp://server02:61700)
Caution:
Port 61700 is the default port for the embedded JMS server, and therefore should not be used by any other application on the Oracle Enterprise Repository server unless another port is configured for the embedded JSM server. -
Click Save.
-
Repeat steps 1-4 for each Oracle Enterprise Repository instance in a given cluster. Using the example above, the Embedded Broker URLs could be set to: failover:(tcp://server01:61700,tcp://server02:61700)
Tip:
Ensure that each embedded JMS server is enabled by setting the cmee.eventframework.embedded.jms.enabled property toTrue.
9.6.4.3 Configuring External JMS Servers for Clustering
For external JMS servers, no additional configuration is required. However, you must make sure that the embedded JMS server is disabled, as follows:
-
Click System Settings in the sidebar on the Oracle Enterprise Repository Admin screen.
-
Set the Event Manager Embedded JMS Enable property to
False(i.e.,cmee.eventframework.embedded.jms.enabledisFalse.
9.6.5 Configuring a JMS Provider In WebSphere 6.1.0.5
When Oracle Enterprise Repository is deployed on WebSphere Application Server 6.1.0.5, the embedded Apache ActiveMQ JMS server cannot be used. Therefore, WebSphere 6.1.0.5 implementations must use the default JMS provider that comes with WebSphere 6.1.0.5.
To configure a JMS provider for Oracle Enterprise Repository in WebSphere 6.1.0.5, complete the following steps in the WebSphere administration console and in your Oracle Enterprise Repository application.
-
Create a new Service Integration Bus:
-
In the navigation pane, expand Service Integration, and then click Buses.
-
On the Buses page, click New.
-
On the Create a new bus page, enter
alerbusas the name for the new bus. -
Clear the Bus security option.
-
Click Next, and then click Finish.
-
-
Add a Bus member to the newly created alerbus:
-
On the Buses page, click the alerbus link.
-
Under the Topology category, click Bus members.
-
On the Bus members page, click Add.
-
On the Add a new bus member > Select Server, Cluster or WebSphere MQ server page, accept the default Server option and click Next.
-
On the Add a new bus member > Select the type of message store page, accept the default File store option and click Next.
-
On the Add a new bus member > Provide the message store properties page, accept the default values and click Next.
-
On the Add a new bus member > Confirmation page, click Finish.
-
On the Buses page, click Save.
-
-
Create a JMS Topic Connection Factory in the default message provider:
-
In the navigation pane, expand JMS, and then click JMS providers.
-
Click the Default messaging provider option, with a Scope of Node=<nodename>, server=server1.
-
On the JMS providers > Default messaging provider page, click the Topic connection factories option under Additional Properties.
-
On the JMS providers > Default messaging provider > Topic connection factories page, click New.
-
On the Administration page, configure the topic connection factory as follows:
*) Name: alerEventingTopicCFDefault
*) JNDI name: jms.alerEventingTopicCFDefault
*) Bus name: alerbus
*) Client identifier: ALER_JmsProducer
*) Durable subscription home: <nodename>.server1-alerbus
-
Click Apply, and then click Save.
-
-
Create a JMS Topic in the default message provider:
-
Re-navigate to the JMS providers > Default messaging provider page.
-
Click the Topics option under Additional Properties.
-
On the JMS providers > Default messaging provider > Topics page, click New.
-
On the Administration page, configure the topic as follows:
*) Name:
alerEventingTopicCFDefault*) JNDI name:
jms.alerEventingTopicCFDefault*) Topic name:
alerEventingTopicDefault*) Bus name:
alerbus*) Topic space:
Default.Topic.Space -
Click Apply, and then click Save to save your changes.
-
-
Deploy the
aler.earapplication file, as follows:-
In the navigation pane, expand Applications, and then click Enterprise Applications.
-
On the Enterprise Applications page, click Install.
-
On the Preparing for the application install page, click Browse, specify the aler.ear file in the path, and then click Next.
-
Click Next on the Select installation options page.
-
Click Next on the Map modules to servers page.
-
On the Map resources to resource references page, click Browse in the Target Resource JNDI Name column.
-
On the Enterprise application > Available resources page, select alerEventingTopicCFDefault, and then click Apply.
-
Click Next in the ensuing Map resources to resource references page.
-
On the Map resource environment entry references to resources page, enter jms/aler/alerEventingTopicDefault in Target Resource JNDI Name and then click Next.
-
Click Finish on the Summary page.
-
After the application is installed, click Save to save it to the Master Configuration.
-
-
Follow the "Manually Installing the Oracle Business Process Management Process Engine and Automated Workflows" steps in Oracle Fusion Middleware Installation Guide for Oracle Enterprise Repository to deploy additional files in the web-inf/classes directory and the database drivers required by the Oracle Enterprise Repository application.
-
Configure the Oracle Enterprise Repository eventing.properties file for the WebSphere settings:
-
Navigate to the
<OER Domain>\WEB-INF\classesdirectory. -
Use a text editor to modify the eventing.properties file as follows:
cmee.eventframework.jms.topic=jms.alerEventingTopicDefault
cmee.eventframework.jndi.provider.url=iiop\://localhost:2809
cmee.eventframework.embedded.jms.enabled=false
cmee.eventframework.jndi.context.factory=com.ibm.websphere.naming.WsnIniti
alContextFactory
cmee.eventframework.jms.connection.factory=jms.alerEventingTopicCFDefault
-
Save the file.
-
-
Restart the WebSphere application server to enable the modified settings.
-
Check the WebSphere logs for possible errors:
\WebSphere\AppServer\profiles\AppSrv01\logs\server1
9.7 Monitoring and Managing Events
This section discusses the steps to monitor and manage events in Oracle Enterprise Repository.
This section contains the following topics:
9.7.1 Overview
This section describes how to use the administrative tools that are shipped as part of Oracle Enterprise Repository. The Advanced Registration Flow administrative tools are used to:
-
Monitor events using a command-line interface
-
Clean up the events and unsubscribe the JMS durable subscriber
-
Generate the Workflow Configuration file
-
Refresh the Oracle Business Process Management Engine with the latest Workflow Configuration file
-
Encrypt the passwords stored in the Workflow Configuration and Subscription Manager files
The administrative tools are installed under the following directory:
<ORACLE_HOME>/repositoryXXX/core/workflow-tools
9.7.2 Monitoring Events
The Event Manager has a tool for monitoring the events that are generated by the Event Manager. The tool peeks into the event traffic and prints information, such as the Event Body and Event Properties, as shown in this section.
9.7.2.1 Prerequisites
The following prerequisites apply before starting the monitoring tool:
-
If the default embedded JMS server is used, then Oracle Enterprise Repository needs to be running with the cmee.eventframework.enabled system setting set to true. This is to make sure that the JMS broker that is embedded within Oracle Enterprise Repository is running so that the monitoring tool can connect to it and monitor the events.
-
If an external JMS server is used, then the external JMS Server needs to be running and the JNDI-related eventing.properties that are required to connect to the external JMS server must be configured.
For more information, see Section 9.6.2, "Configuring Connectivity Properties for External JMS Servers".
9.7.2.2 Usage
From a command prompt, run the Event Monitoring tool as follows:
> event_monitor.bat <Path of WEB-INF\classes>
For example, if Oracle Enterprise Repository is deployed to a domain named oerdomain under: D:\bea816\user_projects\domains\oerdomain
Then the <Path of WEB-INF\classes> is: D:\bea816\user_projects\domains\oerdomain\applications\oer\oer-app\WEB-INF\classes.
This path is needed to get the JMS configuration from the eventing.properties file so that the tool can connect to the JMS server.
9.7.3 Cleaning Up Stored Events
Sometimes it may be required to remove all the events that are stored by the Event Engine and also unsubscribe the durable subscription. The Event Cleanup tool can be used for this purpose.
9.7.3.1 Prerequisites
The following prerequisites apply before starting this tool:
-
Set the Oracle Enterprise Repository
cmee.eventframework.jms.subscribers.enabledsystem setting tofalseso that the Oracle Enterprise Repository Event Manager does not start the durable subscriber because this is unsubscribed by the Clean Event tool. -
Restart Oracle Enterprise Repository with the
cmee.eventframework.jms.subscribers.enabledproperty set tofalse.
9.7.3.2 Usage
From a command prompt, run the Event Cleanup tool as follows:
> event_clean.bat <Path of WEB-INF\classes> <Name of Durable Subscriber> <Message Selector>
For example, if Oracle Enterprise Repository is deployed to a domain named oerdomain under: D:\bea816\user_projects\domains\oerdomain
Then the <Path of WEB-INF\classes> is: D:\bea816\user_projects\domains\oerdomain\applications\oer\oer-app\WEB-INF\classes.
This path is needed to get the JMS configuration from eventing.properties so that the tool can connect to the JMS Server.
The <Name of Durable Subscriber> can be found in the name attribute inside the endpoint that requires event cleanup within the EndPointEventSubscription.xml as follows:
<sub:eventSubscription>
  <!--The name should be unique within this file since
<sub:endPoint name="ALBPMEndpoint">
The <Message Selector> can be found in the expression attribute inside the endpoint that requires cleanup within the EndPointEventSubscription.xml file.
Note:
The parameter can be omitted if the Message selector is not set or empty.9.7.3.3 Sample Event Cleanup
Using the example above, navigate to the workflow-tools directory:
> cd D:\bea816\repositoryXXX\core\workflow-tools>
From the command prompt, type:
> event_clean.bat D:\aler\alerbuild2\aler-app\WEB-INF\classes ALBPMEndpoint
The following is the output printed by the Event Cleanup tool to the console.
9.7.4 Configuring Workflow
The Generate Workflow Config tool is used to generate the Workflow Configuration file (workflow.xml) by connecting to Oracle Enterprise Repository. The tool populates the workflow.xml with configuration for asset types, categorizations, etc. by reading these entities from Oracle Enterprise Repository. The Workflow Config file can then be customized as per your requirements. For example, you may need to configure and customize flows to add new asset types, projects, categorizations, etc.
For more information about configuring Automated Workflows, see Section 9.5, "Configuring Automated Workflows".
From a command prompt, run the Generate Workflow Config tool as follows:
> config_gen.bat URI User Password ConfigDir
where
URI = OER URI (for example: http://localhost:7001/alerbuild/services/FlashlineRegistry)
User = OER user name
Password = OER password
ConfigDir = the directory where the Config XML file is created. If the file exists, it is renamed to workflow.xml.bak.
Figure 9-46 Generate Workflow Configuration Tool
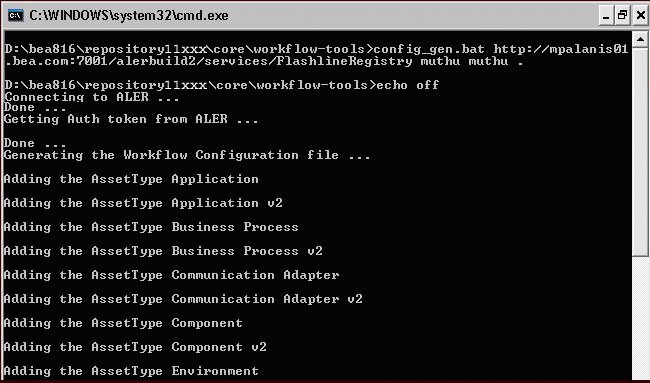
Description of "Figure 9-46 Generate Workflow Configuration Tool"
The workflow.xml file needs to be generated to the following directory:
<OER Enterprise Edition Path>/server/<OER Workflows Project>/workflow.xml
9.7.4.1 Refreshing the Workflow Config File
The Refresh Workflow Config XML tool lets you to refresh a Workflow Config file without restarting the Oracle Business Process Management Engine. For example, if the Workflow Config XML file is updated during development, running this tool allows the Oracle Business Process Management Engine to use the updated version without restarting the engine.
Note:
The Oracle Business Process Management Engine must be running when running this tool.From a command prompt, run the Refresh Workflow Configuration tool as follows:
> refresh_workflows.bat URI User Password
where
URI = Oracle Business Process Managment URI (for example, http://localhost:9000/fuegoServices/ws/RefreshConfigServiceListener)
User = Oracle Business Process Managment user name (for example, aler_workflow_user)
Password = Oracle Business Process Managment password (for example, aler_workflow_pass)
Note:
aler_workflow_user is created by Oracle Products Installer and is the default user that can be used with this tool.Figure 9-47 Refresh Workflow Configuration Tool

Description of "Figure 9-47 Refresh Workflow Configuration Tool"
9.7.5 Encrypting Your Passwords
For enhanced security, the Security Encrypt Password tool (runWfSecurity.bat) allows you to encrypt passwords that are stored in the Workflow Configuration and Subscription Service files.
From a command prompt, run the Security Encrypt Password tool as follows:
> runWfSecurity.bat srcFileName destFileName
where
srcFileName = source config file with clear password.
destFileName = destination config file with encrypted password.
Figure 9-48 Security Encrypt Password Tool
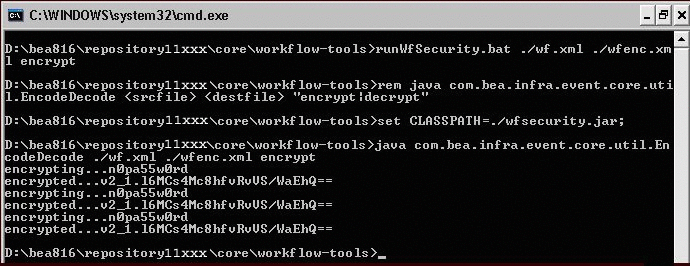
Description of "Figure 9-48 Security Encrypt Password Tool"
9.8 Extending the Event Manager for Web Service Endpoints
This section describes how to extend the event manager for Web Service endpoints.
This section contains the following topics:
9.8.1 Overview
This section explains how to develop a new Web Service endpoint to consume the events that are emitted by the Event Manager and also explains how to extend the Event Manager to use other notifier plug-ins.For information about configuring the Event Manager, see Chapter 9, "Configuring the Oracle Enterprise Repository Event Manager".
9.8.2 Developing a Web Service Endpoint
Figure 9-49 shows how a Web Service endpoint can be plugged-in to receive the Events emitted by the Oracle Enterprise Repository Event Manager.
Perform the following steps to create a new Web Service endpoint and start getting events:
-
Pick up the WSDL contract defined by the Event Manager. This is bundled with the
eventNotifier.jarfile located in the<oer Webapp path>/WEB-INF/libdirectory. -
Open the jar file and locate a WSDL named "EventListener.WSDL" and extract the WSDL to the file system. This WSDL is the abstract contract defined by the Event Manager and the new Web Service endpoint needs to implement the operation defined in the WSDL.
Figure 9-50 shows a snapshot of the WSDL file:
-
Complete the Web Service endpoint development using the tool or technology, as per the requirement. For example, you could develop a Proxy Service using Oracle Service Bus, which provides a feature where you can create a Web Service-based proxy service by pointing to a WSDL file. Make the Web Service running by completing the development of the Web Service.
-
Configure the Event Manager so that the Web Service endpoint's host, port, and URI, etc., are entered in the Subscription Manager file. For more information about configuring the Event Manager, see Chapter 9, "Configuring the Oracle Enterprise Repository Event Manager".
-
Start Oracle Enterprise Repository and trigger events using the Asset Editor and the Web Service endpoint will start getting the Events.
-
You can use the Event Monitoring tool that is bundled with Oracle Enterprise Repository for debugging and monitoring the Events that are generated by the Event Manager.
9.8.3 Web Service Operations
This section describes the available operation for a new Web Service endpoint, and how to specify operations in the Event Manager.
9.8.3.1 Available Web Service Operations
The Oracle Enterprise Repository Event Manager supports the following operations:
This operation takes the event object that is defined in the XML schema section as an input and returns the status as the output. The status is defined as string type. Additionally, if the status string starts with Failure, then the Event Manager will throw an exception and will try to re-deliver the event until it succeeds. If not, it will log the response and will deliver the next event unless there is a transport exception.
newEventRequestResponseString
This operation takes the event data in string form as an input and returns the status as the output. The status is defined as string type. Additionally, if the status string starts with Failure, then the Event Manager will throw an exception and will try to re-deliver the event until it succeeds. If not, it will log the response and will deliver the next event unless there is a transport exception.
newEventRequest
This operation takes the event object that is defined in the XML schema section as an input and is defined as a one-way operation.
newEventRequestString
This operation takes the event data in string form as an input and is defined as a one-way operation.
newEvent
This operation should be used only if the Process Engine is Oracle Business Process Management. This operation internally invokes the startSession operation to start session to authenticate with Oracle Business Process Management. It will also call discardSession after the invocation.
9.8.3.2 Selecting a Web Service Operation
The preferred Web Service operation can be selected by configuring the Event Manager's Subscription Manager the following way, as specified in the operationName element.
<sub:EventSubscriptionData
 xmlns:sub="http://www.bea.com/infra/events/subscription"
 xmlns:xsi="http://www.w3.org/2001/XMLSchema-instance">
  <sub:eventSubscription>
    <sub:endPoint name="ALBPMEndpoint3">
      <sub:host>localhostt>
      <sub:port>9000</sub:port>
      <sub:uri>fuegoServices/ws/StatusChangeEnpointServiceListener</sub:uri>
      <sub:targetNamespace>http://www.bea.com/infra/events</sub:targetNamespace>
      <sub:operationName>newEvent</sub:operationName>
      <sub:authenticationData>
        <sub:basicAuthentication>
          <sub:username>admin</sub:username>
          <sub:password>*****</sub:password>
        </sub:basicAuthentication>
      </sub:authenticationData>
    </sub:endPoint>

<sub:notifierClass>com.bea.infra.event.notifier.plugin.http.DefaultHTTPEventNotif
ier    </sub:notifierClass>
    <sub:expression></sub:expression>
  </sub:eventSubscription>
</sub:EventSubscriptionData>
9.8.3.3 Developing a Notifier Plug-in
The Oracle Enterprise Repository Event Manager includes a default SOAP/HTTP notifier. A new plug-in can be developed and plugged in if there are additional requirements, as shown in Figure 9-51.
Follow these steps to make the new plug-in work with the Event Manager.
-
Develop a new Notifier Plug-in by extending the Java Class AbstractEventNotifier that is bundled with the Oracle Enterprise Repository Event Manager. This class is bundled with the eventNotifier.jar located in the <oer Webapp path>/WEB-INF/lib directory. The init() and sendNotification() methods need to be overridden. Refer to the Javadoc for more information about these methods. The handle() method passes the event data in an XML Beans format, which can be used to send it to an external Web Service.
-
Configure the Subscription Manager file to point to the developed class. Modify the notifierClass element as follows:
<sub:EventSubscriptionData xmlns:sub="http://www.bea.com/infra/events/subscription" xmlns:xsi="http://www.w3.org/2001/XMLSchema-instance"> <sub:eventSubscription> <sub:endPoint name="ALBPMEndpoint3"> <sub:host>localhost</sub:host> <sub:port>9000</sub:port> <sub:uri>albpmServices/aler_engine/ws/StatusChangeEndpointServiceListener</sub:uri> <sub:targetNamespace>StuatusChangeEndpoint</sub:targetNamespace> <sub:operationName>newEvent</sub:operationName> <sub:authenticationData> <sub:basicAuthentication> <sub:username>admin</sub:username> <sub:password>*****</sub:password> </sub:basicAuthentication> </sub:authenticationData> </sub:endPoint> <sub:notifierClass>com.bea.infra.event.notifier.plugin.http.DefaultHTTPEventNo tifier</sub:notifierClass> <sub:expression>id > 500</sub:expression> </sub:eventSubscription> </sub:EventSubscriptionData> -
Bundle the classes in a JAR file and copy it to <oer Webapp path>/WEB-INF/lib directory so that it is picked up by the classpath.
-
Restart the Event Manager and trigger an event using the Asset Editor.
-
The Event Manager will call the init() and handle() methods of the new notifier plug-in.
9.8.4 Developing an Endpoint with an Incompatible Contract
It is possible that there may be an endpoint with an Interface or Contract that is not compatible with Oracle Enterprise Repository Event Manager. This is because the tool that is used to develop the endpoint may have restrictions to use the WSDL provided by Oracle Enterprise Repository Event Manager, or there may be other inter-operability issues. The following approach can be used under those circumstances:
-
Develop an event notifier plug-in to receive the event XML data and register with the Subscription Manager.
-
Write the code in the new notifier plug-in that transforms the event data into the format that the remote Web Service expects.
-
Invoke the remote Web Service by whatever API is supported by the remote endpoint.
