61 Sending and Receiving Messages using the User Messaging Service Java API
This chapter describes how to use the User Messaging Service (UMS) client API to develop applications. This API serves as a programmatic entry point for Fusion Middleware application developers to incorporate messaging features within their enterprise applications.
Because the API provides a plain old java (POJO/POJI) programming model, this eliminates the needs for application developers to package and implement various Java EE modules (such as an EJB module) in an application to access UMS features. This reduces application development time because developers can create applications to run in a Java EE container without performing any additional packaging of modules, or obtaining specialized tools to perform such packaging tasks.
Consumers of the UMS Java API are not required to use any Java EE mechanism such as environment entries or other Java EE deployment descriptor artifacts. Besides the overhead involved in maintaining Java EE descriptors, many client applications already have a configuration framework that does not rely on Java EE descriptors.
This chapter includes the following sections:
-
Section 61.2, "Creating a UMS Client Instance and Specifying Runtime Parameters"
-
Section 61.9, "Using the UMS Client API to Build a Client Application"
-
Section 61.10, "Using the UMS Client API to Build a Client Echo Application"
-
Section 61.11, "Creating a New Application Server Connection"
Note:
To learn more about the code samples for Oracle User Messaging Service, or to run the samples yourself, refer to the Oracle Technology Network code sample page at the following URL:https://codesamples.samplecode.oracle.com/
Once you have navigated to this page, you can find code samples for Oracle User Messaging Service by entering the search term "UMS" and clicking Search.
61.1 Introduction to the UMS Java API
The UMS Java API is exposed as a POJO/POJI API. Consumers of the API can get an instance of a MessagingClient object using a factory method. The consumers do not need to deploy any EJB or other Java EE modules in their applications, but must ensure that the UMS libraries are available in an application' s runtime class path. The deployment is as a shared library, "oracle.sdp.messaging".
The UMS Java API consists of packages grouped as follows:
-
Common and Client Packages
-
oracle.sdp.messaging -
oracle.sdp.messaging.filter: A MessageFilter is used by an application to exercise greater control over what messages are delivered to it.
-
The samples with source code are available on Oracle Technology Network (OTN).
61.2 Creating a UMS Client Instance and Specifying Runtime Parameters
This section describes the requirements for creating a UMS Client. You can create a MessagingClient instance by using the code in the MessagingClientFactory class. Specifically, use the MessagingClientFactory.createMessagingClient() method to create the instance.
Client applications can specify a set of parameters at runtime when instantiating a client object. For example, you configure a MessagingClient instance by specifying parameters as a map of key-value pairs in a java.util.Map<String, Object>. Among other things, the configuration parameters serve to identify the client application, point to the UMS server, and establish security credentials. Client applications are responsible for storing and loading the configuration parameters using any available mechanism.
Table 61-1 lists some configuration parameters that may be set for the Java API. In typical use cases, most of the parameters do not need to be provided and the API implementation uses sensible default values.
Table 61-1 Configuration Parameters Specified at Runtime
| Parameter | Notes |
|---|---|
|
|
Optional. By default, the client is identified by its deployment name. This identifier can be overridden by specifying a value for key |
|
|
Optional. Only required for certain clustered use cases or to take advantage of session-based routing. |
|
|
Optional. By default, the client's resources are available to any application with the same application name and any security principal. This behavior can be overridden by specifying a value for key |
|
|
Optional. When listeners are used to receive messages or statuses asynchronously, the number of listener worker threads can be controlled by specifying values for the MessagingConstants. |
|
|
Optional. When receiving messages, you can control the reliability mode by specifying values for the |
A MessagingClient cannot be reconfigured after it is instantiated. Instead, a new instance of the MessagingClient class must be created using the new configuration.
To release resources used by the MessagingClient instance when it is no longer needed, call MessagingClientFactory.remove(client) . If you do not call this method, some resources such as worker threads and JMS listeners may remain active.
Example 61-1 shows code for creating a MessagingClient instance using the programmatic approach:
Example 61-1 Programmatic Approach to Creating a MessagingClient Instance
Map<String, Object> params = new HashMap<String, Object>();
// params.put(key, value);  // if optional parameters need to be specified.
MessagingClient messagingClient = MessagingClientFactory.createMessagingClient(params);
A MessagingClient cannot be reconfigured after it is instantiated. Instead, you must create a new instance of the MessagingClient class using the desired configuration.
61.3 Sending a Message
The client application can create a message object using the MessagingFactory class of oracle.sdp.messaging. MessagingFactory is a factory class to create various messaging objects. (You can use other methods in this class to create Addresses, AccessPoints, MessageFilters, and MessageQueries. See the Javadoc for these methods).
The client application can then send the message. The API returns a String identifier that the client application can later use to retrieve message delivery status. The status returned is the latest known status based on UMS internal processing and delivery notifications received from external gateways.
The types of messages that can be created include plaintext messages, multipart messages that can consist of text/plain and text/html parts, and messages that include the creation of delivery channel (DeliveryType) specific payloads in a single message for recipients with different delivery types.
61.3.1 Creating a Message
This section describes the various types of messages that can be created.
61.3.1.1 Creating a Plaintext Message
Example 61-2 shows how to create a plaintext message using the UMS Java API.
61.3.1.2 Creating a Multipart/Alternative Message (with Text/Plain and Text/HTML Parts)
Example 61-3 shows how to create a multipart or alternative message using the UMS Java API.
Example 61-3 Creating a Multipart or Alternative Message Using the UMS Java API
Message message = MessagingFactory.createMessage();
MimeMultipart mp = new MimeMultipart("alternative");
MimeBodyPart mp_partPlain = new MimeBodyPart();
mp_partPlain.setContent("This is a Plain Text part.", "text/plain");
mp.addBodyPart(mp_partPlain);
MimeBodyPart mp_partRich = new MimeBodyPart();
mp_partRich
        .setContent(
                "<html><head></head><body><b><i>This is an HTML part.</i></b></body></html>",
                "text/html");
mp.addBodyPart(mp_partRich);
message.setContent(mp, "multipart/alternative");
61.3.1.3 Creating Delivery Channel-Specific Payloads in a Single Message for Recipients with Different Delivery Types
When sending a message to a destination address, there could be multiple channels involved. Oracle UMS application developers are required to specify the correct multipart format for each channel.
Example 61-4 shows how to create delivery channel (DeliveryType) specific payloads in a single message for recipients with different delivery types.
Each top-level part of a multiple payload multipart/alternative message should contain one or more values of this header. The value of this header should be the name of a valid delivery type. Refer to the available values for DeliveryType in the enum DeliveryType.
Example 61-4 Creating Delivery Channel-specific Payloads in a Single Message for Recipients with Different Delivery Types
Message message = MessagingFactory.createMessage();

// create a top-level multipart/alternative MimeMultipart object.
MimeMultipart mp = new MimeMultipart("alternative");

// create first part for SMS payload content.
MimeBodyPart part1 = new MimeBodyPart();
part1.setContent("Text content for SMS.", "text/plain");

part1.setHeader(Message.HEADER_NS_PAYLOAD_PART_DELIVERY_TYPE, "SMS");

// add first part
mp.addBodyPart(part1);

// create second part for EMAIL and IM payload content.
MimeBodyPart part2 = new MimeBodyPart();
MimeMultipart part2_mp = new MimeMultipart("alternative");
MimeBodyPart part2_mp_partPlain = new MimeBodyPart();
part2_mp_partPlain.setContent("Text content for EMAIL/IM.", "text/plain");
part2_mp.addBodyPart(part2_mp_partPlain);
MimeBodyPart part2_mp_partRich = new MimeBodyPart();
part2_mp_partRich.setContent("<html><head></head><body><b><i>" + "HTML content for EMAIL/IM." +
"</i></b></body></html>", "text/html");
part2_mp.addBodyPart(part2_mp_partRich);
part2.setContent(part2_mp, "multipart/alternative");

part2.addHeader(Message.HEADER_NS_PAYLOAD_PART_DELIVERY_TYPE, "EMAIL");
part2.addHeader(Message.HEADER_NS_PAYLOAD_PART_DELIVERY_TYPE, "IM");

// add second part
mp.addBodyPart(part2);

// set the content of the message
message.setContent(mp, "multipart/alternative");

// set the MultiplePayload flag to true
message.setMultiplePayload(true);
61.3.2 API Reference for Class MessagingFactory
The API reference for class MessagingFactory can be accessed from the Javadoc.
61.3.3 API Reference for Interface Message
The API reference for interface Message can be accessed from the Javadoc.
61.3.4 API Reference for Enum DeliveryType
The API reference for enum DeliveryType can be accessed from the Javadoc.
61.3.5 Addressing a Message
This section describes type of addresses and how to create address objects.
61.3.5.1 Types of Addresses
There are two types of addresses, device addresses and user addresses. A device address can be of various types, such as email addresses, instant messaging addresses, and telephone numbers. User addresses are user IDs in a user repository.
61.3.5.2 Creating Address Objects
You can address senders and recipients of messages by using the class MessagingFactory to create Address objects defined by the Address interface.
61.3.5.2.1 Creating a Single Address Object
Example 61-5 shows code for creating a single Address object:
Example 61-5 Creating a Single Address Object
Address recipient = MessagingFactory.createAddress("Email:[email protected]");
61.3.5.2.2 Creating Multiple Address Objects in a Batch
Example 61-6 shows code for creating multiple Address objects in a batch:
Example 61-6 Creating Multiple Address Objects in a Batch
String[] recipientsStr = {"Email:[email protected]", "IM:jabber|[email protected]"};
Address[] recipients = MessagingFactory.createAddress(recipientsStr);
61.3.5.2.3 Adding Sender or Recipient Addresses to a Message
Example 61-7 shows code for adding sender or recipient addresses to a message:
Example 61-7 Adding Sender or Recipient Addresses to a Message
Address sender = MessagingFactory.createAddress("Email:[email protected]");
Address recipient = MessagingFactory.createAddress("Email:[email protected]");
message.addSender(sender);
message.addRecipient(recipient);
61.3.5.3 Creating a Recipient with a Failover Address
Example 61-8 shows code for creating a recipient with a failover address:
Example 61-8 Creating a Single Address Object with Failover
String recipientWithFailoverStr = "Email:[email protected], IM:jabber|[email protected]";
Address recipient = MessagingFactory.createAddress(recipientWithFailoverStr);
61.4 Retrieving Message Status
After sending a message, you can use Oracle UMS to retrieve the message status either synchronously or asynchronously.
61.4.1 Synchronous Retrieval of Message Status
To perform a synchronous retrieval of current status, use the following flow from the MessagingClient API:
String messageId = messagingClient.send(message);
Status[] statuses = messagingClient.getStatus(messageId);
or,
Status[] statuses = messagingClient.getStatus(messageId, address[]) --- where
 address[] is an array of one or more of the recipients set in the message.
61.4.2 Asynchronous Receiving of Message Status
When asynchronously receiving status, the client application specifies a Listener object and an optional correlator object. When incoming status arrives, the listener' s onStatus callback is invoked. The originally-specified correlator object is also passed to the callback method.
61.4.2.1 Creating a Listener Programmatically
Listeners are purely programmatic. You create a listener by implementing the oracle.sdp.messaging.Listener interface. You can implement it as any concrete class - one of your existing classes, a new class, or an anonymous or inner class.
The following code example shows how to implement a status listener:
import oracle.sdp.messaging.Listener;

    public class StatusListener implements Listener {

      @Override
      public void onMessage(Message message, Serializable correlator) {
      }
      @Override
      public void onStatus(Status status, Serializable correlator) {
          System.out.println("Received Status: " + status + " with optional correlator: " +

correlator);
      }
    }
You pass a reference to the Listener object to the setStatusListener or send methods, as described in "Default Status Listener" and "Per Message Status Listener". When a status arrives for your message, the UMS infrastructure invokes the Listener's onStatus method as appropriate.
61.4.2.2 Default Status Listener
The client application typically sets a default status listener (Example 61-9). When the client application sends a message, delivery status callbacks for the message invoke the default listener's onStatus method.
61.4.2.3 Per Message Status Listener
In this approach, the client application sends a message and specifies a Listener object and an optional correlator object (Example 61-10). When delivery status callbacks are available for that message, the specified listener's onStatus method is invoked. The originally-specified correlator object is also passed to the callback method.
61.5 Receiving a Message
This section describes how an application receives messages. To receive a message you must first register an access point. From the application perspective there are two modes for receiving a message, synchronous and asynchronous.
61.5.1 Registering an Access Point
The client application can create and register an access point, specifying that it wants to receive incoming messages sent to a particular address. Since the client application has not specified any message listeners, any received messages are held by UMS. The client application can then invoke the receive method to fetch the pending messages. When receiving messages without specifying an access point, the application receives messages for any of the access points that it has registered. Otherwise, if an access point is specified, the application receives messages sent to that access point.
AccessPoint represents one or more device addresses to receive incoming messages. An application that wants to receive incoming messages must register one or more access points that represent the recipient addresses of the messages. The server matches the recipient address of an incoming message against the set of registered access points, and routes the incoming message to the application that registered the matching access point.
You can use MessagingFactory.createAccessPoint to create an access point and MessagingClient.registerAccessPoint to register it for receiving messages.
To register an SMS access point for the number 9000:
AccessPoint accessPointSingleAddress =
 MessagingFactory.createAccessPoint(AccessPoint.AccessPointType.SINGLE_ADDRESS,
 DeliveryType.SMS, "9000");
messagingClient.registerAccessPoint(accessPointSingleAddress);
To register SMS access points in the number range 9000 to 9999:
AccessPoint accessPointRangeAddress =
 MessagingFactory.createAccessPoint(AccessPoint.AccessPointType.NUMBER_RANGE,
 DeliveryType.SMS,"9000,9999");
messagingClient.registerAccessPoint(accessPointRangeAddress);
61.5.2 Synchronous Receiving
Receive is a non-blocking operation. If there are no pending messages for the application or access point, the call returns immediately with an empty list. Receive is not guaranteed to return all available messages, but may return only a subset of available messages for efficiency reasons.
You can use the method MessagingClient.receive to synchronously receive messages. This is a convenient polling method for light-weight clients that do not want the configuration overhead associated with receiving messages asynchronously. This method returns a list of messages that are immediately available in the application inbound queue.
It performs a nonblocking call, so if no message is currently available, the method returns null.
Note:
A single invocation does not guarantee retrieval of all available messages. You must poll to ensure receiving all available messages.61.5.3 Asynchronous Receiving
When asynchronously receiving messages, the client application registers an access point and specifies a Listener object and an optional correlator object. When incoming messages arrive at the specified access point address, the listener' s onMessage callback is invoked. The originally-specified correlator object is also passed to the callback method.
61.5.3.1 Creating a Listener Programmatically
Listeners are purely programmatic. You create a listener by implementing the oracle.sdp.messaging.Listener interface. You can implement it as any concrete class - one of your existing classes, a new class, or an anonymous or inner class.
The following code example shows how to implement a message listener:
import oracle.sdp.messaging.Listener;

    public class MyListener implements Listener {

      @Override
      public void onMessage(Message message, Serializable correlator) {
          System.out.println("Received Message: " + message + " with optional correlator: " +
correlator);
      }
      @Override
      public void onStatus(Status status, Serializable correlator) {
          System.out.println("Received Status: " + status + " with optional correlator: " +
correlator);
      }

    }
You pass a reference to the Listener object to the setMessageListener or registerAccessPoint methods, as described in "Default Message Listener" and "Per Access Point Message Listener". When a message arrives for your application, the UMS infrastructure invokes the Listener's onMessage method.
61.5.3.2 Default Message Listener
The client application typically sets a default message listener (Example 61-11). This listener is invoked for any delivery statuses for messages sent by this client application that do not have an associated listener. When Oracle UMS receives messages addressed to any access points registered by this client application, it invokes the onMessage callback for the client application's default listener.
To remove a default listener, call this method with a null argument.
See the sample application usermessagingsample-echo for detailed instructions on asynchronous receiving.
61.5.3.3 Per Access Point Message Listener
The client application can also register an access point and specify a Listener object and an optional correlator object (Example 61-12). When incoming messages arrive at the specified access point address, the specified listener' s onMessage method is invoked. The originally-specified correlator object is also passed to the callback method.
61.5.4 Message Filtering
A MessageFilter is used by an application to exercise greater control over what messages are delivered to it. A MessageFilter contains a matching criterion and an action. An application can register a series of message filters; they are applied in order against an incoming (received) message; if the criterion matches the message, the action is taken. For example, an application can use MessageFilters to implement necessary blacklists, by rejecting all messages from a given sender address.
You can use MessagingFactory.createMessageFilter to create a message filter, and MessagingClient.registerMessageFilter to register it. The filter is added to the end of the current filter chain for the application. When a message is received, it is passed through the filter chain in order; if the message matches a filter's criterion, the filter's action is taken immediately. If no filters match the message, the default action is to accept the message and deliver it to the application.For example, to reject a message with the subject "spam":
MessageFilter subjectFilter = MessagingFactory.createMessageFilter("spam",
 MessageFilter.FieldType.SUBJECT, null, MessageFilter.Action.REJECT);
messagingClient.registerMessageFilter(subjectFilter);
To reject messages from email address [email protected]:
MessageFilter senderFilter =
 MessagingFactory.createBlacklistFilter("[email protected]");
messagingClient.registerMessageFilter(senderFilter);
61.6 Configuring for a Cluster Environment
The API supports an environment where client applications and the UMS server are deployed in a cluster environment. For a clustered deployment to function as expected, client applications must be configured correctly. The following rules apply:
-
Two client applications are considered to be instances of the same application if they use the same
ApplicationNameconfiguration parameter. Typically this parameter is synthesized by the API implementation and does not need to be populated by the application developer. -
Instances of the same application share most of their configuration, and artifacts such as
AccessPoints and Message Filters that are registered by one instance are shared by all instances. -
The
ApplicationInstanceNameconfiguration parameter enables you to distinguish instances from one another. Typically this parameter is synthesized by the API implementation and does not need to be populated by the application developer. Refer to the Javadoc for cases in which this value must be populated. -
Application sessions are instance-specific. You can set the session flag on a message to ensure that any reply is received by the instance that sent the message.
-
Listener correlators are instance-specific. If two different instances of an application register listeners and supply different correlators, then when instance A' s listener is invoked, correlator A is supplied; when instance B' s listener is invoked, correlator B is supplied.
61.7 Configuring Security
Client applications may need to specify one or more additional configuration parameters (described in Table 61-1) in order to establish a secure listener.
61.8 Threading Model
Client applications that use the UMS Java API are usually multithreaded. Typical scenarios include a pool of EJB instances, each of which uses a MessagingClient instance; and a servlet instance that is serviced by multiple threads in a web container. The UMS Java API supports the following thread model:
-
Each call to
MessagingClientFactory.createMessagingClientreturns a newMessagingClientinstance. -
When two
MessagingClientinstances are created by passing parameter maps that are equal toMessagingClientFactory.createMessagingClient, they are instances of the same client. Instances created by passing different parameter maps are instances of separate clients. -
An instance of
MessagingClientis not thread safe when it has been obtained usingMessagingClientFactory.createMessagingClient. Client applications must ensure that a given instance is used by only one thread at a time. They may do so by ensuring that an instance is only visible to one thread at a time, or by synchronizing access to theMessagingClientinstance. -
Two instances of the same client (created with identical parameter maps) do share some resources – notably they share Message and Status Listeners, and use a common pool of Worker threads to execute asynchronous messaging operations. For example, if instance A calls
setMessageListener(), and then instance B callssetMessageListener(), then B's listener is the active default message listener.
The following are typical use cases:
-
To use the UMS Java API from an EJB (either a Message Driven Bean or a Session Bean) application, the recommended approach is to create a
MessagingClientinstance in the bean' sejbCreate(or equivalent@PostConstruct) method, and store theMessagingClientin an instance variable in the bean class. The EJB container ensures that only one thread at a time uses a given EJB instance, which ensures that only one thread at a time accesses the bean' sMessagingClientinstance. -
To use the UMS Java API from a Servlet, there are several possible approaches. In general Web containers create a single instance of the servlet class, which may be accessed by multiple threads concurrently. If a single
MessagingClientinstance is created and stored in a servlet instance variable, then access to the instance must be synchronized.Another approach is to create a pool of
MessagingClientinstances that are shared among servlet threads.Finally, you can associate individual
MessagingClientinstances with individual HTTP Sessions. This approach allows increased concurrency compared to having a singleMessagingClientfor all servlet requests. However, it is possible for multiple threads to access an HTTP Session at the same time due to concurrent client requests, so synchronization is still required in this case.
61.8.1 Listener Threading
You can achieve asynchronous listening by spawning one or more worker threads that listen to the configured JMS queues for incoming messages and statuses. By default, one worker thread is spawned for incoming messages, and one worker thread is spawned for incoming status notifications (assuming at least one message or status listener is registered, respectively). Client applications can increase the concurrency of asynchronous processing by configuring additional worker threads. This is done by specifying integer values for the MessagingConstants.MESSAGE_LISTENER_THREADS and MessagingConstants.STATUS_LISTENER_THREADS keys, settings these values to the desired number of worker threads in the configuration parameters used when creating a MessagingClient instance.
61.9 Using the UMS Client API to Build a Client Application
This section describes how to create an application called usermessagingsample, a web client application that uses the UMS Client API for both outbound messaging and the synchronous retrieval of message status. usermessagingsample also supports inbound messaging. Once you have deployed and configured usermessagingsample, you can use it to send a message to an email client.
Note:
To learn more about the code samples for Oracle User Messaging Service, or to run the samples yourself, refer to the Oracle Technology Network code sample page at the following URL:https://codesamples.samplecode.oracle.com/
Once you have navigated to this page, you can find code samples for Oracle User Messaging Service by entering the search term "UMS" and clicking Search.
This sample focuses on a Web Application Module (WAR), which defines some HTML forms and servlets. You can examine the code and corresponding XML files for the web application module from the provided usermessagingsample-src.zip source. The servlets uses the UMS Client API to create an UMS Client instance (which in turn registers the application's information) and sends messages.
This application, which is packaged as a Enterprise ARchive file (EAR) called usermessagingsample.ear, has the following structure:
-
usermessagingsample.ear-
META-INF-
application.xml-- Descriptor file for all of the application modules. -
weblogic-application.xml-- Descriptor file that contains theimportof theoracle.sdp.messagingshared library.
-
-
usermessagingsample-web.ear-- Contains the web-based front-end and servlets.-
WEB-INF
-
web.xml -
weblogic.xml
-
-
The prebuilt sample application, and the source code (usermessagingsample-src.zip) are available on OTN.
61.9.1 Overview of Development
The following steps describe the process of building an application capable of outbound messaging using usermessagingsample.ear as an example:
61.9.2 Configuring the Email Driver
To enable the Oracle User Messaging Service's email driver to perform outbound messaging and status retrieval, configure the email driver as follows:
-
Enter the name of the SMTP mail server as the value for the
OutgoingMailServerproperty.
Note:
This sample application is generic and can support outbound messaging through other channels when the appropriate messaging drivers are deployed and configured.61.9.3 Using JDeveloper 11g to Build the Application
This section describes using a Windows-based build of JDeveloper to build, compile, and deploy usermessagingsample through the following steps:
61.9.3.1 Opening the Project
-
Unzip
usermessagingsample-src.zip, to theJDEV_HOME/communications/samples/directory. This directory must be used for the shared library references to be valid in the project.Note:
If you choose to use a different directory, you must update theoracle.sdp.messaginglibrary source path toJDEV_HOME/communications/modules/oracle.sdp.messaging_11.1.1/sdpmessaging.jar. -
Open
usermessagingsample.jws(contained in the .zip file) in Oracle JDeveloper.Figure 61-1 Oracle JDeveloper Open Application Window
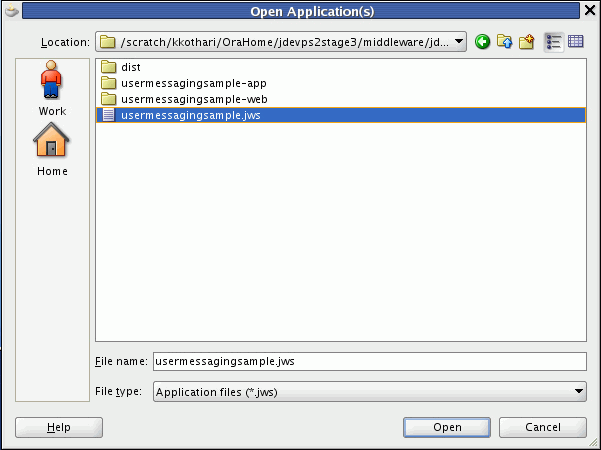
Description of "Figure 61-1 Oracle JDeveloper Open Application Window "
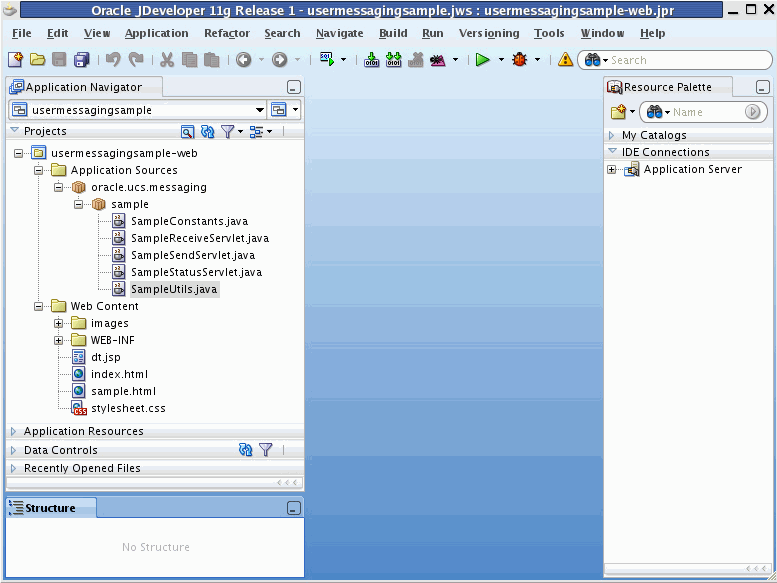
In the Oracle JDeveloper main window, the project appears.
Figure 61-2 Oracle JDeveloper Main Window
Description of "Figure 61-2 Oracle JDeveloper Main Window "
-
Verify that the build dependencies for the sample application have been satisfied by checking that the following library has been added to the web module.
-
Library:
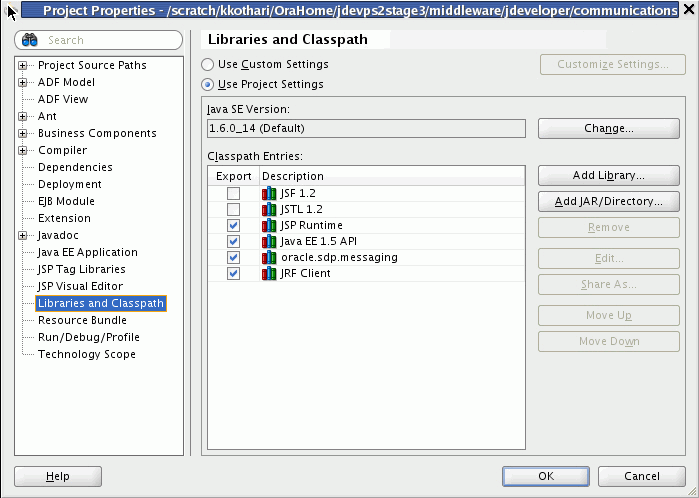
oracle.sdp.messaging, Classpath:JDEV_HOME/communications/modules/oracle.sdp.messaging_11.1.1/sdpmessaging.jar. This is the Java library used by UMS and applications that use UMS to send and receive messages.
-
In the Application Navigator, right-click web module usermessagingsample-web, and select Project Properties.
-
In the left pane, select Libraries and Classpath.
-
Click OK.
-
-
Explore the Java files under the usermessagingsample-web project to see how the messaging client APIs are used to send messages, get statuses, and synchronously receive messages. The MessagingClient instance is created in
SampleUtils.javain the project.
61.9.4 Deploying the Application
Perform the following steps to deploy the application:
-
Create an Application Server Connection by right-clicking the application in the navigation pane and selecting New. Follow the instructions in Section 61.11, "Creating a New Application Server Connection."
-
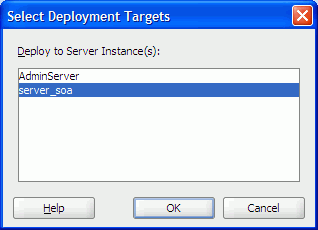
Deploy the application by selecting the usermessagingsample application, Deploy, usermessagingsample, to, and SOA_server (Figure 61-4).
-
Verify that the message
Build Successfulappears in the log. -
Verify that the message
Deployment Finishedappears in the deployment log.You have successfully deployed the application.
Before you can run the sample, you must configure any additional drivers in Oracle User Messaging Service and optionally configure a default device for the user receiving the message in User Messaging Preferences.
Note:
Refer to Oracle Fusion Middleware Administrator's Guide for Oracle SOA Suite and Oracle BPM Suite for more information.
61.9.5 Testing the Application
Once usermessagingsample has been deployed to a running instance of Oracle WebLogic Server, perform the following:
-
Launch a web browser and enter the address of the sample application as follows:
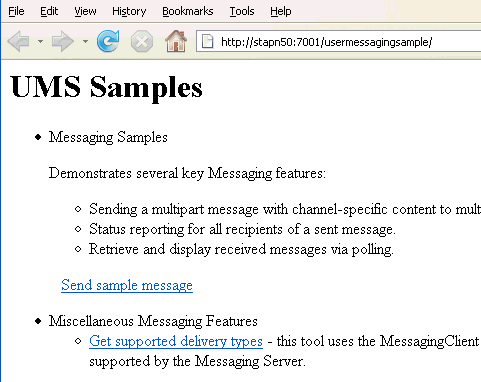
http://host:http-port/usermessagingsample/. For example, enterhttp://localhost:7001/usermessagingsample/into the browser's navigation bar.When prompted, enter login credentials. For example, username
weblogic. The browser page for testing messaging samples appears (Figure 61-5).Figure 61-5 Testing the Sample Application
Description of "Figure 61-5 Testing the Sample Application"
-
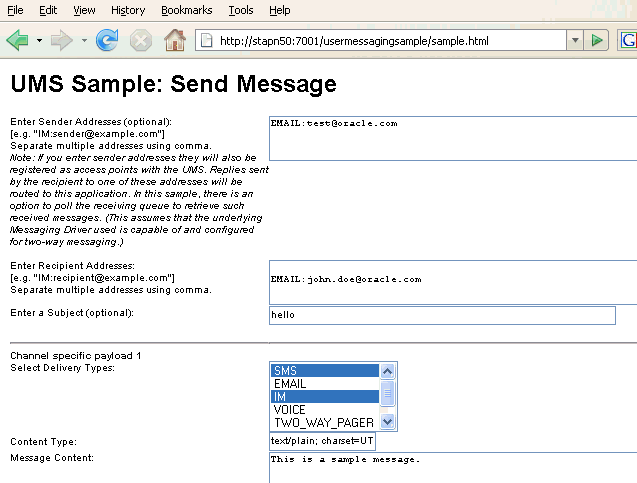
Click Send sample message. The Send Message page appears (Figure 61-6).
-
As an optional step, enter the sender address in the following format:
Email:sender_address.For example, enter
Email:[email protected]. -
Enter one or more recipient addresses. For example, enter
Email:[email protected]. Enter multiple addresses as a comma-separated list as follows:Email:recipient_address1,Email:recipient_address2.If you have configured user messaging preferences, you can address the message simply to
User:username. For example,User:weblogic. -
As an optional step, enter a subject line or content for the email.
-
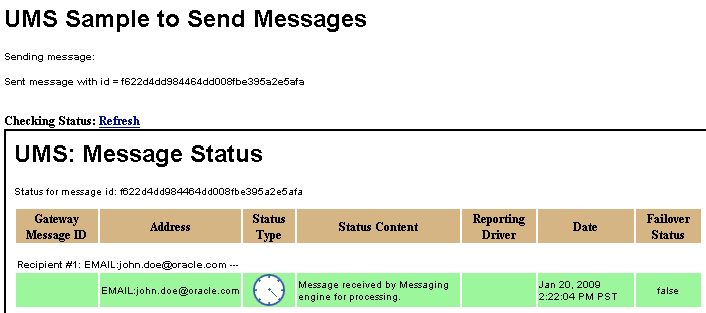
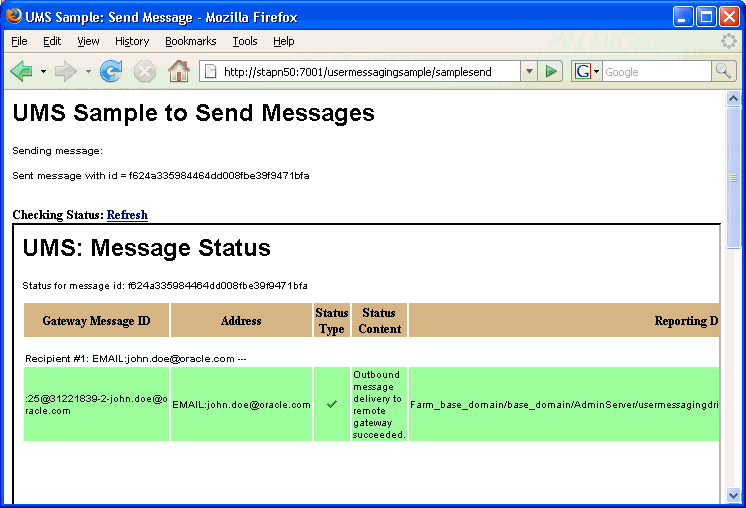
Click Send. The Message Status page appears, showing the progress of transaction (Message received by Messaging engine for processing in Figure 61-7).
-
Click Refresh to update the status. When the email message has been delivered to the email server, the Status Content field displays Outbound message delivery to remote gateway succeeded., as illustrated in Figure 61-8.
61.10 Using the UMS Client API to Build a Client Echo Application
This section describes how to create an application called usermessagingsample-echo, a demo client application that uses the UMS Client API to asynchronously receive messages from an email address and echo a reply back to the sender.
Note:
To learn more about the code samples for Oracle User Messaging Service, or to run the samples yourself, refer to the Oracle Technology Network code sample page at the following URL:https://codesamples.samplecode.oracle.com/
Once you have navigated to this page, you can find code samples for Oracle User Messaging Service by entering the search term "UMS" and clicking Search.
This application, which is packaged as a Enterprise Archive file (EAR) called usermessagingsample-echo.ear, has the following structure:
-
usermessagingsample-echo.ear-
META-INF-
application.xml-- Descriptor file for all of the application modules. -
weblogic-application.xml-- Descriptor file that contains theimportof theoracle.sdp.messagingshared library.
-
-
usermessagingsample-echo-web.war-- Contains the web-based front-end and servlets. It also contains the listener that processes a received message and returns an echo response-
WEB-INF
-
web.xml -
weblogic.xml
-
-
The prebuilt sample application, and the source code (usermessagingsample-echo-src.zip) are available on OTN.
61.10.1 Overview of Development
The following steps describe the process of building an application capable of asynchronous inbound and outbound messaging using usermessagingsample-echo.ear as an example:
61.10.2 Configuring the Email Driver
To enable the Oracle User Messaging Service's email driver to perform inbound and outbound messaging and status retrieval, configure the email driver as follows:
-
Enter the name of the SMTP mail server as the value for the OutgoingMailServer property.
-
Enter the name of the IMAP4/POP3 mail server as the value for the IncomingMailServer property. Also, configure the incoming user name, and password.
Note:
This sample application is generic and can support inbound and outbound messaging through other channels when the appropriate messaging drivers are deployed and configured.61.10.3 Using JDeveloper 11g to Build the Application
This section describes using a Windows-based build of JDeveloper to build, compile, and deploy usermessagingsample-echo through the following steps:
61.10.3.1 Opening the Project
-
Unzip
usermessagingsample-echo-src.zip, to theJDEV_HOME/communications/samples/directory. This directory must be used for the shared library references to be valid in the project.Note:
If you choose to use a different directory, you must update the oracle.sdp.messaging library source path toJDEV_HOME/communications/modules/oracle.sdp.messaging_11.1.1/sdpmessaging.jar. -
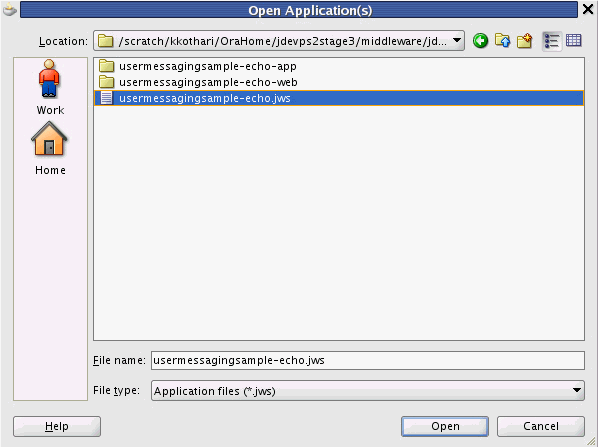
Open
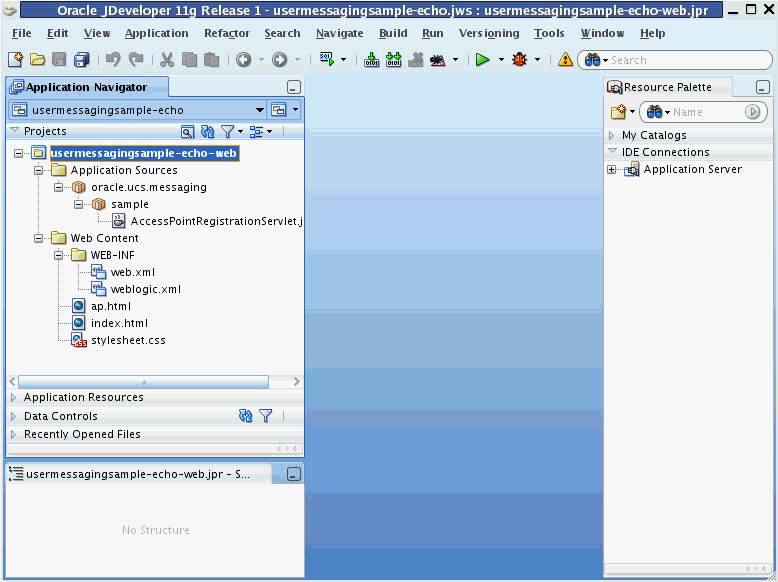
usermessagingsample-echo.jws(contained in the .zip file) in Oracle JDeveloper (Figure 61-9).In the Oracle JDeveloper main window the project appears (Figure 61-10).
Figure 61-10 Oracle JDeveloper Main Window
Description of "Figure 61-10 Oracle JDeveloper Main Window"
-
Verify that the build dependencies for the sample application have been satisfied by checking that the following library has been added to the
usermessagingsample-echo-webmodule.-
Library: oracle.sdp.messaging, Classpath:
JDEV_HOME/communications/modules/oracle.sdp.messaging_11.1.1/sdpmessaging.jar. This is the Java library used by UMS and applications that use UMS to send and receive messages.
Perform the following steps for each module:
-
In the Application Navigator, right-click the module and select Project Properties.
-
In the left pane, select Libraries and Classpath (Figure 61-11).
-
Click OK.
-
-
Explore the Java files under the usermessagingsample-echo-web project to see how the messaging client APIs are used to register and unregister access points, and how the
EchoListeneris used to asynchronously receive messages.
61.10.4 Deploying the Application
Perform the following steps to deploy the application:
-
Create an Application Server Connection by right-clicking the application in the navigation pane and selecting New. Follow the instructions in Section 61.11, "Creating a New Application Server Connection."
-
Deploy the application by selecting the usermessagingsample-echo application, Deploy, usermessagingsample-echo, to, and SOA_server (Figure 61-12).
-
Verify that the message
Build Successfulappears in the log. -
Verify that the message
Deployment Finishedappears in the deployment log.You have successfully deployed the application.
Before you can run the sample you must configure any additional drivers in Oracle User Messaging Service and optionally configure a default device for the user receiving the message in User Messaging Preferences.
Note:
Refer to Oracle Fusion Middleware Administrator's Guide for Oracle SOA Suite and Oracle BPM Suite for more information.
61.10.5 Testing the Application
Once usermessagingsample-echo has been deployed to a running instance of Oracle WebLogic Server, perform the following:
-
Launch a web browser and enter the address of the sample application as follows:
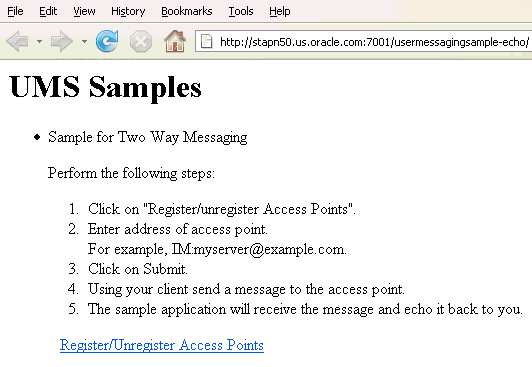
http://host:http-port/usermessagingsample-echo/. For example, enterhttp://localhost:7001/usermessagingsample-echo/into the browser's navigation bar.When prompted, enter login credentials. For example, username
weblogic. The browser page for testing messaging samples appears (Figure 61-13).Figure 61-13 Testing the Sample Application
Description of "Figure 61-13 Testing the Sample Application"
-
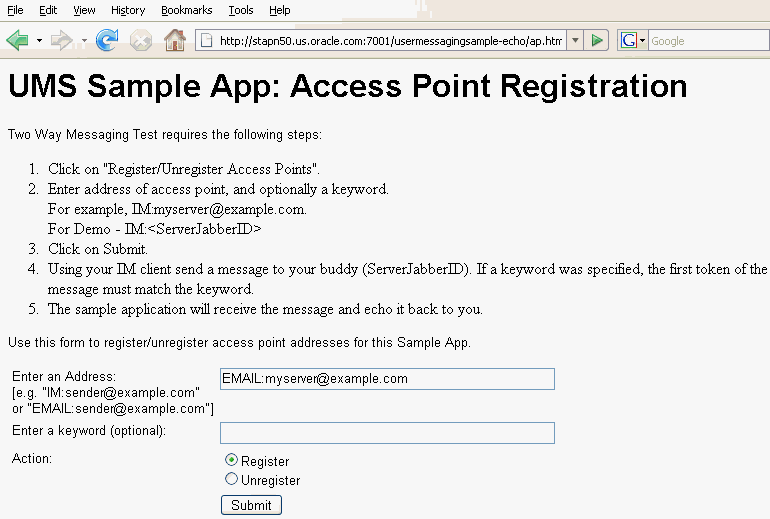
Click Register/Unregister Access Points. The Access Point Registration page appears (Figure 61-14).
-
Enter the access point address in the following format:
EMAIL:server_address.For example, enter
EMAIL:[email protected]. -
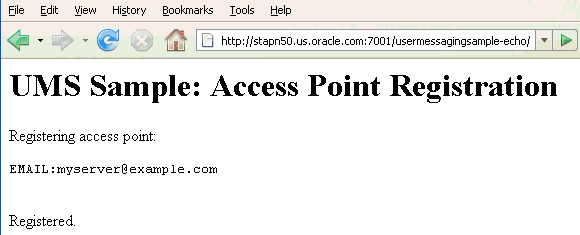
Select the Action Register and Click Submit. The registration status page appears, showing "Registered" in Figure 61-15).
Figure 61-15 Access Point Registration Status
Description of "Figure 61-15 Access Point Registration Status"
-
Send a message from your messaging client (for email, your email client) to the address you just registered as an access point in the previous step.
If the UMS messaging driver for that channel is configured correctly, you should expect to receive an echo message back from the usermessagingsample-echo application.
61.11 Creating a New Application Server Connection
Perform the following steps to create a new Application Server Connection.
-
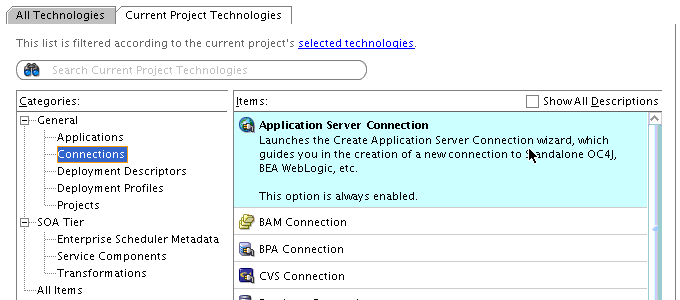
Create a new Application Server Connection by right-clicking the project and selecting New, Connections, and Application Server Connection (Figure 61-16).
Figure 61-16 New Application Server Connection
Description of "Figure 61-16 New Application Server Connection"
-
Name the connection
SOA_serverand click Next (Figure 61-17). -
Select WebLogic 10.3 as the Connection Type.
Figure 61-17 New Application Server Connection

Description of "Figure 61-17 New Application Server Connection"
-
Enter the authentication information. A typical value for user name is
weblogic. -
In the Connection dialog, enter the hostname, port, and SSL port for the SOA admin server, and enter the name of the domain for WLS Domain.
-
Click Next.
-
In the Test dialog, click Test Connection.
-
Verify that the message
Success!appears.The Application Server Connection has been created.
