Audits
An audit evaluates an organization's compliance with security standards.
Read the following for information about audits:
Creating Audits
The Compliance 360 SuiteApp allows you to create audits within your account. Audits help you track and monitor your organization's security compliance.
To create an audit:
-
Go to Compliance 360 > Audit Documentation > Audits.
-
Click Create Audit.
-
If you want to use and apply an audit template, hover over Actions, and click Import Audit Template.
-
In the Audit Template popup window:
-
From the list of audit templates, select the audit template you want to apply to the audit.
If the list is long, you can search for the audit template name or number in the Search field, and then select it.
-
Click Import Audit Template.
Note:Applying an audit template automatically adds its controls to the Audit Controls section. For more information, see Audit Templates.
-
-
In the Primary Information section:
-
From the Audit Start Date field, select the start date of the audit.
-
From the Audit End Date field, select the end date of the audit.
-
Select an Audit Type based on your requirement:
-
Internal - For audits conducted by your organization’s staff.
-
External - For audits by outside firms or independent parties.
-
Government - For audits required or performed by government agencies.
-
System - For audits focused on IT systems and information security.
-
Financial - For audits of financial records and reporting.
-
Other - For audits that don’t fit the standard categories.
-
-
In the Audit Title field, enter a name for the audit. The field has a limit of 20 characters.
-
In the Audit Scope field, enter the goal of the audit. The field has a limit of 100 characters.
-
From the Auditor list, select the name of the person in-charge of this audit.
-
From the Auditor Role list, select the role of the assigned auditor of this audit.
-
(Optional) From the Audit Supporter list, select the name of the person who will support the auditor of this audit. You can select multiple audit supporters.
-
(Optional) From the Subsidiary list, select the subsidiary for this audit.
-
(Optional) From the Location list, select a location associated with the subsidiary.
To view the list of existing locations, go to Setup > Company > Locations.
-
(Optional) From the Department list, select a department associated with the subsidiary.
To view the list of existing departments, go to Setup > Company > Departments.
-
(Optional) From the Class list, select a class associated with the subsidiary.
To view the list of existing classes, go to Setup > Company > Classes.
-
(Optional) You can attach files, if required:
-
In the Attachments field, click Choose a File to select a file to attach to the audit.
-
You can attach multiple files, either one by one or all at a time.
-
After you save the audit, click View Attachments to see a list of all the attached files.
Note:You can attach up to 20 files per audit. Each file must be no larger than 10 MB.
-
-
(Optional) You can delete one or multiple files attached, if required:
-
Click View Attachments to display all attached files.
-
Select the necessary files or all the files.
-
Click Delete.
-
-
-
(Optional) To get Audit Insights, follow the procedure for Audit Summarization using Generative AI
-
If you applied an audit template, the controls’ IDs, titles, and descriptions included in that template will fill the Audit Controls section.
Otherwise, you can manually add audit controls by:
-
In the ID field, enter a unique and alphanumeric ID for an audit control.
-
Select a Control Test Type based on the requirements of the Audit Control. This specifies the type of test that will be applied. Choose one of the following options from the dropdown:
-
Inquiry - Ask questions to gather information about processes or controls.
-
Observation - Watch activities or processes as they are performed.
-
Examination - Review documents, records, or evidence related to the audit.
-
Computer Assisted Audit (CAAT) - Use software tools to analyze data or test controls.
-
Re-performance/Re-calculation - Independently perform the control or calculation to verify results.
-
-
In the Title field, enter a title for the audit control.
-
In the Description field, enter a description for the audit control.
-
In the Memo field, enter a note or a memo for the audit control.
-
In the Due Date field, enter the due date for the audit control.
Note:The due date must be on or after the Audit Start Date and on or before the Audit End Date.
-
From the Status list, select one from the following options:
-
Pass – If the audited process or control passed the compliance standards.
-
Fail – If the audited process or control failed the compliance standards.
-
In Progress – If the audit for this process or control is still on-going.
-
Not Started – If the audit for this process has not yet started.
You can still submit the audit even if the status is set to In Progress.
-
-
Click OK to add the audit control.
-
(Optional) To add another row, repeat steps 6a to 6f.
-
-
To save the audit as draft, click Save.
Upon saving, the Audit Status field will automatically populate as In Progress.
-
The System Notes subtab on the Audits and Audit Templates page tracks all changes made to a record. It captures the following important data:
-
Date of change
-
Who made the change
-
Role of the user who made the change
-
Type of change
-
Old and new record values
For long text fields such as Audit Insights, system notes display the character changes from the old values to the new values.
-
-
To submit the finished audit, click Submit.
Upon submitting, the Audit Status field will automatically populate as Completed.
Audit Summarization using Generative AI
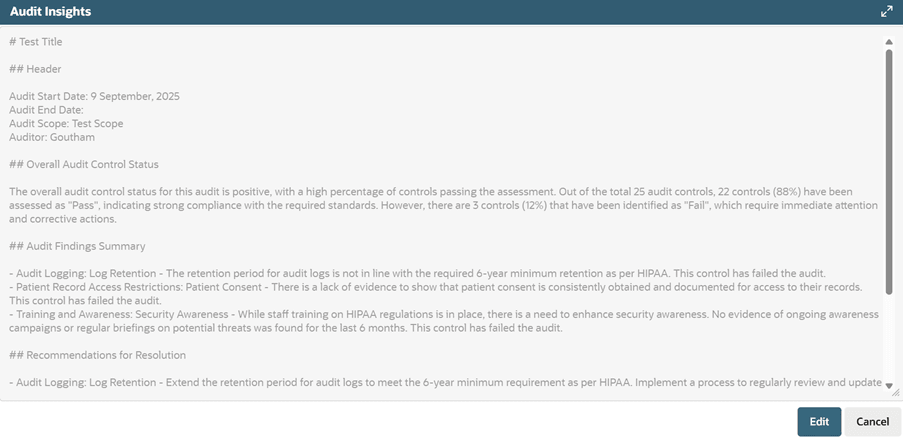
The Generative AI (GenAI) audit summarization feature automates audit findings in the Compliance 360 SuiteApp. This feature uses the SuiteScript GenAI API to access Large Language Models (LLMs). This summarizes your audit using information from the audit control ID, title, description, memo, and status fields. The Audit Insights field displays a comprehensive summary of your audit and suggested steps. A pre-built prompt ensures every summary remains consistent.
This feature helps you produce high-quality, standardized outputs. It also reduces manual, repetitive tasks for compliance officers and administrators.
Before you use the audit summary feature, you must first create an audit in the Audit page.
To create an Audit Summary with GenAI:
-
On the Create Audit page, enter the required audit information.
-
Click the Text Enhance button next to the Audit Insights field.
 Warning:
Do not edit the existing Compliance 360 prompts in Prompt Studio. Editing these prompts may cause the generated audit summary to become inconsistent with the Audit Controls.
Also, if you edit the original Compliance 360 prompts, future Compliance 360 SuiteApp upgrades for your account may fail.
-
The Audit Insights field provides a text enhance functionality that can help you further customize the audit summary. Select one of the following options:
-
Summarize Audit - GenAI summarizes your audit using data from the Audit Controls and the default, pre-built prompt in Prompt Studio.
-
Clean Up - Refines the existing text and corrects grammar and spelling errors. It may also rephrase some of the existing text to use effective style and tone.
-
Make Longer - Expands the AI generated summary into well-written business content.
-
Make Shorter - Shortens the AI generated summary into a more concise format.
Note:If you click on Summarize Audit or Clean Up after manually editing the summary, a warning message will inform you that your manual changes will be deleted.
-
Undo - Reverts the most recent Audit Insights action and changes the field back to its previous content. To return to an even earlier state, continue selecting Undo until you reach the desired result. Audit Insights maintains the previous results while you work on the page.
-
Redo - Restores the Audit Insights action and updates the field to its state before you selected Undo.

-
-
You can view the AI generated audit summary using the View button located next to the Text Enhance button.
-
Click Edit to make changes to the summary.

-
Click Save.
You should carefully review the audit summary generated by GenAI before saving your changes to the page. Generative AI services such as audit summarization provide creative responses. Always validate the generated content for accuracy and quality.
Audits List Page
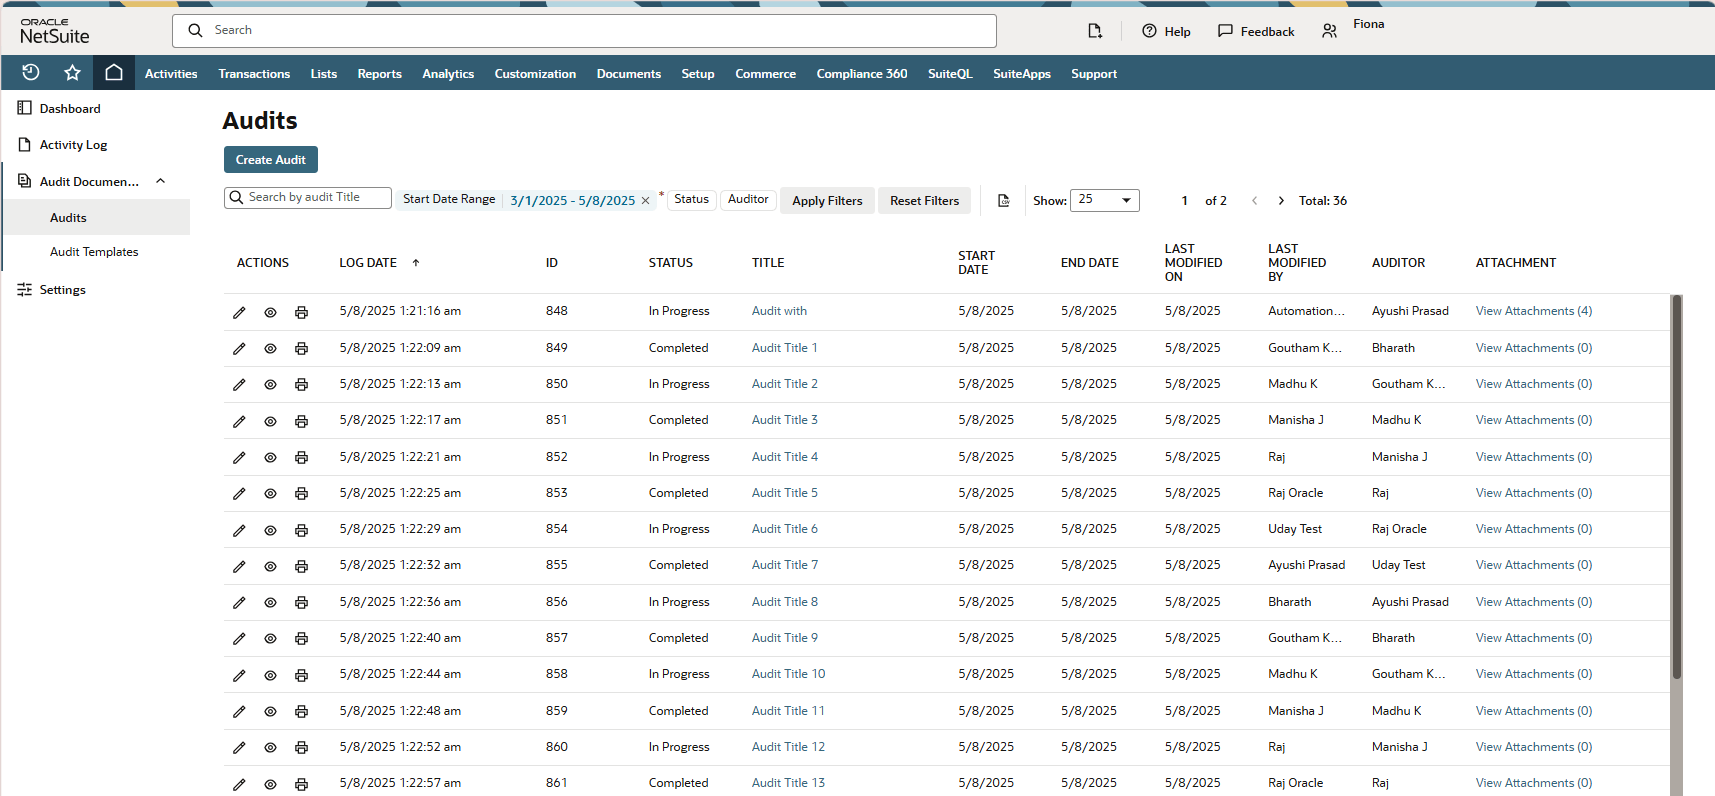
Created audits in the account are displayed in the Audits list page. The list page is filterable and exportable to a CSV file.
If you created a new audit and have already applied filters to the Audits list page, you must click Apply Filters again to update the list and display your newly created audit.
The screenshot below shows the Audits page:

The following icons on the Actions column let you do the following to audits:
-
 – Edit
 -
 – View
 -
 – Print
Applying Filters to the Audits List
You can customize the audits shown in the Audits list by applying filters to it.
To apply filters to the Audits list:
-
Go to Compliance 360 > Audit Documentation > Audits.
-
Select one or more filters to apply to the Audits list. The following table lists the filters that can be applied:
Filter
Function
Start Date Range
Filters the list by the selected start date range.
Status
Filters the list based on the audit status.
Auditor
Filters the list based on the auditor.
-
(Optional) In the Search field, you can type and search for a specific audit title.
-
Click Apply Filters.
The Audits list is sortable. You can sort it by clicking either one of the following columns:
-
Last Modified On
-
Last Modified By
To reset the filters applied to the list, click Reset Filters.
You can customize the number of audits displayed in the list page. From the Show dropdown list, select the number of audits to show in the Audits list page.
You also have the option to export the Audits list page in CSV format by clicking the ![]() icon next to the Show list (pagination).
icon next to the Show list (pagination).
Editing Existing Audits
You can go back to update or submit a saved audit. However, after the audit is submitted and marked as Completed, the compliance manager cannot edit it anymore.
To edit an existing audit:
-
Go to Compliance 360 > Audit Documentation > Audits.
-
Click Edit next to the audit that you want to update.
-
In the Audit page, make the necessary changes. For more information about filling up the fields in the Audit page, see Audits.
When editing an audit, the following fields get updated each time you modify an audit.
-
Last Modified By – Shows the name of the most recent person who modified the audit.
-
Last Modified On – Shows the date and time of the audit's most recent modification.
-
-
To save the audit as draft, click Save.
Upon saving, the Audit Status field will automatically populate as In Progress.
-
To submit the finished audit, click Submit.
Upon submitting, the Audit Status field will automatically populate as Completed.