50 Automating Testing of SOA Composite Applications
This chapter includes the following sections:
50.1 Introduction to the Composite Test Framework
Oracle SOA Suite provides an automated test suite framework for creating and running repeatable tests on a SOA composite application.
The test suite framework provides the following features:
-
Simulates web service partner interactions
-
Validates process actions with test data
-
Creates reports of test results
50.1.1 Test Cases Overview
The test framework supports testing at the SOA composite application level. In this type of testing, wires, service binding components, service components (such as BPEL processes and Oracle Mediator service components), and reference binding components are tested.
For more information, see Creating Test Suites and Test Cases with the Create Composite Test Wizard.
50.1.2 Overview of Test Suites
Test suites consist of a logical collection of one or more test cases. Each test case contains a set of commands to perform as the test instance is executed. The execution of a test suite is known as a test run. Each test corresponds to a single SOA composite application instance.
For more information, see the following:
50.1.3 Overview of Emulations
Emulations enable you to simulate the behavior of the following components with which your SOA composite application interacts during execution:
-
Internal service components inside the composite
-
Binding components outside the composite
Instead of invoking another service component or binding component, you can specify a response from the component or reference.
For more information, see the following:
50.1.4 Overview of Assertions
Assertions enable you to verify variable data or process flow. You can perform the following types of assertions:
-
Entire XML document assertions:
Compare the element values of an entire XML document to the expected element values. For example, compare the exact contents of an entire loan request XML document to another document. The
XMLTestCaseclass in theXMLUnitpackage includes a collection of methods for performing assertions between XML files. For more information about these methods, visit the following URL:http://xmlunit.sourceforge.net
-
Part section of message assertions:
Compare the values of a part section of a message to the expected values. An example is a payload part of an entire XML document message.
-
Nonleaf element assertions:
Compare the values of an XML fragment to the expected values. An example is a loan application, which includes leaf elements SSN, email, customerName, and loanAmount.
-
Leaf element assertions:
Compare the value of a selected string or number element or a regular expression pattern to an expected value. An example is the SSN of a loan application.
For more information about asserts, see Assertions.
50.2 Introduction to the Components of a Test Suite
This section describes and provides examples of the test components that comprise a test case. Methods for creating and importing these tests into your process are described in subsequent sections of this chapter.
50.2.1 Process Initiation
You first define the operation of your process in a binding component service such as a SOAP web service. The following example defines the operation of initiate to initiate the TestFwk SOA composite application. The initiation payload is also defined in this section:
<?xml version="1.0" encoding="UTF-8" ?>
<!-- Generated by Oracle SCA Test Modeler version 1.0 at [6/13/07 10:50 AM]. -->
<compositeTest compositeDN="TestFwk"
 xmlns="http://xmlns.oracle.com/sca/2006/test">
  <about></about>
  <initiate serviceName="client" operation="initiate" isAsync="true">
    <message>
      <part partName="payload">
        <content>
          <loanApplication xmlns="http://www.autoloan.com/ns/autoloan">
            <SSN>111222333</SSN>
            <email>[email protected]</email>
            <customerName>Joe Smith</customerName>
            <loanAmount>20000</loanAmount>
            <carModel>Camry</carModel>
            <carYear>2007</carYear>
            <creditRating>800</creditRating>
          </loanApplication>
        </content>
      </part>
    </message>
  </initiate>
</compositeTest>
50.2.2 Emulations
You create emulations to simulate the message data that your SOA composite application receives from web service partners.
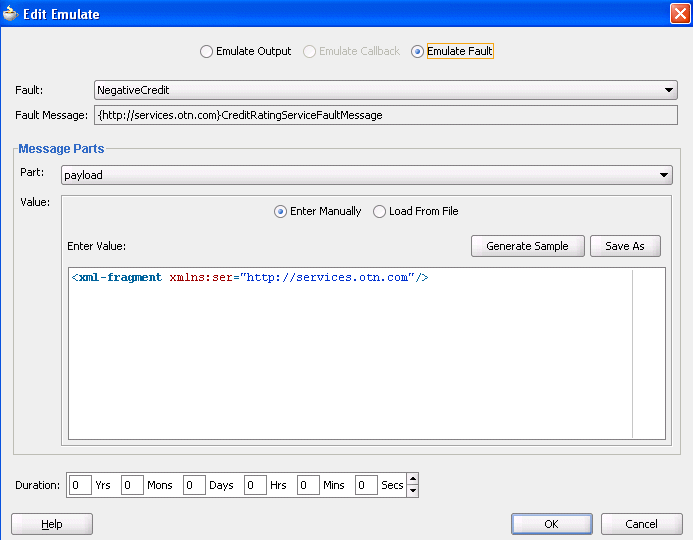
In the test code in the following example, the loan request is initiated with an error. A fault message is received in return from a web service partner:
<?xml version="1.0" encoding="UTF-8" ?>
<!-- Generated by Oracle SCA Test Modeler version 1.0 at [7/3/07 3:29 PM]. -->
<compositeTest compositeDN="CompositeTest"
 xmlns="http://xmlns.oracle.com/sca/2006/test">
  <about></about>
  <initiate serviceName="client" operation="initiate" isAsync="true">
    <message>
      <part partName="payload">
        <filePath>loanApplication.xml</filePath>
      </part>
    </message>
  </initiate>
  <wireActions wireSource="LoanBroker/CreditRatingService" operation="process">
    <emulate duration="PT0S">
      <fault faultName="ser:NegativeCredit" xmlns:ser="http://services.otn.com">
        <message>
          <part partName="payload">
            <filePath>creditRatingFault.xml</filePath>
          </part>
        </message>
      </fault>
    </emulate>
  </wireActions>
</compositeTest>
Two message files, loanApplication.xml and creditRatingFault.xml, are invoked in this emulation. If the loan application request in loanApplication.xml contains a social security number beginning with 0, the creditRatingFault.xml file returns the fault message shown in the following example:
<error xmlns="http://services.otn.com">
  Invalid SSN, SSN cannot start with digit '0'.
</error>
For more information, see Editing the Contents of Test Cases in Test Mode in the SOA Composite Editor.
50.2.3 Assertions
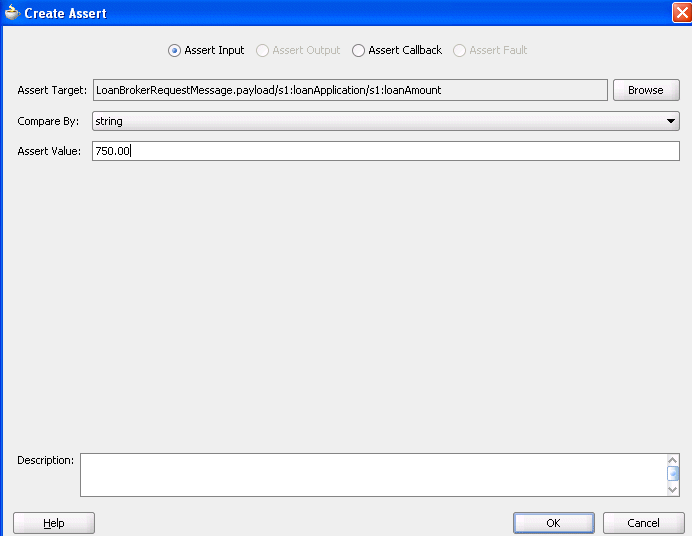
You create assertions to validate an entire XML document, a part section of a message, a nonleaf element, or a leaf element at a point during SOA composite application execution. The following example instructs Oracle SOA Suite to ensure that the content of the customerName variable matches the content specified.
<?xml version="1.0" encoding="UTF-8" ?>
<!-- Generated by Oracle SCA Test Modeler version 1.0 at [6/13/07 10:51 AM]. -->
<compositeTest compositeDN="TestFwk"
 xmlns="http://xmlns.oracle.com/sca/2006/test">
  <about></about>
  <initiate serviceName="client" operation="initiate" isAsync="true">
    <message>
      <part partName="payload">
        <content>
          <loanApplication xmlns="http://www.autoloan.com/ns/autoloan">
            <SSN>111222333</SSN>
            <email>[email protected]</email>
            <customerName>Joe Smith</customerName>
            <loanAmount>20000</loanAmount>
            <carModel>Camry</carModel>
            <carYear>2007</carYear>
            <creditRating>800</creditRating>
          </loanApplication>
        </content>
      </part>
    </message>
  </initiate>
  <wireActions wireSource="client" operation="initiate">
    <assert comparisonMethod="string">
      <expected>
        <location key="input" partName="payload"
 xpath="/s1:loanApplication/s1:customerName"
 xmlns:s1="http://www.autoloan.com/ns/autoloan"/>
        <simple>Joe Smith</simple>
      </expected>
    </assert>
  </wireActions>
</compositeTest>
For more information, see Editing the Contents of Test Cases in Test Mode in the SOA Composite Editor.
50.2.4 Message Files
Message instance files provide a method for simulating the message data received back from web service partners. You can manually enter the received message data into this XML file or load a file through the test mode of the SOA Composite Editor. For example, the following message file simulates a credit rating result of 900 returned from a partner:
<rating xmlns="http://services.otn.com">900</rating>
For more information about loading message files into test mode, see Editing the Contents of Test Cases in Test Mode in the SOA Composite Editor.
50.3 Creating Test Suites and Test Cases with the Create Composite Test Wizard
This section describes how to create test suites and their test cases for a SOA composite application. The test cases consist of sets of commands to perform as the test instance is executed.
You can create test suites and test cases in either of two ways:
-
In the Applications window
-
From the Oracle JDeveloper main menu
Both options invoke the Create Composite Test wizard, which enables you to define the initiating operation, callback operation, and input and output messages.
Note:
Do not enter a multibyte character string as a test suite name or test case name. Doing so causes an error to occur when the test is executed from Oracle Enterprise Manager Fusion Middleware Control.
-
Perform one of the following steps to create a new test suite or create a new composite test in an existing test suite. Table 50-1 provides details.
Table 50-1 Test Suite Creation or Selection
From the... Perform... Oracle JDeveloper main menu
-
Select File > New > Application > SOA Tier > Tests > Composite Test Suite.
The Create Test Suite dialog is displayed.
-
Enter a test suite name, and click OK.
or
-
Select File > From Gallery > SOA Tier > Tests > Composite Test Suite.
The Create Test Suite dialog is displayed.
-
Enter a test suite name, and click OK.
Applications window
-
Right-click the testsuites folder and select Create Test Suite.
The Create Test Suite dialog is displayed.
-
Enter a test suite name, and click OK.
Structure window
-
Right-click Test Suites and select Create Test Suite.
The Create Test Suite dialog is displayed.
-
Enter a test suite name, and click OK.
Oracle JDeveloper main menu
-
Select File > New > Application > SOA Tier > Tests > Composite Test.
or
-
Select File > New > Composite Test.
Note: Both selections provide the option of creating a new test suite or selecting an existing test suite in which to include the new composite test.
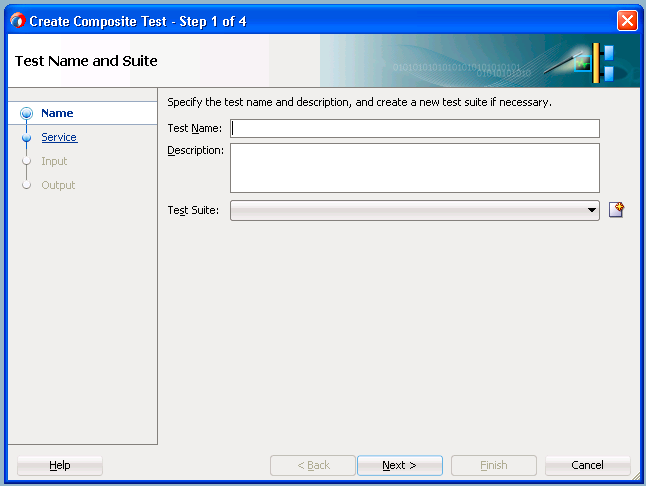
The Create Composite Test Wizard - Test Name and Suite page appears, as shown in Figure 50-1.
Figure 50-1 Create Composite Test Wizard - Test Name and Suite Page
Description of "Figure 50-1 Create Composite Test Wizard - Test Name and Suite Page"This wizard enables you to create simple tests without manually creating test details in test mode in the SOA Composite Editor, as described in Editing the Contents of Test Cases in Test Mode in the SOA Composite Editor. You only must manually use this editor in test mode if you want to add additional test metadata such as emulations.
-
-
Provide values appropriate to your environment, as described in Table 50-2, and click Next.
Table 50-2 Create Composite Test Wizard - Test Name and Suite Page
Field Description Test Name
Enter a name for the test.
Description
Enter an optional description of the test. The description is displayed in the Description column of the Test Cases page of the Unit Tests tab in Oracle Enterprise Manager Fusion Middleware Control.
Test Suite
Select an existing test suite to include this test or click the icon to create a new test suite in the Create Test Suite dialog.
The Create Composite Test Wizard - Service and Operation page appears, as shown in Figure 50-2.
Figure 50-2 Create Composite Test Wizard - Service and Operation Page
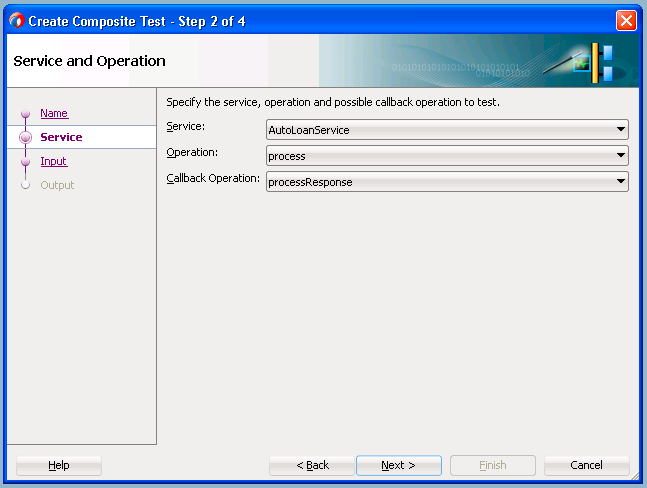
Description of "Figure 50-2 Create Composite Test Wizard - Service and Operation Page" -
Provide values appropriate to your environment, as described in Table 50-3, and click Next.
Table 50-3 Create Composite Test Wizard - Service and Operation Page
Field Description Service
Select the SOA composite application to test.
Operator
Select the operation.
Callback Operation
Optionally select the callback (response) operation.
The Create Composite Test Wizard - Input Message page appears, as shown in Figure 50-3. This page enables you to specify the input message to test the operation.
Figure 50-3 Create Composite Test Wizard - Input Message Page
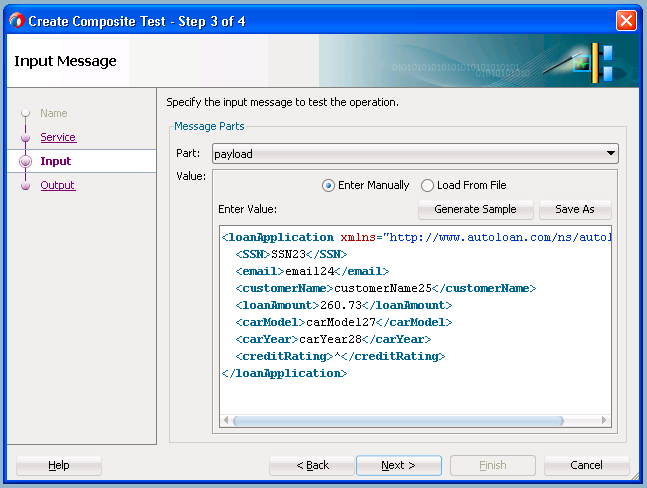
Description of "Figure 50-3 Create Composite Test Wizard - Input Message Page"Provide values appropriate to your environment, as described in Table 50-4, and click Next.
Table 50-4 Create Composite Test Wizard - Input Message Page
Field Description Part
Select the message part containing the input (for example, payload). If the operation input message has multiple parts, then specify each message part by changing the part name, one by one.
For each message part, you can either enter the XML document contents manually or you can load the document from an XML file.
Value
Create a simulated input message to send to a web service partner:
-
Enter Manually
Click to manually enter message data in the Enter Value field. A Generate Sample button enables you to automatically generate a sample file from the message part schema for testing. Click Save As to save the sample file for later use by the same test or other tests in the same test suite.
-
Load From File
Click the Browse icon to load message data from a file. The file is added to the messages folder in the Applications window.
The Create Composite Test Wizard - Output Message page appears, as shown in Figure 50-4. This page specifies the output message expected from the operation or callback operation.
Figure 50-4 Create Composite Test Wizard - Output Message Page
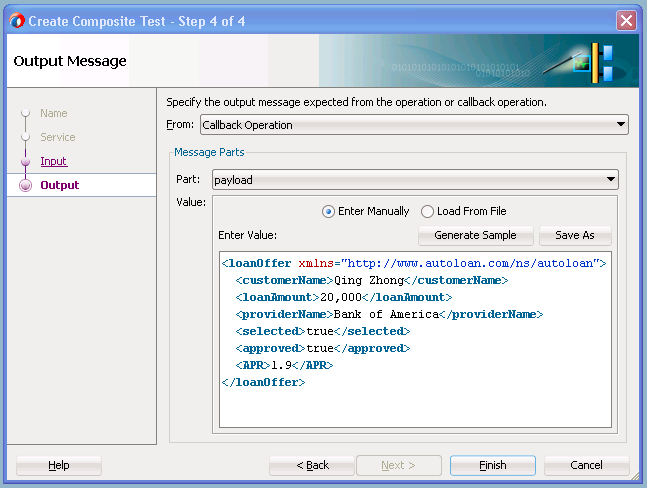
Description of "Figure 50-4 Create Composite Test Wizard - Output Message Page"Provide values appropriate to your environment, as described in Table 50-5, and click Finish.
Table 50-5 Create Composite Test Wizard - Output Message Page
Field Description From
Select the external web service from which to receive the message.
Part
Select the message part containing the output (for example, payload). If the operation input message has multiple parts, then specify each message part by changing the part name, one by one.
For each message part, you can either enter the XML document contents manually or you can load the document from an XML file.
Value
Create a simulated output message to return from a web service partner:
-
Enter Manually
Click to manually enter message data in the Enter Value field. A Generate Sample button enables you to automatically generate a sample file for testing. Click Save As to save the sample file.
-
Load From File
Click the Browse icon to load message data from a file. The file is added to the messages folder in the Applications window.
The test suite is created, and the test mode of the SOA Composite Editor is displayed to show the test. Figure 50-5 provides details. You can add additional test metadata such as emulations, if necessary. If the current test is complete, you can continue to create another test by clicking the test image button on the toolbar. If you want to run the test, you can press the green arrow button.
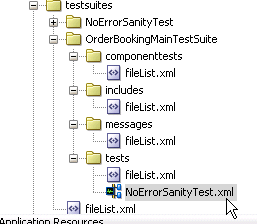
A test is created in the Applications window, along with the following subfolders:
-
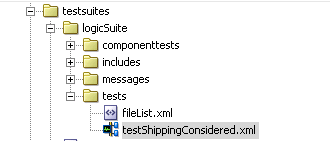
componenttests
-
includes
-
messages
Contains message test files that you load into this directory through the test mode user interface.
-
tests
Contains the XML file for the test suite.
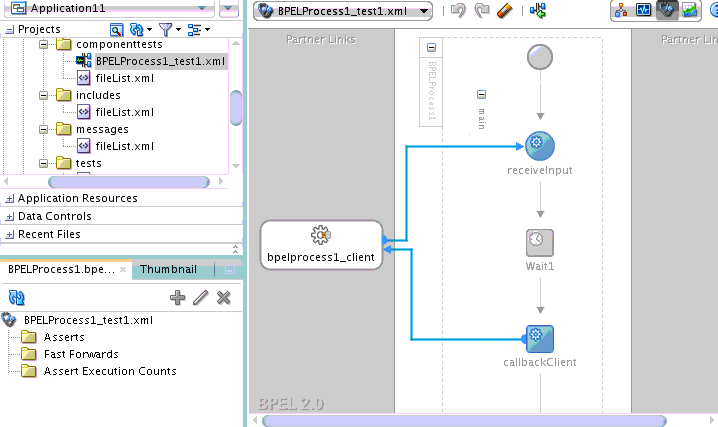
A folder named after the test suite also displays in the Structure window. This indicates that you are in the test mode of the . You can create test initiations, assertions, and emulations in test mode. No other modifications, such as editing the property dialogs of service components or dropping service components into the editor, can be performed in test mode.
The following operating system test suite directory is also created:
C:\JDeveloper\mywork\application_name\project_name\testsuites\test_suite_name
-
-
If you want to exit test mode and return to design mode in the , click the last icon above the designer. Figure 50-6 provides details.
-
Save your changes when prompted.
-
Under the testsuites folder in the Applications window, double-click the XML file name to return to test mode. Figure 50-7 provides details.
Note:
-
Do not edit the filelist.xml files that display under the subfolders of the testsuites folder. These files are automatically created during design time and used during runtime to calculate the number of test cases.
-
You cannot create test suites within other test suites. However, you can organize a test suite into subdirectories.
-
50.4 Editing the Contents of Test Cases in Test Mode in the SOA Composite Editor
After creating the basic contents of test suites and test cases with the Create Composite Test Wizard, you can make additional updates in the test mode of the SOA Composite Editor.
Test cases consist of process initiations, emulations, and assertions. You create process initiations to initiate client inbound messages into your SOA composite application. You create emulations to simulate input or output message data, fault data, callback data, or all of these types that your SOA composite application receives from web service partners. You create assertions to validate entire XML documents, part sections of messages, nonleaf elements, and leaf elements as a process is executed.
Note:
You can also edit test case contents in the Property Inspector. Single-click the component or wire to edit to invoke the Property Inspector at the bottom of the page for editing.
50.4.1 How to Initiate Inbound Messages
To initiate inbound messages:
You must first initiate the sending of inbound client messages to the SOA composite application.
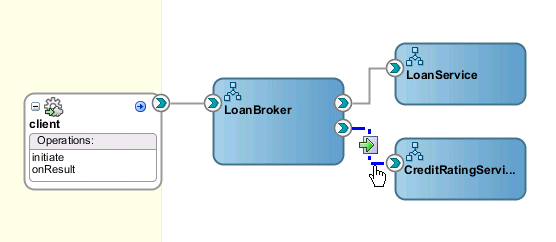
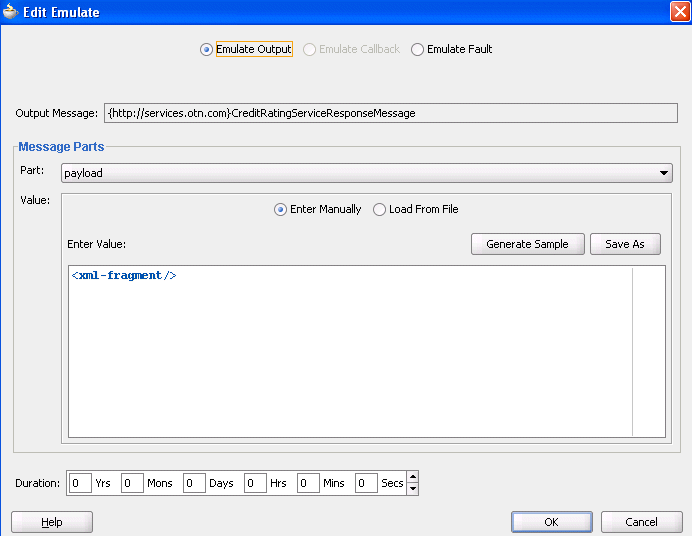
50.4.2 How to Emulate Outbound Messages
To emulate outbound messages:
Note:
The creation of multiple emulations in an instance in a test case is supported only if one emulation is for an output message and the other is for a callback message.
You can simulate a message returned from a synchronous web service partner.
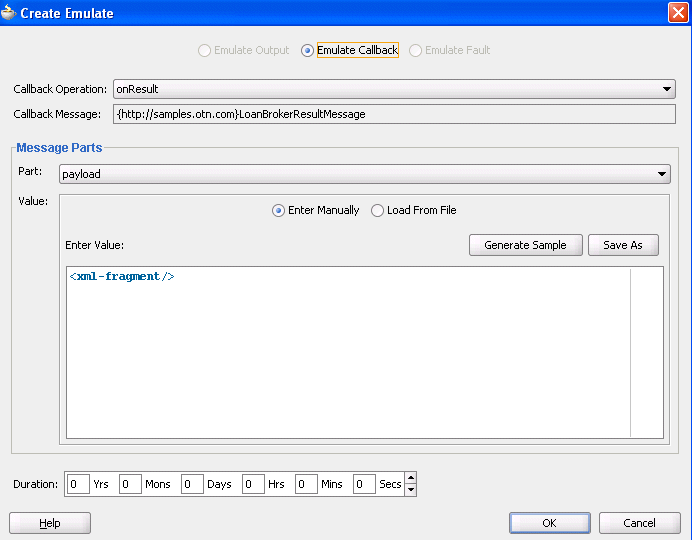
50.4.3 How to Emulate Callback Messages
To emulate callback messages:
Note:
The creation of multiple emulations in an instance in a test case is supported only if one emulation is for an output message and the other is for a callback message.
You can simulate a callback message returned from an asynchronous web service partner.
50.4.4 How to Emulate Fault Messages
To emulate fault messages:
You can simulate a fault message returned from a web service partner. This simulation enables you to test fault handling capabilities in your process.
50.4.5 How to Create Assertions
To create assertions:
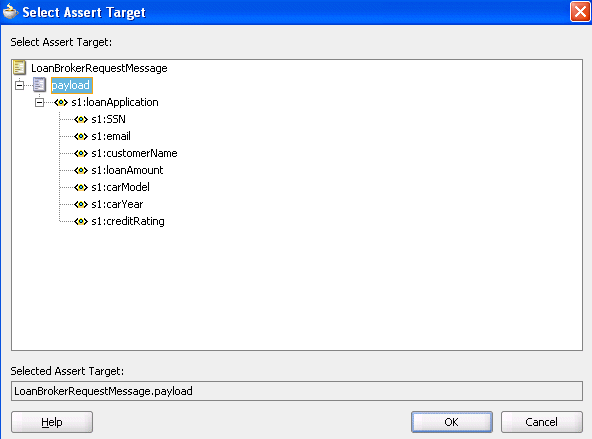
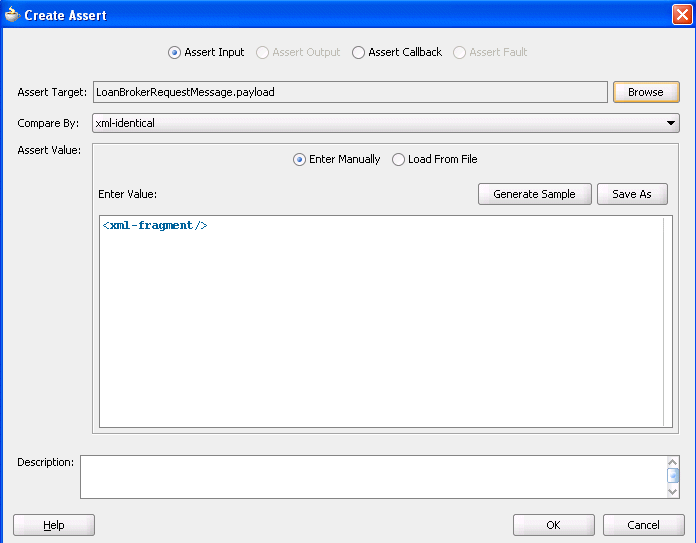
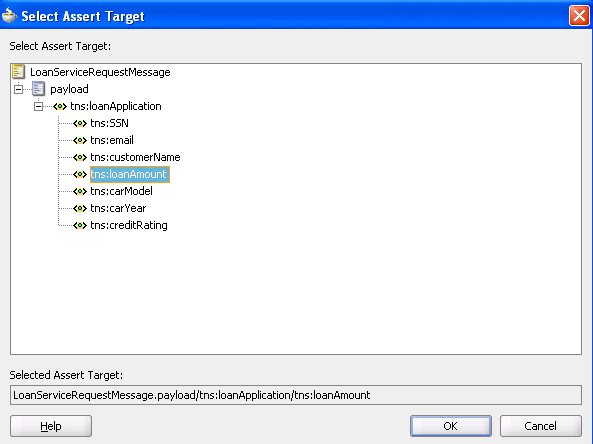
You perform assertions to verify variable data or process flow. Assertions enable you to validate test data in an entire XML document, a part section of a message, a nonleaf element, or a leaf element as a process is executed. This is done by extracting a value and comparing it to an expected value.
50.4.5.1 Creating Assertions on a Part Section, Nonleaf Element, or Entire XML Document
To create assertions on a part section, nonleaf element, or entire XML document:
This test compares the values to the expected values.
Note:
If the message contains multiple parts (for example, payload1, payload2, and payload3), you must create separate assertions for each part.
50.4.6 What You May Need to Know About Assertions
When a test is executed, and the response type returned is different from the type expected, the assertion is skipped. For example, you are expecting a fault (RemoteFault) to be returned for a specific message, but a response (BpelResponseMessage) is instead returned.
As a best practice, always assert and emulate the expected behavior.
50.5 Testing BPEL Process Service Components
After creating the basic contents of test suites and test cases with the Create Composite Test Wizard, you can automate the testing of an individual BPEL process service component included in a new or existing SOA composite application test suite. These test cases enable you to simulate the interaction between a BPEL process and its web service partners before deployment in a production environment. This helps to ensure that a BPEL process interacts with web service partners as expected by the time it is ready for deployment to a production environment.
The following provides an example of a SOA composite application test suite that includes a component test for the LoanBroker BPEL process service component.
<compositeTest compositeDN="TestFwk"
xmlns="http://xmlns.oracle.com/sca/2006/test">
<about></about>
<initiate serviceName="client" operation="initiate" isAsync="true">
<message>
<part partName="payload">
<content>
<loanApplication xmlns="http://www.autoloan.com/ns/autoloan">
  <SSN>111222333</SSN>
  <email>[email protected]</email>
  <customerName>Joe Smith</customerName>
  <loanAmount>20000</loanAmount>
  <carModel>Camry</carModel>
  <carYear>2007</carYear>
  <creditRating>800</creditRating>
</loanApplication>
</content>
</part>
</message>
</initiate>
<componentTest componentName="LoanBroker" filePath="assert.xml"/>
</compositeTest>
The assert.xml test shown in the preceding example specifies assertions for variables and faults.
Note:
You cannot automate the testing of business rule, human task, Oracle Mediator, or spring service components.
50.5.1 Overview of Assertions on BPEL Process Activities
You can create variable and fault assertions on BPEL process activities. The following example instructs the BPEL process to ensure that the contents of textVar and crOutput match the contents specified:
 <bpelTest xmlns:xsi="http://www.w3.org/2001/XMLSchema-instance"
               xmlns="http://xmlns.oracle.com/sca/2006/test"
               componentName="LoanBroker">
 <activityActions activityName="elementAssign">
    <assert comparisonMethod="number">
      <description>Some other assertion.</description>
      <expected>
        <location key="textVar"
                  xmlns:loan="http://www.autoloan.com/ns/autoloan"/>
        <simple>111222333</simple>
      </expected>
    </assert>
  </activityActions>
 <activityActions activityName="invokeCR">
    <assert comparisonMethod="number">
      <description>Make sure we got the output.</description>
      <expected>
        <location key="crOutput" partName="payload" xpath="/tns:rating"
 xmlns:tns="http://services.otn.com"/>
        <simple>560</simple>
      </expected>
    </assert>
  </activityActions>
</bpelTest>
For more information about creating assertions on BPEL process activities, see How to Create Assertions.
50.5.2 Overview of a Fast Forward Action on a Wait Activity
A wait activity allows a process to wait for a given time period or until a time limit has been reached. When testing a BPEL process service component, you may want to bypass the wait activity to continue with testing. A fast forward action enables you to specify the amount of time for which to bypass a wait activity and move forward in the test scenario. The following example instructs the BPEL process to bypass the wait activity for 1 second.
<bpelTest xmlns:xsi="http://www.w3.org/2001/XMLSchema-instance"
               xsi:schemaLocation="http://xmlns.oracle.com/sca/2006/test
 TestFwk.xsd"
               xmlns="http://xmlns.oracle.com/sca/2006/test"
               componentName="LoanBroker">
    <activityActions activityName="wait1">
      <fastForward duration="PT1S"/>
    </activityActions>
</bpelTest>
For more information about creating fast forward actions on wait activities, see How to Bypass a Wait Activity.
50.5.3 Overview of Assert Activity Execution
You can specify and validate the number of times an activity is executed in a BPEL process. The following example instructs the BPEL process to execute the invoke, elementAssign, invokeCR, and replyOutput activities one time each.
<bpelTest xmlns:xsi="http://www.w3.org/2001/XMLSchema-instance"
               xmlns="http://xmlns.oracle.com/sca/2006/test"
               componentName="LoanBroker">
    <assertActivityExecuted activityName="invoke" executionCount="1"/>
    <assertActivityExecuted activityName="elementAssign" executionCount="1"/>
    <assertActivityExecuted activityName="invokeCR" executionCount="1"/>
    <assertActivityExecuted activityName="replyOutput" executionCount="1"/>
</bpelTest>
For more information about creating assert activity executions, see How to Specify the Number of Times to Execute an Activity.
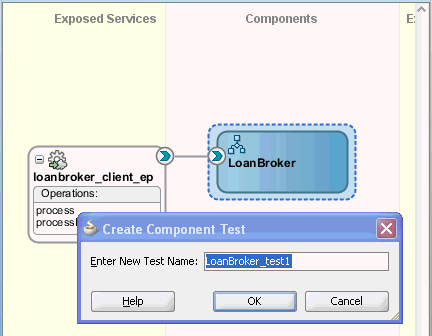
50.5.4 How to Create BPEL Process Service Component Tests
To create BPEL process service component tests:
50.5.5 How to Create Assertions
You can create assertions for variables and faults in BPEL process activities.
To create assertions:
-
Select the activity on which to create an assertion through one of the following methods:
-
In the Structure window, right-click the Asserts folder and select Create, or select the Asserts folder and click the Add button.
The Assert dialog is displayed.
-
In the Activity Name field, click the Browse icon to select an activity.
or
-
Right-click a specific BPEL activity in the designer, and select Edit Activity Test Data.
-
Click the Asserts tab.
-
Click the Add icon.
The activity you selected is displayed in the Activity Name field.
-
-
Enter details in the remaining fields, as shown in Table 50-14.
Table 50-14 Assertions on BPEL Activities
Field Value Assert Variable
Select to assert a variable.
Assert Fault
Select to assert a fault.
Target
Select a target to assert:
-
If you selected Assert Variable, click the Browse icon to select the type of variable to assert (for example, /autoloan:loanApplication/autoloan:SSN).
-
If you selected Assert Fault, click the Browse icon to select the type of fault to assert (for example, NegativeCredit).
Compare By
If comparing XML documents, specify the strictness of the comparison:
-
XML Identical: Use when the comparison between the elements and attributes of the XML documents must be exact. If there is any difference between the two XML documents, the comparison fails. For example, the comparison fails if one document uses an element name of
purchaseOrder, while the other uses an element name ofinvoice. The comparison also fails if the child attributes of two elements are the same, but the attributes are ordered differently in each element. -
XML Similar: Use when the comparison must be similar in content, but does not need to exactly match. For example, the comparison succeeds if both use the same namespace URI, but have different namespace prefixes. The comparison also succeeds if both contain the same element with the same child attributes, but the attributes are ordered differently in each element.
In both of these examples, the differences are considered recoverable, and therefore similar.
If comparing variables, specify the type:
-
String: Select to compare string values.
-
Pattern Match Using Java Regular Expressions: Select to compare a regular expression pattern (for example,
[0-9]*). Java Development Kit (JDK) regular expression (regexp) constructs are supported. For example, entering a pattern ofab[0-9]*cdmeans that a value ofab123cdorab456cdis correct. An asterisk (*) indicates any number of occurrences. -
Number: Select to compare numeric values.
Parts
Select the message part containing the XML document (for example, payload).
Value
Create an XML document whose content is compared to the assert target content:
-
Enter Manually
Click to manually enter message data in the Enter Value field. A Generate Instance Sample icon enables you to automatically generate a sample file for testing. Click the Save As icon to save the sample file.
-
Load From File
Click the Browse icon to load message data from a file. The file is added to the messages folder in the Applications window.
Description
Enter an optional description.
-
-
Click OK.
Expand the Assert folder in the Structure window to view the activities on which you have created asserts. Figure 50-25 provides details.
Figure 50-25 Assert Folder in Structure Window
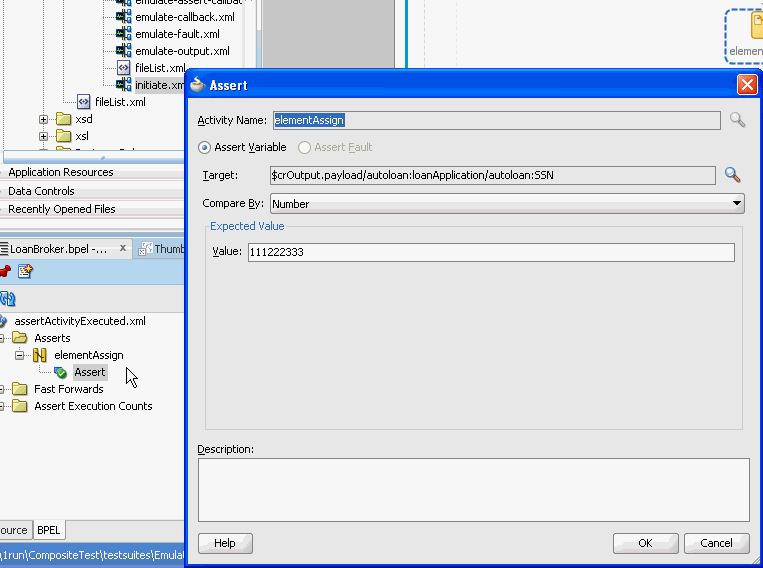
Description of "Figure 50-25 Assert Folder in Structure Window"
50.5.6 How to Bypass a Wait Activity
You can specify the amount of time for which to bypass a wait activity and move forward in the test scenario. Once the time limit expires, the wait activity is processed.
To bypass a wait activity:
-
Select the wait activity to bypass through one of the following methods:
-
In the Structure window, right-click the Fast Forwards folder and select Create, or select the Fast Forwards folder and click the Add button.
The Fast Forward dialog is displayed.
-
In the Activity Name field, click the Browse icon to select the wait activity.
or
-
Right-click a specific wait activity in the designer, and select Edit Activity Test Data.
-
Click the Fast Forward tab. This tab is only displayed if there are wait activities in the BPEL process.
-
Click the Add icon.
The wait activity you selected is displayed in the Activity Name field.
-
-
In the Duration list, specify a time period for which to bypass the wait activity (for example,
1second). -
Click OK.
-
Expand the Fast Forwards folder in the Structure window to view the amount of time for which to bypass the wait activity and move forward in the test scenario. Figure 50-26 provides details.
Figure 50-26 Fast Forwards Folder in Structure Window
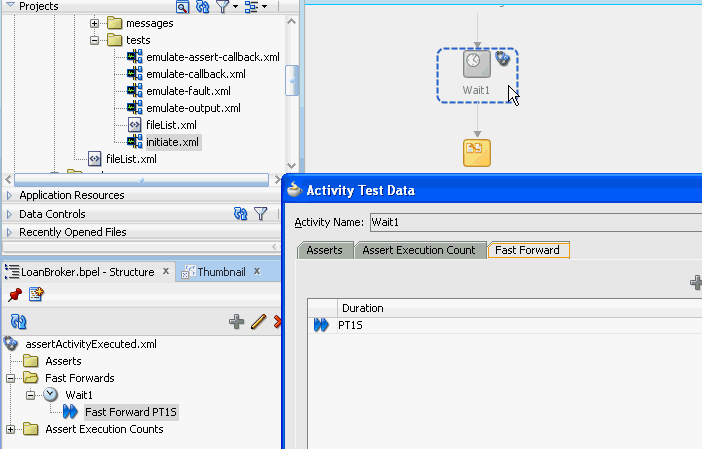
Description of "Figure 50-26 Fast Forwards Folder in Structure Window"
For more information about wait activities, see Setting an Expiration Time with a Wait Activity .
50.5.7 How to Specify the Number of Times to Execute an Activity
You can specify to execute an activity a specified number of times. This provides a method for verifying that an activity executes the correct number of times in a process flow (for example, ensuring that a while activity executes the correct number of times).
To specify the number of times an activity is executed:
-
Select the activity to execute through one of the following methods:
-
In the Structure window, right-click the Assert Execution Counts folder and select Create, or select the Assert Execution Counts folder and click the Add button.
The Assert Execution Count dialog is displayed.
-
In the Activity Name field, click the Browse icon to select the activity to execute.
or
-
Right-click a specific BPEL activity in the designer, and select Edit Activity Test Data.
-
Click the Assert Execution Count tab.
-
Click the Add icon.
The activity you selected is displayed in the Activity Name field.
-
-
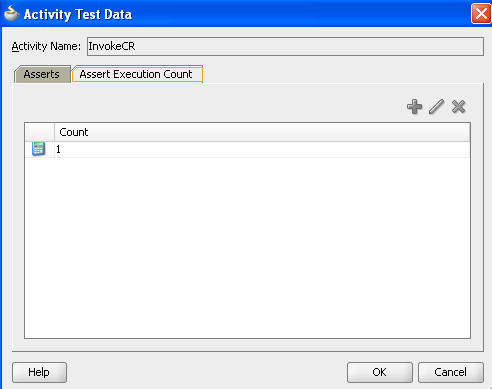
In the Count list, select a value.
-
Click OK.
The Activity Test Data dialog looks as shown in Figure 50-27.
-
Expand the Assert Execution Counts folder in the Structure window to view execution counts assigned to activities. Figure 50-28 provides details.
Figure 50-28 Assert Execution Counts Folder in the Structure Window
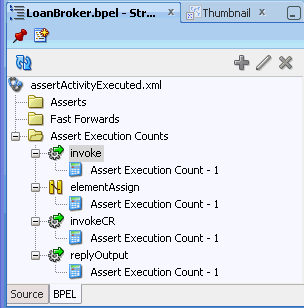
Description of "Figure 50-28 Assert Execution Counts Folder in the Structure Window"
50.6 Deploying and Running a Test Suite
After creating a test suite of test cases, you deploy the suite as part of a SOA composite application. You then run the test suites from Oracle JDeveloper, Oracle Enterprise Manager Fusion Middleware Control, an Oracle WebLogic Scripting Tool (WLST) script, or an ant command.
50.6.1 How to Deploy and Run a Test Suite from Oracle JDeveloper
You can run a test suite from Oracle JDeveloper. After test suites are created, you can select multiple test suites to run, an individual test suite to run, or an individual test in a test suite to run.
To deploy and run a test suite from Oracle JDeveloper:
-
Perform the appropriate task shown in Table 50-15.
Table 50-15 Test Suite Execution Options
To... In the Applications Window... Run the test suite currently open in test mode in the SOA Composite Editor.
-
Click the Run Test icon above the SOA Composite Editor.

Run all test suites.
-
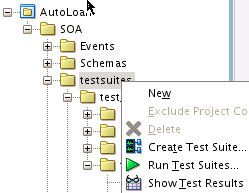
Right-click the testsuites folder, and select Run Test Suites.
Run an individual test suite.
-
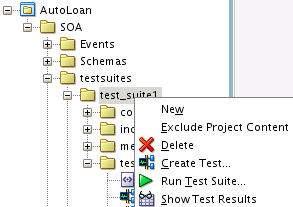
Right-click the test suite name, and select Run Test Suite.
Run an individual test in a test suite.
-
Right-click the individual test in the tests folder, and select Run Test.
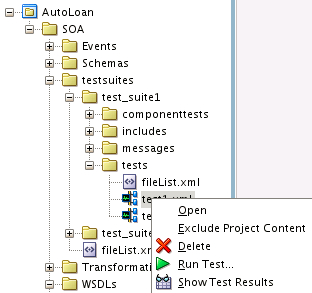
If you have not configured the test server to use, the Specify Test Server dialog is displayed.
-
-
Enter the test server host name and optionally select the Do not ask again, save it in Tools-> Preferences-> SOA check box. This prevents this dialog from being displayed again until you go to Tools > Preferences > SOA and change the configuration.
-
Click OK.
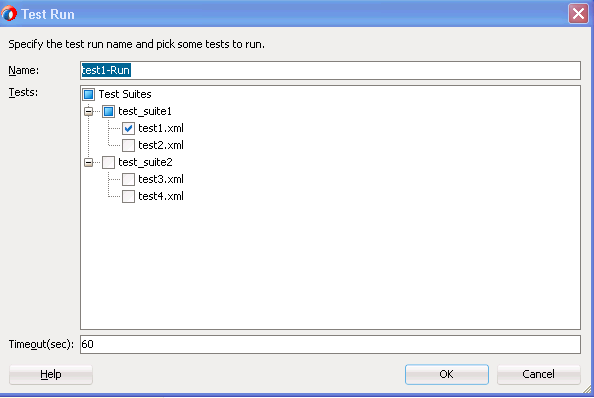
The Test Run dialog is displayed.
-
Perform the following steps:
-
Specify the test run name.
-
Select or deselect tests to run.
-
Specify the timeout value in seconds for running tests on the test server.
-
Click OK.
Figure 50-29 provides details.
A check is made to see if the SOA composite application (including the tests) has ever been deployed on the test server. You must first deploy the composite before you can run tests on the test server.
-
-
Perform the steps shown in Table 50-16 based on the deployment status of the SOA composite application.
Table 50-16 Check to Determine if the SOA Composite Application is Deployed
If the SOA Composite Application ... Then ... Is deployed.
Go to Step 6.
-
Has never been deployed on the test server.
-
Has been deployed on the test server, but the composite (including the tests) has been changed since the last deployment.
The Confirm to Deploy Composite dialog is displayed.
-
Click OK to deploy the SOA composite application.
The Deployment Action page of the Deploy Project_Name wizard is displayed.
-
Select Deploy to Application Server.
-
Follow the pages of the wizard to deploy the SOA composite application to an application server.
For information about deploying SOA composite applications, see Deploying the Profile.
-
When deployment is complete, go to Step 6.
After deployment has completed, the tests run on the test server.
-
-
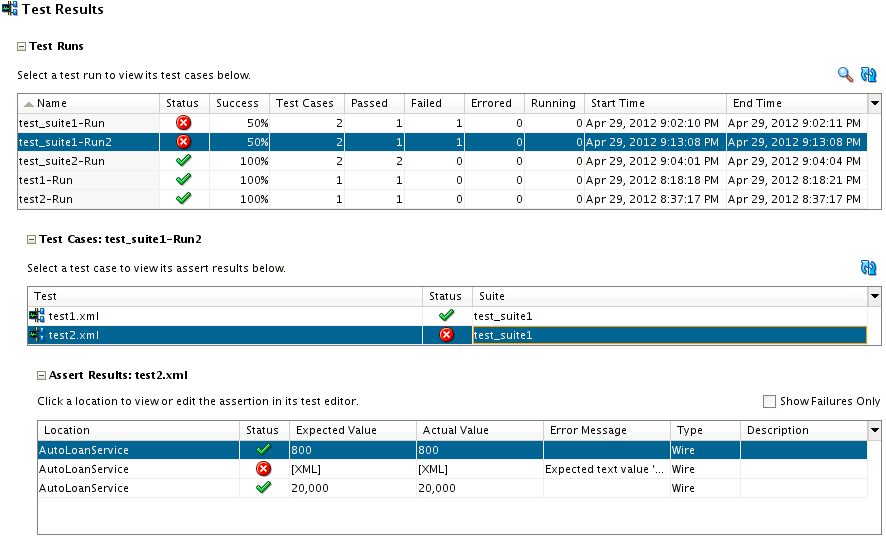
View the test results. Figure 50-30 provides details. The Test Results dialog is per test server and composite DN. The test server URL (the SOA server host name and port number) and composite DN are displayed in the top right corner to indicate the context. You can run tests as many times as you want, and can select different test combinations to run on the same test server or different test servers.
Test results are displayed in three collapsible tables, from master to details. Table 50-17 provides details.
Table 50-17 Test Results Tables
Test Runs Test Cases Assert Results Shows the current test run and its status summary if you just submitted a test run. If you just queried the test server for test runs, the table shows all test runs matching your query criteria.
-
Name of the test run that you entered in the Test Run dialog.
-
Status of the test run: either passed or failed. The status is passed if all test cases in the test run passed. Otherwise, the status is failed, which means at least one test case failed.
-
Success percentage of the test run.
-
Total number of test cases.
-
Number of passed, failed, in error, and running test cases.
-
Start and end times for a test run.
Shows all test cases and the statuses of the selected test run from the Test Runs table. Click the Refresh button to refresh the test case statuses.
-
Test file name of the test case. Click to access its test editor.
-
Status of the test case, either passed or failed. The status is passed if all assertions in the test case passed. Otherwise, the status is failed, which means at least one assertion failed.
-
Test suite of the test case.
Shows all assertion results of the selected test case from the Test Cases table.
-
Assertion location. This is the wire source (service or reference) for a wire assert and the component (BPEL process) activity name for a component assert. This is a hyperlink to the location of the assert in its test editor. Figure 50-31 provides details.
-
Assertion status: Passed or failed. The status is passed if the actual value matches the expected value.
-
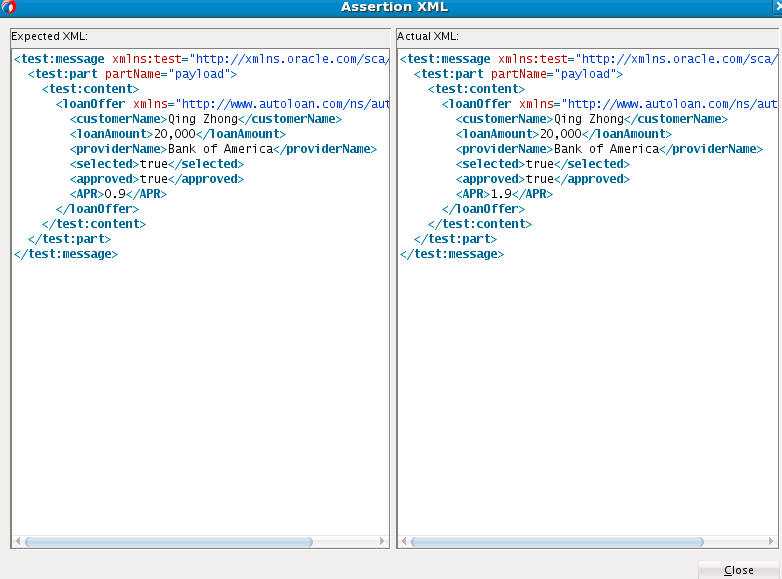
Expected and actual values of the assert. This is a simple value if it is a simple value assert and a hyperlink to a popup to show the XML value if it is an XML value assert.
-
Error message if the status is failed.
-
Assertion type: either wire or component. Wire means to assert on a composite wire. Component means to assert within a component (BPEL process).
-
Assertion description that you entered for the assertion when created.
-
-
Perform the following additional tasks in the Test Runs table in Figure 50-30:
-
Click the Search icon above the Test Runs table to query test runs from the test server by specifying search criteria.
-
Click the Refresh icon above the Test Runs table to refresh the status of test runs.
-
-
Perform the following additional tasks in the Test Cases table in Figure 50-30:
-
Click the Refresh icon above the Test Cases table to refresh the test case statuses.
-
-
Perform the following additional tasks in the Asserts Results table in Figure 50-30:
-
Select the Show Failures Only check box above the Asserts Results table to show failed asserts only.
-
50.6.2 How to Deploy and Run a Test Suite from Oracle Enterprise Manager Fusion Middleware Control
For information about deploying a SOA composite application and running a test suite from Oracle Enterprise Manager Fusion Middleware Control, see Administering Oracle SOA Suite and Oracle Business Process Management Suite.
50.6.3 How to Deploy and Run a Test Suite with a WLST Command
For information about using the sca_test WLST command to execute a test suite, see Section "sca_test" of WLST Command Reference for SOA Suite.
50.6.4 How to Deploy and Run a Test Suite with an ant Script
For information about using the ant-sca-test.xml ant script to execute a test suite, see How to Use ant to Automate the Testing of a SOA Composite Application.
