Adding Text and Image Content
To add text to an area on a page, you drag the text content from the side panel and drop it in the area where you want to place it. If there's already content in the area, you'll see a drop indicator that shows exactly where your new content will go. When you drop the content, the page automatically opens the text editor so you can add your text. The text editor is a WYSIWYG editor that lets you add formatted text and images to your site.
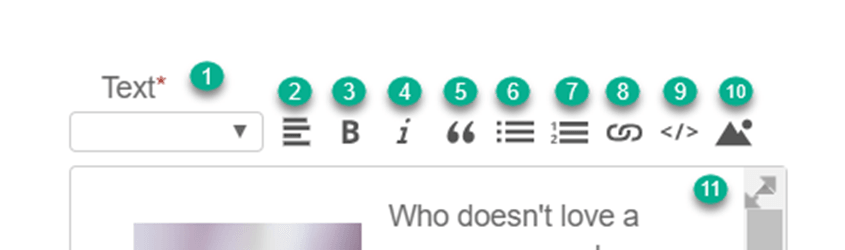
The following image shows the available formatting controls in the text editor.
|
Item |
Description |
|---|---|
|
1 |
Heading style list |
|
2 |
Alignment |
|
3 |
Bold |
|
4 |
Italic |
|
5 |
Block Quote |
|
6 |
Bullet List |
|
7 |
Numbered List |
|
8 |
Insert Hyperlink |
|
9 |
Switch to HTML View |
|
10 |
Insert Image |
|
11 |
Expand Editor |
To add text and image content:
-
Log in to Site Management Tools. For details, see Logging into Site Management Tools.
-
Go to the page where you want to add the content.
-
Click the Edit Mode icon
 from the site management toolbar.
 -
Click the Add icon
 from the site management toolbar.
 -
Drag the text content from the side panel to the area where you want to place it. You can drag the content to multiple areas of the page:
-
If you drag onto an area marked all pages, your content shows on any page that contains that area.
-
If you drag onto an area marked page type, your content shows on any page of that type.
-
If you drag onto an area marked this page, your content shows only on that page.
-
-
Position the content over the area and drop it. If the area already contains content, a horizontal line shows you where the new content will go.
-
In the Name field, enter a name for the text content.
-
Set the content visibility options. Choose from Always Visible or Visible on Specific Dates. For more information, see View Site as of a Specific Date in Site Management Tools.
-
Enter your text in the text field and use the text editor toolbar to format it.
-
To add an image, position your cursor in the text editor where you want the image to appear.
-
Click the Image icon
 from the text editor toolbar to open the Image Manager.
 -
Select an existing image or upload a new image.
-
Click Insert.
-
Hover over the image in the text editor and click the gear icon.
-
In the Alt Text field, enter the alternate text to display when the image doesn't load. Alternate text is also used by screen readers and helps to promote Search Process Optimization (SEO).
-
Set the spacing for top, right, bottom, and center to control the space between the image and text.
-
Set the image dimensions. If you enter either width or height, the aspect ratio stays the same automatically.
-
Click Save.
-
In the Tags field, enter one or more descriptive tags. For details, see Content Tags and Filter Tools.
-
Click Save.
-
Publish your changes. For details, see Review and Publish Content in Site Management Tools.